`/team/${team.id}`}
selectedTeam={team}
noUpdateSelectedTeam
/>
```
## Example: Deep Link + Most Recent Team
First, create a page at `/app/team/[teamId]/page.tsx` to display information about a specific team:
```jsx title="/app/team/[teamId]/page.tsx"
"use client";
import { useUser, SelectedTeamSwitcher } from "@stackframe/stack";
export default function TeamPage({ params }: { params: { teamId: string } }) {
const user = useUser({ or: 'redirect' });
const team = user.useTeam(params.teamId);
if (!team) {
return Team not found
;
}
return (
`/team/${team.id}`}
selectedTeam={team}
/>
Team Name: {team.displayName}
You are a member of this team.
);
}
```
Next, create a page to display all teams at `/app/team/page.tsx`:
```jsx title="/app/team/page.tsx"
"use client";
import { useRouter } from "next/navigation";
import { useUser } from "@stackframe/stack";
export default function TeamsPage() {
const user = useUser({ or: 'redirect' });
const teams = user.useTeams();
const router = useRouter();
const selectedTeam = user.selectedTeam;
return (
{selectedTeam &&
}
All Teams
{teams.map(team => (
))}
);
}
```
Now, if you navigate to `http://localhost:3000/team`, you should be able to see and interact with the teams.
# User Onboarding
URL: /docs/concepts/user-onboarding
Source: /vercel/path0/docs/content/docs/(guides)/concepts/user-onboarding.mdx
Implementing a user onboarding page and collecting information on sign-up
***
title: User Onboarding
description: Implementing a user onboarding page and collecting information on sign-up
--------------------------------------------------------------------------------------
By default, Stack Auth collects information such as email addresses from OAuth providers. Sometimes, you may want to collect additional information from users during sign-up, for example a name or address.
The most straightforward approach is to redirect users to an onboarding page right after they sign up. However, this is not recommended for the following reasons:
1. Users can accidentally (or purposefully) close or navigate away from the page before completing the onboarding.
2. Redirect URLs may vary depending on the context. For instance, if a user is redirected to a sign-in page after trying to access a protected page, they'll expect to return to the original protected page post-authentication.
Instead, a more reliable strategy is to store an `onboarded` flag in the user's metadata and redirect users to the onboarding page if they haven't completed it yet.
## Example implementation
Let's say you have an onboarding page that asks for an address and stores it in the user's [metadata](../concepts/custom-user-data.mdx):
```jsx title="app/onboarding/page.tsx"
export default function OnboardingPage() {
const user = useUser();
const router = useRouter();
const [address, setAddress] = useState('');
return <>
setAddress(e.target.value)}
/>
);
}
```
While the above implementation offers a basic onboarding process, users can still skip onboarding by directly sending an API request to update the `clientMetadata.onboarded` flag. If you want to ensure that onboarding cannot be bypassed on the API level, you should create a server endpoint to validate and store the data, then save the `onboarded` flag in the `clientReadOnlyMetadata` on the server side after validation.
Next, we can create a hook/function to check if the user has completed onboarding and redirect them to the onboarding page:
Client Hook
Server Function
```jsx title="app/onboarding-hooks.ts"
'use client';
import { useEffect } from 'react';
import { useUser } from '@stackframe/stack';
import { useRouter } from 'next/navigation';
export function useOnboarding() {
const user = useUser();
const router = useRouter();
useEffect(() => {
if (!user.clientReadOnlyMetadata.onboarded) {
router.push('/onboarding');
}
}, [user]);
}
```
```jsx title="app/onboarding-functions.ts"
import { stackServerApp } from '@/stack/server';
import { redirect } from 'next/navigation';
export async function ensureOnboarded() {
const user = await stackServerApp.getUser();
if (!user.clientReadOnlyMetadata.onboarded) {
redirect('/onboarding');
}
}
```
You can then use these functions wherever onboarding is required:
Client Component
Server Component
```jsx title="app/page.tsx"
import { useOnboarding } from '@/app/onboarding-hooks';
import { useUser } from '@stackframe/stack';
export default function HomePage() {
useOnboarding();
const user = useUser();
return (
Welcome to the app, {user.displayName}
);
}
```
```jsx title="app/page.tsx"
import { ensureOnboarding } from '@/app/onboarding-functions';
import { stackServerApp } from '@/stack/server';
export default async function HomePage() {
await ensureOnboarding();
const user = await stackServerApp.getUser();
return (
Welcome to the app, {user.displayName}
);
}
```
# Custom Pages
URL: /docs/customization/custom-pages
Source: /vercel/path0/docs/content/docs/(guides)/customization/custom-pages.mdx
***
## title: Custom Pages
Custom pages allow you to take full control over the layout and logic flow of authentication pages in your application. Instead of using the default pages provided by Stack Auth, you can build your own using our built-in components or low-level functions.
By default, `StackHandler` creates all authentication pages you need, however, you can replace them with your own custom implementations for a more tailored user experience.
## Simple Example
For example, if you want to create a custom sign-in page with a customized title on the top, you can create a file at `app/signin/page.tsx`:
```tsx title="app/signin/page.tsx"
import { SignIn } from "@stackframe/stack";
export default function CustomSignInPage() {
return (
My Custom Sign In page
);
}
```
Then you can instruct the Stack app in `stack/server.ts` to use your custom sign in page:
```tsx title="stack/server.ts"
export const stackServerApp = new StackServerApp({
// ...
// add these three lines
urls: {
signIn: '/signin',
}
});
```
You are now all set! If you visit the `/signin` page, you should see your custom sign in page. When users attempt to access a protected page or navigate to the default `/handler/sign-in` URL, they will automatically be redirected to your new custom sign-in page.
For more examples, please refer to the [Examples](../customization/custom-pages.mdx).
## Building From Scratch
While the simple approach above lets you customize the layout while using Stack's pre-built components, sometimes you need complete control over both the UI and authentication logic.
We also provide the low-level functions powering our components, so that you can build your own logic. For example, to build a custom OAuth sign-in button, create a file at `app/signin/page.tsx`:
```tsx title="app/signin/page.tsx"
'use client';
import { useStackApp } from "@stackframe/stack";
export default function CustomOAuthSignIn() {
const app = useStackApp();
return (
My Custom Sign In page
);
}
```
Again, edit the Stack app in `stack/server.ts` to use your custom sign in page:
```tsx title="stack/server.ts"
export const stackServerApp = new StackServerApp({
// ...
// add these three lines
urls: {
signIn: '/signin',
}
});
```
As above, visit the `/signin` page to see your newly created custom OAuth page.
# Custom Styles
URL: /docs/customization/custom-styles
Source: /vercel/path0/docs/content/docs/(guides)/customization/custom-styles.mdx
***
## title: Custom Styles
Customizing the styles of your Stack Auth components allows you to maintain your brand identity while leveraging the pre-built functionality. This approach is ideal when you want to quickly align the authentication UI with your application's design system without building custom components from scratch. Stack's theming system uses a React context to store colors and styling variables that can be easily overridden.
You can customize the following color variables to match your brand:
* `background`: Main background color of the application
* `foreground`: Main text color on the background
* `card`: Background color for card elements
* `cardForeground`: Text color for card elements
* `popover`: Background color for popover elements like dropdowns
* `popoverForeground`: Text color for popover elements
* `primary`: Primary brand color, used for buttons and important elements
* `primaryForeground`: Text color on primary-colored elements
* `secondary`: Secondary color for less prominent elements
* `secondaryForeground`: Text color on secondary-colored elements
* `muted`: Color for muted or disabled elements
* `mutedForeground`: Text color for muted elements
* `accent`: Accent color for highlights and emphasis
* `accentForeground`: Text color on accent-colored elements
* `destructive`: Color for destructive actions like delete buttons
* `destructiveForeground`: Text color on destructive elements
* `border`: Color used for borders
* `input`: Border color for input fields
* `ring`: Focus ring color for interactive elements
And some other variables:
* `radius`: border radius of components like buttons, inputs, etc.
These variables are CSS variables so you can use any valid CSS color syntax like `hsl(0, 0%, 0%)`, `black`, `#fff`, `rgb(255, 0, 0)`, etc.
The colors can be different for light and dark mode, allowing you to create a cohesive experience across both themes. You can pass these into the `StackTheme` component (in your `layout.tsx` file if you followed the Getting Started guide) as follows:
```jsx title="app/layout.tsx"
const theme = {
light: {
primary: 'red',
},
dark: {
primary: '#00FF00',
},
radius: '8px',
}
// ...
{/* children */}
```
# Dark Mode
URL: /docs/customization/dark-mode
Source: /vercel/path0/docs/content/docs/(guides)/customization/dark-mode.mdx
***
## title: Dark Mode
Stack components support light and dark mode out of the box. All UI components automatically adapt their colors, shadows, and contrast levels based on the selected theme.
You can switch between light and dark mode using [next-themes](https://github.com/pacocoursey/next-themes) (or any other library that changes the `data-theme` or `class` to `dark` or `light` attribute of the `html` element).
Here is an example of how to set up next-themes with Stack (find more details in the [next-themes documentation](https://github.com/pacocoursey/next-themes)):
1. Install next-themes:
```bash
npm install next-themes
```
2. Create a client-side provider component:
```jsx title="components/providers.jsx"
'use client';
import { ThemeProvider } from 'next-themes'
import { StackTheme } from '@stackframe/stack'
export default function Providers({ children }) {
return (
{/*
ThemeProvider enables theme switching throughout the application.
defaultTheme="system" uses the user's system preference as the default.
attribute="class" applies the theme by changing the class on the html element.
*/}
{/* StackTheme ensures Stack components adapt to the current theme */}
{children}
)
}
```
3. Use the provider in your `layout.tsx` file:
```jsx title="app/layout.tsx"
import Providers from './components/providers'
export default function Layout({ children }) {
return (
{children}
)
}
```
4. Build a color mode switcher component:
```jsx
'use client';
import { useTheme } from 'next-themes'
export default function ColorModeSwitcher() {
// useTheme hook provides the current theme and a function to change it
const { theme, setTheme } = useTheme()
return (
)
}
```
Now if you put the `ColorModeSwitcher` component in your app, you should be able to switch between light and dark mode. There should be no flickering or re-rendering of the page after reloading.
# Internationalization
URL: /docs/customization/internationalization
Source: /vercel/path0/docs/content/docs/(guides)/customization/internationalization.mdx
***
## title: Internationalization
Internationalization (i18n) allows your application to support multiple languages, making it accessible to users worldwide. Stack Auth provides built-in internationalization support for its components, enabling you to offer a localized authentication experience with minimal effort.
## Setup
Internationalization with Stack is very straightforward. Simply pass the `lang` prop to the `StackProvider` component, and all the pages will be translated to the specified language.
```jsx title="layout.tsx"
...
...
...
```
By default, if no language is provided, it will be set to `en-US`.
You can choose which languages to use by employing your own methods, such as storing the language in `localStorage` or using the user's browser language.
## Supported languages
* `en-US`: English (United States)
* `de-DE`: German (Germany)
* `es-419`: Spanish (Latin America)
* `es-ES`: Spanish (Spain)
* `fr-CA`: French (Canada)
* `fr-FR`: French (France)
* `it-IT`: Italian (Italy)
* `pt-BR`: Portuguese (Brazil)
* `pt-PT`: Portuguese (Portugal)
* `zh-CN`: Chinese (China)
* `zh-TW`: Chinese (Taiwan)
* `ja-JP`: Japanese (Japan)
* `ko-KR`: Korean (South Korea)
# Components
URL: /docs/getting-started/components
Source: /vercel/path0/docs/content/docs/(guides)/getting-started/components.mdx
Pre-built Next.js components to make your life easier
***
title: Components
description: Pre-built Next.js components to make your life easier
------------------------------------------------------------------
In [the last guide](./setup.mdx), we initialized Stack. This time, we will take a quick look at some of the most useful Next.js components.
For the full documentation of all available components, please refer to the [components reference](../components).
## ``
The `` component shows the user's avatar that opens a dropdown with various user settings on click.
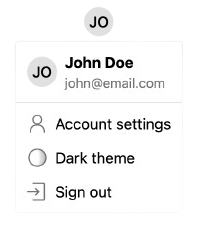 ```tsx title="page.tsx"
import { UserButton } from '@stackframe/stack';
export default function Page() {
return (
);
}
```
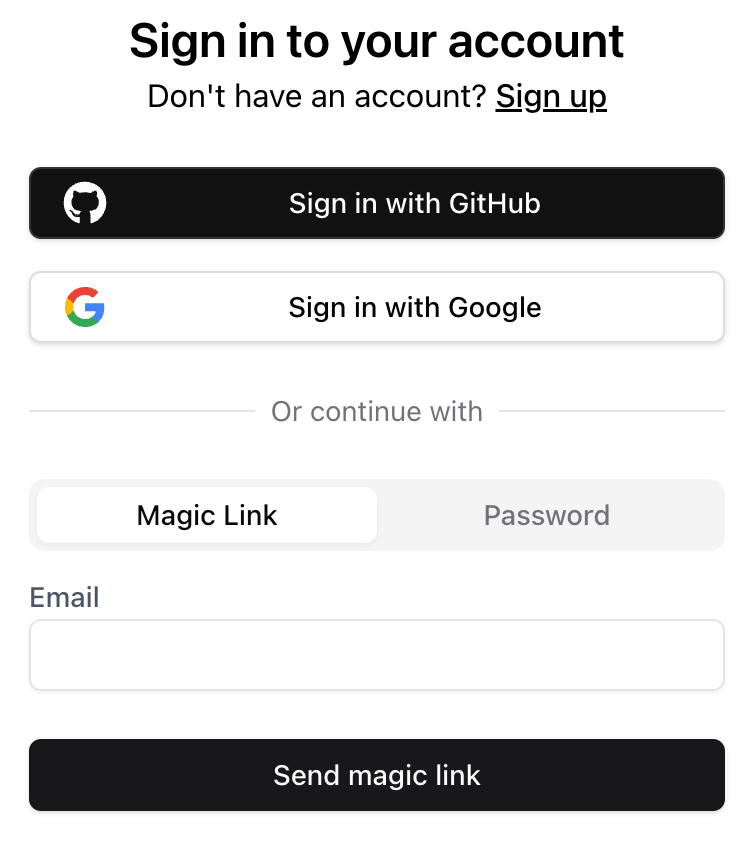
## `` and ``
These components show a sign-in and sign-up form, respectively.
```tsx title="page.tsx"
import { UserButton } from '@stackframe/stack';
export default function Page() {
return (
);
}
```
## `` and ``
These components show a sign-in and sign-up form, respectively.
 ```tsx title="page.tsx"
import { SignIn } from '@stackframe/stack';
export default function Page() {
return (
);
}
```
All of Stack's components are modular and built from smaller primitives. For example, the `` component is composed of the following:
* An ``, which itself is composed of multiple `` components
* A ``, which has a text field and calls `useStackApp().signInWithMagicLink()`
* A ``, which has two text fields and calls `useStackApp().signInWithCredential()`
You can use these components individually to build a custom sign-in component.
To change the default sign-in URL to your own, see the documentation on [custom pages](../customization/custom-pages.mdx).
## Others
Stack has many more components available. For a comprehensive list, please check the documentation on [components](../components).
## Next steps
In the next guide, we will do a deep-dive into retrieving and modifying user objects, as well as how to protect a page.
# Production
URL: /docs/getting-started/production
Source: /vercel/path0/docs/content/docs/(guides)/getting-started/production.mdx
Steps to prepare Stack for production use
***
title: Production
description: Steps to prepare Stack for production use
------------------------------------------------------
Stack makes development easy with various default settings, but these settings need to be optimized for security and user experience when moving to production. Here's a checklist of things you need to do before switching to production mode:
### Domains
By default, Stack allows all localhost paths as valid callback URLs. This is convenient for development but poses a security risk in production because attackers could use their own domains as callback URLs to intercept sensitive information. Therefore, in production, Stack must know your domain (e.g., `https://your-website.com`) and only allow callbacks from those domains.
Follow these steps when you're ready to push your application to production:
## Add Your Domain
Navigate to the `Domain & Handlers` tab in the Stack dashboard. If you haven't configured your handler, you can leave it as the default. (Learn more about handlers [here](../sdk/objects/stack-app)).
## Disable Localhost Callbacks
For enhanced security, disable the `Allow all localhost callbacks for development` option.
### OAuth providers
Stack uses shared OAuth keys for development to simplify setup when using "Sign in with Google/GitHub/etc." However, this isn't secure for production as it displays "Stack Development" on the providers' consent screens, making it unclear to users if the OAuth request is genuinely from your site. Thus, you should configure your own OAuth keys with the providers and connect them to Stack.
To use your own OAuth provider setups in production, follow these steps for each provider you use:
## Create an OAuth App
On the provider's website, create an OAuth app and set the callback URL to the corresponding Stack callback URL. Copy the client ID and client secret.
Google
GitHub
Facebook
Microsoft
Spotify
Gitlab
Bitbucket
LinkedIn
X
[Google OAuth Setup Guide](https://developers.google.com/identity/protocols/oauth2#1.-obtain-oauth-2.0-credentials-from-the-dynamic_data.setvar.console_name-.)
Callback URL:
```
https://api.stack-auth.com/api/v1/auth/oauth/callback/google
```
[GitHub OAuth Setup Guide](https://docs.github.com/en/apps/oauth-apps/building-oauth-apps/creating-an-oauth-app)
Callback URL:
```
https://api.stack-auth.com/api/v1/auth/oauth/callback/github
```
[Facebook OAuth Setup Guide](https://developers.facebook.com/docs/development/create-an-app/facebook-login-use-case)
Callback URL:
```
https://api.stack-auth.com/api/v1/auth/oauth/callback/facebook
```
[Microsoft Azure OAuth Setup Guide](https://learn.microsoft.com/en-us/entra/identity-platform/quickstart-register-app)
Callback URL:
```
https://api.stack-auth.com/api/v1/auth/oauth/callback/microsoft
```
[Spotify OAuth Setup Guide](https://developer.spotify.com/documentation/general/guides/app-settings/)
Callback URL:
```
https://api.stack-auth.com/api/v1/auth/oauth/callback/spotify
```
[Gitlab OAuth Setup Guide](https://docs.gitlab.com/ee/integration/oauth_provider.html)
Callback URL:
```
https://api.stack-auth.com/api/v1/auth/oauth/callback/gitlab
```
[Bitbucket OAuth Setup Guide](https://support.atlassian.com/bitbucket-cloud/docs/use-oauth-on-bitbucket-cloud)
Callback URL:
```
https://api.stack-auth.com/api/v1/auth/oauth/callback/bitbucket
```
[LinkedIn OAuth Setup Guide](https://learn.microsoft.com/en-us/linkedin/shared/authentication/authorization-code-flow?context=linkedin%2Fcontext\&tabs=HTTPS1)
Callback URL:
```
https://api.stack-auth.com/api/v1/auth/oauth/callback/linkedin
```
[X OAuth Setup Guide](https://developer.x.com/en/docs/apps/overview)
Callback URL:
```
https://api.stack-auth.com/api/v1/auth/oauth/callback/x
```
## Enter OAuth Credentials
Go to the `Auth Methods` section in the Stack dashboard, open the provider's settings, switch from shared keys to custom keys, and enter the client ID and client secret.
### Email server
For development, Stack uses a shared email server, which sends emails from Stack's domain. This is not ideal for production as users may not trust emails from an unfamiliar domain. You should set up an email server connected to your own domain.
Steps to connect your own email server with Stack:
1. **Setup Email Server**: Configure your own email server and connect it to your domain (this step is beyond Stack's documentation scope).
2. **Configure Stack's Email Settings**: Navigate to the `Emails` section in the Stack dashboard, click `Edit` in the `Email Server` section, switch from `Shared` to `Custom SMTP server`, enter your SMTP configurations, and save.
### Enabling production mode
After completing the steps above, you can enable production mode on the `Project Settings` tab in the Stack dashboard, ensuring that your website runs securely with Stack in a production environment.
# Setup
URL: /docs/getting-started/setup
Source: /vercel/path0/docs/content/docs/(guides)/getting-started/setup.mdx
***
## title: Setup
### Prerequisites
Before getting started, make sure you have a project set up for your chosen platform:
* **Next.js**: A [Next.js project](https://nextjs.org/docs/getting-started/installation) using the app router (Stack Auth does not support the pages router on Next.js)
* **React**: A [React project](https://react.dev/learn/creating-a-react-app) (we show examples with Vite)
* **JavaScript**: A Node.js project with Express
* **Python**: A Python environment with your chosen framework (Django, FastAPI, or Flask)
We recommend using our **setup wizard** for JavaScript frameworks for a seamless installation experience. For Python, we recommend using the REST API approach.
### Setup Wizard / Manual Installation
Setup wizard (recommended for JS)
Manual installation
### Run installation wizard
The setup wizard is available for JavaScript/TypeScript frameworks. For Python projects, please use the manual installation method.
Run Stack's installation wizard with the following command:
```sh title="Terminal"
npx @stackframe/stack-cli@latest init
```
### Update API keys
Create an account on [the Stack Auth dashboard](https://app.stack-auth.com/projects), create a new project, and copy its environment variables into the appropriate configuration file. If your project requires publishable client keys, create a project key that includes one and copy that as well.
**Next.js:**
```bash title=".env.local"
NEXT_PUBLIC_STACK_PROJECT_ID=
NEXT_PUBLIC_STACK_PUBLISHABLE_CLIENT_KEY=
STACK_SECRET_SERVER_KEY=
```
**React:**
```typescript title="stack/client.ts"
// Update the values in stack/client.ts created by the wizard
export const stackClientApp = new StackClientApp({
projectId: "your-project-id",
publishableClientKey: "your-publishable-client-key",
tokenStore: "cookie",
});
```
**Vanilla JavaScript:**
```bash title=".env"
STACK_PROJECT_ID=
STACK_PUBLISHABLE_CLIENT_KEY=
STACK_SECRET_SERVER_KEY=
```
### Done!
That's it! The wizard should have created or updated the following files in your project:
**For Next.js:**
* `app/handler/[...stack]/page.tsx`: Default pages for sign-in, sign-out, account settings, and more
* `app/layout.tsx`: Updated to wrap the entire body with `StackProvider` and `StackTheme`
* `app/loading.tsx`: Suspense boundary for Stack's async hooks
* `stack/server.ts`: Contains the `stackServerApp` for server-side usage
* `stack/client.ts`: Contains the `stackClientApp` for client-side usage
**For React:**
* `stack/client.ts`: Contains the `stackClientApp` configuration
* Your app should be wrapped with `StackProvider` and `StackTheme`
**For Node.js/Express:**
* `stack/server.ts`: Contains the `stackServerApp` configuration
Note: The setup wizard also supports existing, complicated projects. Cases where manual installation is necessary are rare for JavaScript frameworks.
### Install package
First, install the appropriate Stack package:
**Next.js:**
```bash title="Terminal"
npm install @stackframe/stack
```
**React:**
```bash title="Terminal"
npm install @stackframe/react
```
**Express:**
```bash title="Terminal"
npm install @stackframe/js
```
**Node.js:**
```bash title="Terminal"
npm install @stackframe/js
```
**Django:**
```bash title="Terminal"
pip install requests
```
**FastAPI:**
```bash title="Terminal"
pip install requests
```
**Flask:**
```bash title="Terminal"
pip install requests
```
### Create API keys
[Register a new account on Stack](https://app.stack-auth.com/handler/sign-up), create a project in the dashboard, and copy the project ID. If your project requires publishable client keys, also create a project key from the left sidebar and copy the publishable client key. For server-side setups, also copy the secret server key.
### Configure environment variables
Set up your environment variables or configuration:
**Next.js:**
```bash title=".env.local"
NEXT_PUBLIC_STACK_PROJECT_ID=
NEXT_PUBLIC_STACK_PUBLISHABLE_CLIENT_KEY=
STACK_SECRET_SERVER_KEY=
```
**React:**
```bash title=".env"
# Store these in environment variables or directly in the client file during development
VITE_STACK_PROJECT_ID=
VITE_STACK_PUBLISHABLE_CLIENT_KEY=
```
**Express:**
```bash title=".env"
STACK_PROJECT_ID=
STACK_PUBLISHABLE_CLIENT_KEY=
STACK_SECRET_SERVER_KEY=
```
**Node.js:**
```bash title=".env"
STACK_PROJECT_ID=
STACK_PUBLISHABLE_CLIENT_KEY=
STACK_SECRET_SERVER_KEY=
```
**Django:**
```python title="settings.py"
import os
stack_project_id = os.getenv("STACK_PROJECT_ID")
stack_publishable_client_key = os.getenv("STACK_PUBLISHABLE_CLIENT_KEY")
stack_secret_server_key = os.getenv("STACK_SECRET_SERVER_KEY")
```
**FastAPI:**
```python title="main.py"
import os
stack_project_id = os.getenv("STACK_PROJECT_ID")
stack_publishable_client_key = os.getenv("STACK_PUBLISHABLE_CLIENT_KEY")
stack_secret_server_key = os.getenv("STACK_SECRET_SERVER_KEY")
```
**Flask:**
```python title="app.py"
import os
stack_project_id = os.getenv("STACK_PROJECT_ID")
stack_publishable_client_key = os.getenv("STACK_PUBLISHABLE_CLIENT_KEY")
stack_secret_server_key = os.getenv("STACK_SECRET_SERVER_KEY")
```
### Create Stack configuration
Create the Stack app configuration:
**stack/server.ts:**
```typescript title="stack/server.ts"
import "server-only";
import { StackServerApp } from "@stackframe/stack";
export const stackServerApp = new StackServerApp({
tokenStore: "nextjs-cookie", // storing auth tokens in cookies
});
```
**stack/client.ts:**
```typescript title="stack/client.ts"
import { StackClientApp } from "@stackframe/stack";
export const stackClientApp = new StackClientApp({
// Environment variables are automatically read
});
```
**stack/client.ts:**
```typescript title="stack/client.ts"
import { StackClientApp } from "@stackframe/react";
// If you use a router, uncomment the appropriate import and the redirectMethod below
// import { useNavigate } from "react-router-dom"; // React Router
// import { useNavigate } from "@tanstack/react-router"; // TanStack Router
export const stackClientApp = new StackClientApp({
projectId: process.env.VITE_STACK_PROJECT_ID || "your-project-id",
publishableClientKey: process.env.VITE_STACK_PUBLISHABLE_CLIENT_KEY || "your-publishable-client-key",
tokenStore: "cookie",
// redirectMethod: { useNavigate }, // Set this for non-Next.js frameworks
});
```
**stack/server.ts:**
```typescript title="stack/server.ts"
import { StackServerApp } from "@stackframe/js";
export const stackServerApp = new StackServerApp({
projectId: process.env.STACK_PROJECT_ID,
publishableClientKey: process.env.STACK_PUBLISHABLE_CLIENT_KEY,
secretServerKey: process.env.STACK_SECRET_SERVER_KEY,
tokenStore: "memory",
});
```
**stack/client.ts:**
```typescript title="stack/client.ts"
import { StackClientApp } from "@stackframe/js";
export const stackClientApp = new StackClientApp({
projectId: process.env.STACK_PROJECT_ID,
publishableClientKey: process.env.STACK_PUBLISHABLE_CLIENT_KEY,
tokenStore: "cookie",
});
```
**stack/server.js:**
```javascript title="stack/server.js"
import { StackServerApp } from "@stackframe/js";
export const stackServerApp = new StackServerApp({
projectId: process.env.STACK_PROJECT_ID,
publishableClientKey: process.env.STACK_PUBLISHABLE_CLIENT_KEY,
secretServerKey: process.env.STACK_SECRET_SERVER_KEY,
tokenStore: "memory",
});
```
**stack/client.js:**
```javascript title="stack/client.js"
import { StackClientApp } from "@stackframe/js";
export const stackClientApp = new StackClientApp({
projectId: process.env.STACK_PROJECT_ID,
publishableClientKey: process.env.STACK_PUBLISHABLE_CLIENT_KEY,
tokenStore: "cookie",
});
```
**views.py:**
```python title="views.py"
import requests
def stack_auth_request(method, endpoint, **kwargs):
res = requests.request(
method,
f'https://api.stack-auth.com/{endpoint}',
headers={
'x-stack-access-type': 'server', # or 'client' if you're only accessing the client API
'x-stack-project-id': stack_project_id,
'x-stack-publishable-client-key': stack_publishable_client_key,
'x-stack-secret-server-key': stack_secret_server_key, # not necessary if access type is 'client'
**kwargs.pop('headers', {}),
},
**kwargs,
)
if res.status_code >= 400:
raise Exception(f"Stack Auth API request failed with {res.status_code}: {res.text}")
return res.json()
```
**main.py:**
```python title="main.py"
import requests
def stack_auth_request(method, endpoint, **kwargs):
res = requests.request(
method,
f'https://api.stack-auth.com/{endpoint}',
headers={
'x-stack-access-type': 'server', # or 'client' if you're only accessing the client API
'x-stack-project-id': stack_project_id,
'x-stack-publishable-client-key': stack_publishable_client_key,
'x-stack-secret-server-key': stack_secret_server_key, # not necessary if access type is 'client'
**kwargs.pop('headers', {}),
},
**kwargs,
)
if res.status_code >= 400:
raise Exception(f"Stack Auth API request failed with {res.status_code}: {res.text}")
return res.json()
```
**app.py:**
```python title="app.py"
import requests
def stack_auth_request(method, endpoint, **kwargs):
res = requests.request(
method,
f'https://api.stack-auth.com/{endpoint}',
headers={
'x-stack-access-type': 'server', # or 'client' if you're only accessing the client API
'x-stack-project-id': stack_project_id,
'x-stack-publishable-client-key': stack_publishable_client_key,
'x-stack-secret-server-key': stack_secret_server_key, # not necessary if access type is 'client'
**kwargs.pop('headers', {}),
},
**kwargs,
)
if res.status_code >= 400:
raise Exception(f"Stack Auth API request failed with {res.status_code}: {res.text}")
return res.json()
```
### Set up authentication handlers (Frontend frameworks only)
For JavaScript frameworks, create the authentication handler:
**Next.js:**
```typescript title="app/handler/[...stack]/page.tsx"
import { StackHandler } from "@stackframe/stack";
import { stackServerApp } from "@/stack/server";
export default function Handler(props: unknown) {
return ;
}
```
**React:**
```typescript title="App.tsx"
import { StackHandler, StackProvider, StackTheme } from "@stackframe/react";
import { Suspense } from "react";
import { BrowserRouter, Route, Routes, useLocation } from "react-router-dom";
import { stackClientApp } from "./stack/client";
function HandlerRoutes() {
const location = useLocation();
return (
);
}
export default function App() {
return (
} />
hello world} />
);
}
```
**Express:**
```typescript title="Note"
// Express doesn't use built-in handlers
// Use the REST API or integrate with your frontend
```
**Node.js:**
```javascript title="Note"
// Node.js doesn't use built-in handlers
// Use the REST API or integrate with your frontend
```
### Add providers (Next.js and React only)
For Next.js and React, wrap your app with Stack providers:
**Next.js:**
```typescript title="app/layout.tsx"
import React from "react";
import { StackProvider, StackTheme } from "@stackframe/stack";
import { stackServerApp } from "@/stack/server";
export default function RootLayout({ children }: { children: React.ReactNode }) {
return (
{children}
);
}
```
**React:**
```typescript title="Note"
// Already shown in the App.tsx example above
// Make sure to wrap your app with StackProvider and StackTheme
```
### Add loading boundary (Next.js only)
For Next.js, add a Suspense boundary:
```typescript title="app/loading.tsx"
export default function Loading() {
// You can use any loading indicator here
return <>
Loading...
;
}
```
### Add suspense boundary (React only)
For React, add a suspense boundary:
```typescript title="App.tsx"
import { Suspense } from "react";
import { StackProvider } from "@stackframe/react";
import { stackClientApp } from "./stack/client";
export default function App() {
return (
// Wrap your StackProvider with Suspense for async hooks to work
Loading...}>
{/* Your app content */}
);
}
```
### Done!
## Post-setup
That's it! Stack is now configured in your project.
### Testing your setup
**Next.js:**
```bash title="Terminal"
# Start your Next.js app
npm run dev
# Navigate to the sign-up page
# http://localhost:3000/handler/sign-up
```
**React:**
```bash title="Terminal"
# Start your React app
npm run dev
# Navigate to the sign-up page
# http://localhost:5173/handler/sign-up
```
**Express:**
```bash title="Terminal"
# Start your Express server
npm start
# Use the REST API or integrate with your frontend
# Check the REST API documentation for endpoints
```
**Node.js:**
```bash title="Terminal"
# Start your Node.js app
node index.js
# Use the REST API or integrate with your frontend
# Check the REST API documentation for endpoints
```
**Django:**
```python title="Terminal"
# Test the Stack Auth API connection
print(stack_auth_request('GET', '/api/v1/projects/current'))
# Start your Django server
python manage.py runserver
```
**FastAPI:**
```python title="Terminal"
# Test the Stack Auth API connection
print(stack_auth_request('GET', '/api/v1/projects/current'))
# Start your FastAPI server
uvicorn main:app --reload
```
**Flask:**
```python title="Terminal"
# Test the Stack Auth API connection
print(stack_auth_request('GET', '/api/v1/projects/current'))
# Start your Flask server
flask run
```
### What you'll see
For JavaScript frameworks with built-in UI components, you'll see the Stack Auth sign-up page:
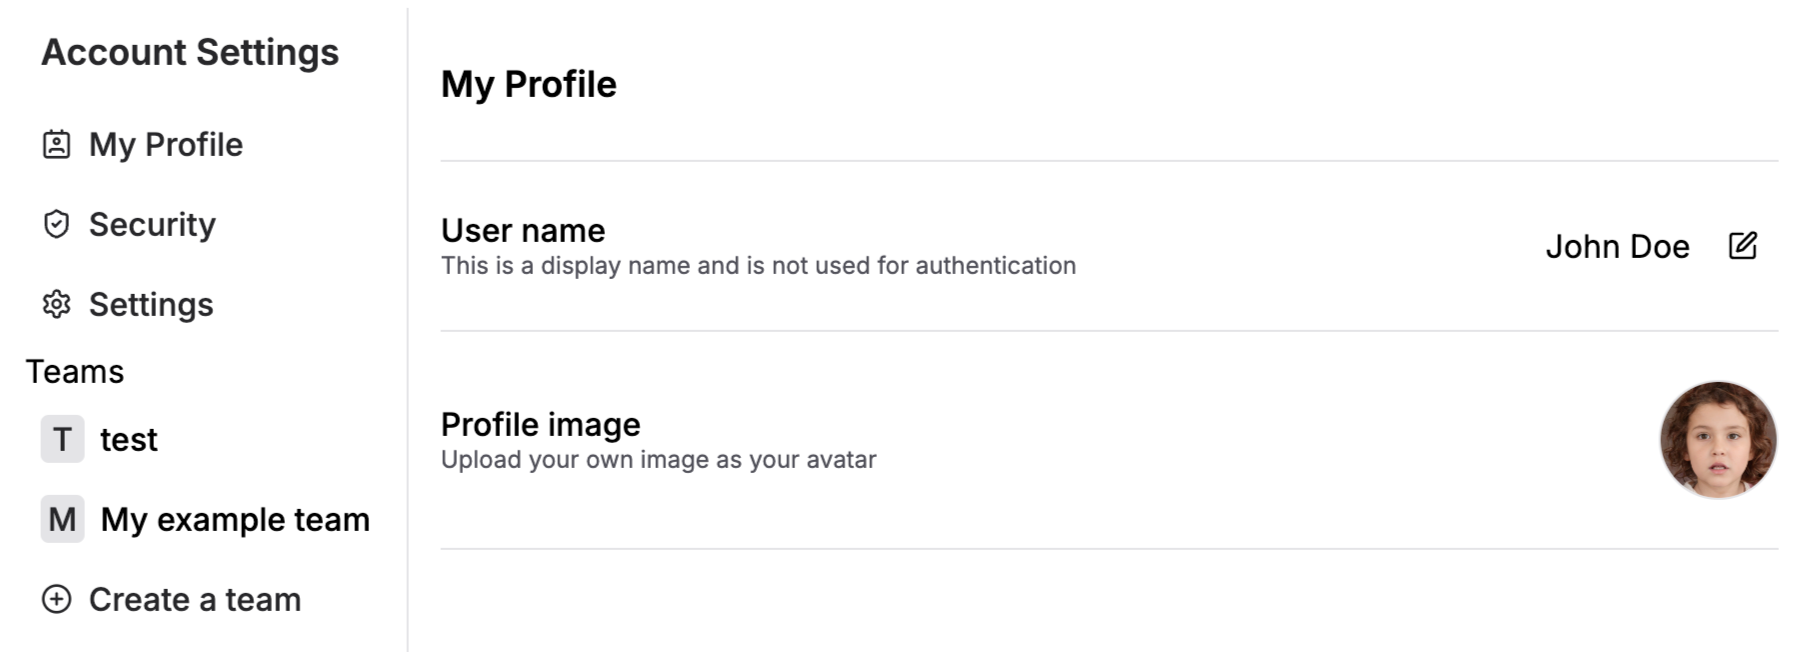
After signing up/in, you will be redirected back to the home page. You can also check out the account settings page.
```tsx title="page.tsx"
import { SignIn } from '@stackframe/stack';
export default function Page() {
return (
);
}
```
All of Stack's components are modular and built from smaller primitives. For example, the `` component is composed of the following:
* An ``, which itself is composed of multiple `` components
* A ``, which has a text field and calls `useStackApp().signInWithMagicLink()`
* A ``, which has two text fields and calls `useStackApp().signInWithCredential()`
You can use these components individually to build a custom sign-in component.
To change the default sign-in URL to your own, see the documentation on [custom pages](../customization/custom-pages.mdx).
## Others
Stack has many more components available. For a comprehensive list, please check the documentation on [components](../components).
## Next steps
In the next guide, we will do a deep-dive into retrieving and modifying user objects, as well as how to protect a page.
# Production
URL: /docs/getting-started/production
Source: /vercel/path0/docs/content/docs/(guides)/getting-started/production.mdx
Steps to prepare Stack for production use
***
title: Production
description: Steps to prepare Stack for production use
------------------------------------------------------
Stack makes development easy with various default settings, but these settings need to be optimized for security and user experience when moving to production. Here's a checklist of things you need to do before switching to production mode:
### Domains
By default, Stack allows all localhost paths as valid callback URLs. This is convenient for development but poses a security risk in production because attackers could use their own domains as callback URLs to intercept sensitive information. Therefore, in production, Stack must know your domain (e.g., `https://your-website.com`) and only allow callbacks from those domains.
Follow these steps when you're ready to push your application to production:
## Add Your Domain
Navigate to the `Domain & Handlers` tab in the Stack dashboard. If you haven't configured your handler, you can leave it as the default. (Learn more about handlers [here](../sdk/objects/stack-app)).
## Disable Localhost Callbacks
For enhanced security, disable the `Allow all localhost callbacks for development` option.
### OAuth providers
Stack uses shared OAuth keys for development to simplify setup when using "Sign in with Google/GitHub/etc." However, this isn't secure for production as it displays "Stack Development" on the providers' consent screens, making it unclear to users if the OAuth request is genuinely from your site. Thus, you should configure your own OAuth keys with the providers and connect them to Stack.
To use your own OAuth provider setups in production, follow these steps for each provider you use:
## Create an OAuth App
On the provider's website, create an OAuth app and set the callback URL to the corresponding Stack callback URL. Copy the client ID and client secret.
Google
GitHub
Facebook
Microsoft
Spotify
Gitlab
Bitbucket
LinkedIn
X
[Google OAuth Setup Guide](https://developers.google.com/identity/protocols/oauth2#1.-obtain-oauth-2.0-credentials-from-the-dynamic_data.setvar.console_name-.)
Callback URL:
```
https://api.stack-auth.com/api/v1/auth/oauth/callback/google
```
[GitHub OAuth Setup Guide](https://docs.github.com/en/apps/oauth-apps/building-oauth-apps/creating-an-oauth-app)
Callback URL:
```
https://api.stack-auth.com/api/v1/auth/oauth/callback/github
```
[Facebook OAuth Setup Guide](https://developers.facebook.com/docs/development/create-an-app/facebook-login-use-case)
Callback URL:
```
https://api.stack-auth.com/api/v1/auth/oauth/callback/facebook
```
[Microsoft Azure OAuth Setup Guide](https://learn.microsoft.com/en-us/entra/identity-platform/quickstart-register-app)
Callback URL:
```
https://api.stack-auth.com/api/v1/auth/oauth/callback/microsoft
```
[Spotify OAuth Setup Guide](https://developer.spotify.com/documentation/general/guides/app-settings/)
Callback URL:
```
https://api.stack-auth.com/api/v1/auth/oauth/callback/spotify
```
[Gitlab OAuth Setup Guide](https://docs.gitlab.com/ee/integration/oauth_provider.html)
Callback URL:
```
https://api.stack-auth.com/api/v1/auth/oauth/callback/gitlab
```
[Bitbucket OAuth Setup Guide](https://support.atlassian.com/bitbucket-cloud/docs/use-oauth-on-bitbucket-cloud)
Callback URL:
```
https://api.stack-auth.com/api/v1/auth/oauth/callback/bitbucket
```
[LinkedIn OAuth Setup Guide](https://learn.microsoft.com/en-us/linkedin/shared/authentication/authorization-code-flow?context=linkedin%2Fcontext\&tabs=HTTPS1)
Callback URL:
```
https://api.stack-auth.com/api/v1/auth/oauth/callback/linkedin
```
[X OAuth Setup Guide](https://developer.x.com/en/docs/apps/overview)
Callback URL:
```
https://api.stack-auth.com/api/v1/auth/oauth/callback/x
```
## Enter OAuth Credentials
Go to the `Auth Methods` section in the Stack dashboard, open the provider's settings, switch from shared keys to custom keys, and enter the client ID and client secret.
### Email server
For development, Stack uses a shared email server, which sends emails from Stack's domain. This is not ideal for production as users may not trust emails from an unfamiliar domain. You should set up an email server connected to your own domain.
Steps to connect your own email server with Stack:
1. **Setup Email Server**: Configure your own email server and connect it to your domain (this step is beyond Stack's documentation scope).
2. **Configure Stack's Email Settings**: Navigate to the `Emails` section in the Stack dashboard, click `Edit` in the `Email Server` section, switch from `Shared` to `Custom SMTP server`, enter your SMTP configurations, and save.
### Enabling production mode
After completing the steps above, you can enable production mode on the `Project Settings` tab in the Stack dashboard, ensuring that your website runs securely with Stack in a production environment.
# Setup
URL: /docs/getting-started/setup
Source: /vercel/path0/docs/content/docs/(guides)/getting-started/setup.mdx
***
## title: Setup
### Prerequisites
Before getting started, make sure you have a project set up for your chosen platform:
* **Next.js**: A [Next.js project](https://nextjs.org/docs/getting-started/installation) using the app router (Stack Auth does not support the pages router on Next.js)
* **React**: A [React project](https://react.dev/learn/creating-a-react-app) (we show examples with Vite)
* **JavaScript**: A Node.js project with Express
* **Python**: A Python environment with your chosen framework (Django, FastAPI, or Flask)
We recommend using our **setup wizard** for JavaScript frameworks for a seamless installation experience. For Python, we recommend using the REST API approach.
### Setup Wizard / Manual Installation
Setup wizard (recommended for JS)
Manual installation
### Run installation wizard
The setup wizard is available for JavaScript/TypeScript frameworks. For Python projects, please use the manual installation method.
Run Stack's installation wizard with the following command:
```sh title="Terminal"
npx @stackframe/stack-cli@latest init
```
### Update API keys
Create an account on [the Stack Auth dashboard](https://app.stack-auth.com/projects), create a new project, and copy its environment variables into the appropriate configuration file. If your project requires publishable client keys, create a project key that includes one and copy that as well.
**Next.js:**
```bash title=".env.local"
NEXT_PUBLIC_STACK_PROJECT_ID=
NEXT_PUBLIC_STACK_PUBLISHABLE_CLIENT_KEY=
STACK_SECRET_SERVER_KEY=
```
**React:**
```typescript title="stack/client.ts"
// Update the values in stack/client.ts created by the wizard
export const stackClientApp = new StackClientApp({
projectId: "your-project-id",
publishableClientKey: "your-publishable-client-key",
tokenStore: "cookie",
});
```
**Vanilla JavaScript:**
```bash title=".env"
STACK_PROJECT_ID=
STACK_PUBLISHABLE_CLIENT_KEY=
STACK_SECRET_SERVER_KEY=
```
### Done!
That's it! The wizard should have created or updated the following files in your project:
**For Next.js:**
* `app/handler/[...stack]/page.tsx`: Default pages for sign-in, sign-out, account settings, and more
* `app/layout.tsx`: Updated to wrap the entire body with `StackProvider` and `StackTheme`
* `app/loading.tsx`: Suspense boundary for Stack's async hooks
* `stack/server.ts`: Contains the `stackServerApp` for server-side usage
* `stack/client.ts`: Contains the `stackClientApp` for client-side usage
**For React:**
* `stack/client.ts`: Contains the `stackClientApp` configuration
* Your app should be wrapped with `StackProvider` and `StackTheme`
**For Node.js/Express:**
* `stack/server.ts`: Contains the `stackServerApp` configuration
Note: The setup wizard also supports existing, complicated projects. Cases where manual installation is necessary are rare for JavaScript frameworks.
### Install package
First, install the appropriate Stack package:
**Next.js:**
```bash title="Terminal"
npm install @stackframe/stack
```
**React:**
```bash title="Terminal"
npm install @stackframe/react
```
**Express:**
```bash title="Terminal"
npm install @stackframe/js
```
**Node.js:**
```bash title="Terminal"
npm install @stackframe/js
```
**Django:**
```bash title="Terminal"
pip install requests
```
**FastAPI:**
```bash title="Terminal"
pip install requests
```
**Flask:**
```bash title="Terminal"
pip install requests
```
### Create API keys
[Register a new account on Stack](https://app.stack-auth.com/handler/sign-up), create a project in the dashboard, and copy the project ID. If your project requires publishable client keys, also create a project key from the left sidebar and copy the publishable client key. For server-side setups, also copy the secret server key.
### Configure environment variables
Set up your environment variables or configuration:
**Next.js:**
```bash title=".env.local"
NEXT_PUBLIC_STACK_PROJECT_ID=
NEXT_PUBLIC_STACK_PUBLISHABLE_CLIENT_KEY=
STACK_SECRET_SERVER_KEY=
```
**React:**
```bash title=".env"
# Store these in environment variables or directly in the client file during development
VITE_STACK_PROJECT_ID=
VITE_STACK_PUBLISHABLE_CLIENT_KEY=
```
**Express:**
```bash title=".env"
STACK_PROJECT_ID=
STACK_PUBLISHABLE_CLIENT_KEY=
STACK_SECRET_SERVER_KEY=
```
**Node.js:**
```bash title=".env"
STACK_PROJECT_ID=
STACK_PUBLISHABLE_CLIENT_KEY=
STACK_SECRET_SERVER_KEY=
```
**Django:**
```python title="settings.py"
import os
stack_project_id = os.getenv("STACK_PROJECT_ID")
stack_publishable_client_key = os.getenv("STACK_PUBLISHABLE_CLIENT_KEY")
stack_secret_server_key = os.getenv("STACK_SECRET_SERVER_KEY")
```
**FastAPI:**
```python title="main.py"
import os
stack_project_id = os.getenv("STACK_PROJECT_ID")
stack_publishable_client_key = os.getenv("STACK_PUBLISHABLE_CLIENT_KEY")
stack_secret_server_key = os.getenv("STACK_SECRET_SERVER_KEY")
```
**Flask:**
```python title="app.py"
import os
stack_project_id = os.getenv("STACK_PROJECT_ID")
stack_publishable_client_key = os.getenv("STACK_PUBLISHABLE_CLIENT_KEY")
stack_secret_server_key = os.getenv("STACK_SECRET_SERVER_KEY")
```
### Create Stack configuration
Create the Stack app configuration:
**stack/server.ts:**
```typescript title="stack/server.ts"
import "server-only";
import { StackServerApp } from "@stackframe/stack";
export const stackServerApp = new StackServerApp({
tokenStore: "nextjs-cookie", // storing auth tokens in cookies
});
```
**stack/client.ts:**
```typescript title="stack/client.ts"
import { StackClientApp } from "@stackframe/stack";
export const stackClientApp = new StackClientApp({
// Environment variables are automatically read
});
```
**stack/client.ts:**
```typescript title="stack/client.ts"
import { StackClientApp } from "@stackframe/react";
// If you use a router, uncomment the appropriate import and the redirectMethod below
// import { useNavigate } from "react-router-dom"; // React Router
// import { useNavigate } from "@tanstack/react-router"; // TanStack Router
export const stackClientApp = new StackClientApp({
projectId: process.env.VITE_STACK_PROJECT_ID || "your-project-id",
publishableClientKey: process.env.VITE_STACK_PUBLISHABLE_CLIENT_KEY || "your-publishable-client-key",
tokenStore: "cookie",
// redirectMethod: { useNavigate }, // Set this for non-Next.js frameworks
});
```
**stack/server.ts:**
```typescript title="stack/server.ts"
import { StackServerApp } from "@stackframe/js";
export const stackServerApp = new StackServerApp({
projectId: process.env.STACK_PROJECT_ID,
publishableClientKey: process.env.STACK_PUBLISHABLE_CLIENT_KEY,
secretServerKey: process.env.STACK_SECRET_SERVER_KEY,
tokenStore: "memory",
});
```
**stack/client.ts:**
```typescript title="stack/client.ts"
import { StackClientApp } from "@stackframe/js";
export const stackClientApp = new StackClientApp({
projectId: process.env.STACK_PROJECT_ID,
publishableClientKey: process.env.STACK_PUBLISHABLE_CLIENT_KEY,
tokenStore: "cookie",
});
```
**stack/server.js:**
```javascript title="stack/server.js"
import { StackServerApp } from "@stackframe/js";
export const stackServerApp = new StackServerApp({
projectId: process.env.STACK_PROJECT_ID,
publishableClientKey: process.env.STACK_PUBLISHABLE_CLIENT_KEY,
secretServerKey: process.env.STACK_SECRET_SERVER_KEY,
tokenStore: "memory",
});
```
**stack/client.js:**
```javascript title="stack/client.js"
import { StackClientApp } from "@stackframe/js";
export const stackClientApp = new StackClientApp({
projectId: process.env.STACK_PROJECT_ID,
publishableClientKey: process.env.STACK_PUBLISHABLE_CLIENT_KEY,
tokenStore: "cookie",
});
```
**views.py:**
```python title="views.py"
import requests
def stack_auth_request(method, endpoint, **kwargs):
res = requests.request(
method,
f'https://api.stack-auth.com/{endpoint}',
headers={
'x-stack-access-type': 'server', # or 'client' if you're only accessing the client API
'x-stack-project-id': stack_project_id,
'x-stack-publishable-client-key': stack_publishable_client_key,
'x-stack-secret-server-key': stack_secret_server_key, # not necessary if access type is 'client'
**kwargs.pop('headers', {}),
},
**kwargs,
)
if res.status_code >= 400:
raise Exception(f"Stack Auth API request failed with {res.status_code}: {res.text}")
return res.json()
```
**main.py:**
```python title="main.py"
import requests
def stack_auth_request(method, endpoint, **kwargs):
res = requests.request(
method,
f'https://api.stack-auth.com/{endpoint}',
headers={
'x-stack-access-type': 'server', # or 'client' if you're only accessing the client API
'x-stack-project-id': stack_project_id,
'x-stack-publishable-client-key': stack_publishable_client_key,
'x-stack-secret-server-key': stack_secret_server_key, # not necessary if access type is 'client'
**kwargs.pop('headers', {}),
},
**kwargs,
)
if res.status_code >= 400:
raise Exception(f"Stack Auth API request failed with {res.status_code}: {res.text}")
return res.json()
```
**app.py:**
```python title="app.py"
import requests
def stack_auth_request(method, endpoint, **kwargs):
res = requests.request(
method,
f'https://api.stack-auth.com/{endpoint}',
headers={
'x-stack-access-type': 'server', # or 'client' if you're only accessing the client API
'x-stack-project-id': stack_project_id,
'x-stack-publishable-client-key': stack_publishable_client_key,
'x-stack-secret-server-key': stack_secret_server_key, # not necessary if access type is 'client'
**kwargs.pop('headers', {}),
},
**kwargs,
)
if res.status_code >= 400:
raise Exception(f"Stack Auth API request failed with {res.status_code}: {res.text}")
return res.json()
```
### Set up authentication handlers (Frontend frameworks only)
For JavaScript frameworks, create the authentication handler:
**Next.js:**
```typescript title="app/handler/[...stack]/page.tsx"
import { StackHandler } from "@stackframe/stack";
import { stackServerApp } from "@/stack/server";
export default function Handler(props: unknown) {
return ;
}
```
**React:**
```typescript title="App.tsx"
import { StackHandler, StackProvider, StackTheme } from "@stackframe/react";
import { Suspense } from "react";
import { BrowserRouter, Route, Routes, useLocation } from "react-router-dom";
import { stackClientApp } from "./stack/client";
function HandlerRoutes() {
const location = useLocation();
return (
);
}
export default function App() {
return (
} />
hello world} />
);
}
```
**Express:**
```typescript title="Note"
// Express doesn't use built-in handlers
// Use the REST API or integrate with your frontend
```
**Node.js:**
```javascript title="Note"
// Node.js doesn't use built-in handlers
// Use the REST API or integrate with your frontend
```
### Add providers (Next.js and React only)
For Next.js and React, wrap your app with Stack providers:
**Next.js:**
```typescript title="app/layout.tsx"
import React from "react";
import { StackProvider, StackTheme } from "@stackframe/stack";
import { stackServerApp } from "@/stack/server";
export default function RootLayout({ children }: { children: React.ReactNode }) {
return (
{children}
);
}
```
**React:**
```typescript title="Note"
// Already shown in the App.tsx example above
// Make sure to wrap your app with StackProvider and StackTheme
```
### Add loading boundary (Next.js only)
For Next.js, add a Suspense boundary:
```typescript title="app/loading.tsx"
export default function Loading() {
// You can use any loading indicator here
return <>
Loading...
;
}
```
### Add suspense boundary (React only)
For React, add a suspense boundary:
```typescript title="App.tsx"
import { Suspense } from "react";
import { StackProvider } from "@stackframe/react";
import { stackClientApp } from "./stack/client";
export default function App() {
return (
// Wrap your StackProvider with Suspense for async hooks to work
Loading...}>
{/* Your app content */}
);
}
```
### Done!
## Post-setup
That's it! Stack is now configured in your project.
### Testing your setup
**Next.js:**
```bash title="Terminal"
# Start your Next.js app
npm run dev
# Navigate to the sign-up page
# http://localhost:3000/handler/sign-up
```
**React:**
```bash title="Terminal"
# Start your React app
npm run dev
# Navigate to the sign-up page
# http://localhost:5173/handler/sign-up
```
**Express:**
```bash title="Terminal"
# Start your Express server
npm start
# Use the REST API or integrate with your frontend
# Check the REST API documentation for endpoints
```
**Node.js:**
```bash title="Terminal"
# Start your Node.js app
node index.js
# Use the REST API or integrate with your frontend
# Check the REST API documentation for endpoints
```
**Django:**
```python title="Terminal"
# Test the Stack Auth API connection
print(stack_auth_request('GET', '/api/v1/projects/current'))
# Start your Django server
python manage.py runserver
```
**FastAPI:**
```python title="Terminal"
# Test the Stack Auth API connection
print(stack_auth_request('GET', '/api/v1/projects/current'))
# Start your FastAPI server
uvicorn main:app --reload
```
**Flask:**
```python title="Terminal"
# Test the Stack Auth API connection
print(stack_auth_request('GET', '/api/v1/projects/current'))
# Start your Flask server
flask run
```
### What you'll see
For JavaScript frameworks with built-in UI components, you'll see the Stack Auth sign-up page:
After signing up/in, you will be redirected back to the home page. You can also check out the account settings page.
 For Python and backend-only JavaScript setups, you'll interact with Stack Auth through the REST API.
## Example usage
Here are some basic usage examples for each platform:
**Server Component:**
```typescript title="Server Component"
import { stackServerApp } from "@/stack/server";
// In a Server Component or API route
const user = await stackServerApp.getUser();
if (user) {
console.log("User is signed in:", user.displayName);
} else {
console.log("User is not signed in");
}
```
**Client Component:**
```typescript title="Client Component"
'use client';
import { useUser } from "@stackframe/stack";
export default function MyComponent() {
const user = useUser();
if (user) {
return
For Python and backend-only JavaScript setups, you'll interact with Stack Auth through the REST API.
## Example usage
Here are some basic usage examples for each platform:
**Server Component:**
```typescript title="Server Component"
import { stackServerApp } from "@/stack/server";
// In a Server Component or API route
const user = await stackServerApp.getUser();
if (user) {
console.log("User is signed in:", user.displayName);
} else {
console.log("User is not signed in");
}
```
**Client Component:**
```typescript title="Client Component"
'use client';
import { useUser } from "@stackframe/stack";
export default function MyComponent() {
const user = useUser();
if (user) {
return Hello, {user.displayName}!
;
} else {
return Please sign in
;
}
}
```
**Component:**
```typescript title="Component"
import { useUser } from "@stackframe/react";
export default function MyComponent() {
const user = useUser();
if (user) {
return Hello, {user.displayName}!
;
} else {
return Please sign in
;
}
}
```
**server.ts:**
```typescript title="server.ts"
import { stackServerApp } from "./stack/server.js";
app.get('/profile', async (req, res) => {
try {
// Get access token from request headers
const accessToken = req.headers['x-stack-access-token'];
const user = await stackServerApp.getUser({ accessToken });
if (user) {
res.json({ message: `Hello, ${user.displayName}!` });
} else {
res.status(401).json({ error: 'Not authenticated' });
}
} catch (error) {
res.status(500).json({ error: 'Server error' });
}
});
```
**index.js:**
```javascript title="index.js"
import { stackServerApp } from "./stack/server.js";
async function checkUser(accessToken) {
try {
const user = await stackServerApp.getUser({ accessToken });
if (user) {
console.log(`Hello, ${user.displayName}!`);
} else {
console.log('User not authenticated');
}
} catch (error) {
console.error('Error:', error);
}
}
```
**views.py:**
```python title="views.py"
# In your views.py
def profile_view(request):
# Get access token from request headers
access_token = request.headers.get('X-Stack-Access-Token')
try:
user_data = stack_auth_request('GET', '/api/v1/users/me', headers={
'x-stack-access-token': access_token,
})
return JsonResponse({'message': f"Hello, {user_data['displayName']}!"})
except Exception as e:
return JsonResponse({'error': 'Not authenticated'}, status=401)
```
**main.py:**
```python title="main.py"
from fastapi import FastAPI, Header, HTTPException
app = FastAPI()
@app.get("/profile")
async def get_profile(x_stack_access_token: str = Header(None)):
if not x_stack_access_token:
raise HTTPException(status_code=401, detail="Access token required")
try:
user_data = stack_auth_request('GET', '/api/v1/users/me', headers={
'x-stack-access-token': x_stack_access_token,
})
return {"message": f"Hello, {user_data['displayName']}!"}
except Exception as e:
raise HTTPException(status_code=401, detail="Not authenticated")
```
**app.py:**
```python title="app.py"
from flask import Flask, request, jsonify
app = Flask(__name__)
@app.route('/profile')
def profile():
access_token = request.headers.get('X-Stack-Access-Token')
if not access_token:
return jsonify({'error': 'Access token required'}), 401
try:
user_data = stack_auth_request('GET', '/api/v1/users/me', headers={
'x-stack-access-token': access_token,
})
return jsonify({'message': f"Hello, {user_data['displayName']}!"})
except Exception as e:
return jsonify({'error': 'Not authenticated'}), 401
```
## Next steps
Next up, we will show you how to [retrieve and update user information](./users.mdx), and how to [protect a page](./users.mdx#protecting-a-page) from unauthorized access.
For Python developers, check out the [REST API documentation](../rest-api/overview.mdx) to learn more about the available endpoints and how to use them in your Python application.
# Users
URL: /docs/getting-started/users
Source: /vercel/path0/docs/content/docs/(guides)/getting-started/users.mdx
***
title: Users
icon: "users"
-------------
You will inevitably build custom components that access the user in one way or another. In this section, we will take a closer look at the functions and hooks that let you do this.
## Client Component basics
The `useUser()` hook returns the current user in a Client Component. By default, it will return `null` if the user is not signed in.
```tsx title="my-client-component.tsx"
"use client";
import { useUser } from "@stackframe/stack"
export function MyClientComponent() {
const user = useUser();
return {user ? `Hello, ${user.displayName ?? "anon"}` : 'You are not logged in'}
;
}
```
The `useUser()` hook is simply a shorthand for `useStackApp().useUser()`. `useStackApp()` also contains other useful hooks and methods for clients, which will be described later.
Sometimes, you want to retrieve the user only if they're signed in, and redirect to the sign-in page otherwise. In this case, simply pass `{ or: "redirect" }`, and the function will never return `null`.
```tsx
const user = useUser({ or: "redirect" });
return {`Hello, ${user.displayName ?? "anon"}`}
;
```
## Server Component basics
Since `useUser()` is a stateful hook, you can't use it on server components. Instead, you can import `stackServerApp` from `stack/server.ts` and call `getUser()`:
```tsx title="my-server-component.tsx"
import { stackServerApp } from "@/stack/server";
export default async function MyServerComponent() {
const user = await stackServerApp.getUser(); // or: stackServerApp.getUser({ or: "redirect" })
return {user ? `Hello, ${user.displayName ?? "anon"}` : 'You are not logged in'}
;
}
```
Since `useUser()` is a hook, it will re-render the component on user changes (eg. signout), while `getUser()` will only fetch the user once (on page load). You can also call `useStackApp().getUser()` on the client side to get the user in a non-component context.
## Protecting a page
There are three ways to protect a page: in Client Components with `useUser({ or: "redirect" })`, in Server Components with `await getUser({ or: "redirect" })`, or with middleware.
On Client Components, the `useUser({ or: 'redirect' })` hook will redirect the user to the sign-in page if they are not logged in. Similarly, on Server Components, call `await getUser({ or: "redirect" })` to protect a page (or component).
Middleware can be used whenever it is easy to tell whether a page should be protected given just the URL, for example, when you have a `/private` section only accessible to logged-in users.
Client Component
Server Component
Middleware
```tsx title="my-protected-client-component.tsx"
"use client";
import { useUser } from "@stackframe/stack";
export default function MyProtectedClientComponent() {
useUser({ or: 'redirect' });
return You can only see this if you are logged in
}
```
```tsx title="my-protected-server-component.tsx"
import { stackServerApp } from "@/stack/server";
export default async function MyProtectedServerComponent() {
await stackServerApp.getUser({ or: 'redirect' });
return You can only see this if you are logged in
}
```
```tsx title="middleware.tsx"
export async function middleware(request: NextRequest) {
const user = await stackServerApp.getUser();
if (!user) {
return NextResponse.redirect(new URL('/handler/sign-in', request.url));
}
return NextResponse.next();
}
export const config = {
// You can add your own route protection logic here
// Make sure not to protect the root URL, as it would prevent users from accessing static Next.js files or Stack's /handler path
matcher: '/protected/:path*',
};
```
If you have sensitive information hidden in the page HTML itself, be aware of Next.js differences when using Server vs. Client Components.
* **Client Components**: Client components are always sent to the browser, regardless of page protection. This is standard Next.js behavior. For more information, please refer to the [Next.js documentation](https://nextjs.org/docs/app/building-your-application/rendering/composition-patterns#keeping-server-only-code-out-of-the-client-environment).
* **Server Components**: If a component is protected, it is guaranteed that its bundled HTML will not be sent to the browser if the user is not logged in. However, this is not necessarily true for its children and the rest of the page, as Next.js may split components on the same page and send them to the client separately for performance.
For example, if your page is ``, where `Parent` is protected and `Child` is not, Next.js may still send `` to the browser even if the user is not logged in. (Normal browsers will never display it, but attackers may be able to retrieve it.) Notably, this also applies to unprotected pages inside protected layouts.
To remediate this, every component/page that contains sensitive information should protect itself, instead of relying on an outer layout. This is good practice anyways; it prevents you from accidentally exposing the data.
* **Middleware**: Prior to Next.js v15.2.3, Next.js allowed attackers to see unprotected components if you only protect on a middleware level. Since v15.2.3, this is no longer possible, and you don't have to worry about leaking sensitive information when using middleware to protect a route.
No matter which method you use, attackers will never be able to, say, impersonate a user.
## User data
You can update attributes on a user object with the `user.update()` function.
```tsx title="my-client-component.tsx"
'use client';
import { useUser } from "@stackframe/stack";
export default function MyClientComponent() {
const user = useUser();
return ;
}
```
You can also store custom user data in the `clientMetadata`, `serverMetadata`, or `clientReadOnlyMetadata` fields. More information [here](../concepts/custom-user-data).
## Signing out
You can sign out the user by redirecting them to `/handler/sign-out` or simply by calling `user.signOut()`. They will be redirected to the URL [configured as `afterSignOut` in the `StackServerApp`](../sdk/objects/stack-app).
user.signOut()
Redirect
```tsx title="sign-out-button.tsx"
"use client";
import { useUser } from "@stackframe/stack";
export default function SignOutButton() {
const user = useUser();
return user ? : "Not signed in";
}
```
```tsx title="sign-out-link.tsx"
import { stackServerApp } from "@/stack/server";
export default async function SignOutLink() {
// stackServerApp.urls.signOut is equal to /handler/sign-out
return Sign Out;
}
```
## Example: Custom profile page
Stack automatically creates a user profile on sign-up. Let's build a page that displays this information. In `app/profile/page.tsx`:
Client Component
Server Component
```tsx title="app/profile/page.tsx"
'use client';
import { useUser, useStackApp, UserButton } from "@stackframe/stack";
export default function PageClient() {
const user = useUser();
const app = useStackApp();
return (
{user ? (
Welcome, {user.displayName ?? "unnamed user"}
Your e-mail: {user.primaryEmail}
) : (
You are not logged in
)}
{user ? (
Welcome, {user.displayName ?? "unnamed user"}
Your e-mail: {user.primaryEmail}
Sign Out
) : (
)}
Stack Auth JS Examples
Choose an authentication example:
User Information
Email:
```
**index-script.ts:**
```typescript title="index-script.ts"
import { stackClientApp } from "./stack/client";
const updateUIState = (user: any | null) => {
const authOptions = document.getElementById("authOptions");
const userInfo = document.getElementById("userInfo");
const userEmailSpan = document.getElementById("userEmail");
if (user) {
if (authOptions) authOptions.style.display = "none";
if (userInfo) userInfo.style.display = "block";
if (userEmailSpan) userEmailSpan.textContent = user.primaryEmail || "";
} else {
if (authOptions) authOptions.style.display = "block";
if (userInfo) userInfo.style.display = "none";
}
};
// Check if user is already signed in
stackClientApp.getUser().then(updateUIState);
// Handle Sign Out
document.getElementById("signOut")?.addEventListener("click", async () => {
const user = await stackClientApp.getUser();
if (user) {
await user.signOut();
updateUIState(null);
}
});
```
### Sign in with password
**password-sign-in.html:**
```html title="password-sign-in.html"
Password Sign In
Password Sign In
← Back to home
```
**password-sign-in-script.ts:**
```typescript title="password-sign-in-script.ts"
import { stackClientApp } from "./stack/client";
// Check if user is already signed in
stackClientApp.getUser().then((user) => {
if (user) {
window.location.href = "/";
}
});
document.getElementById("showSignUp")?.addEventListener("click", (e) => {
e.preventDefault();
document.getElementById("loginForm")?.classList.add("hidden");
document.getElementById("signUpForm")?.classList.remove("hidden");
});
document.getElementById("showSignIn")?.addEventListener("click", (e) => {
e.preventDefault();
document.getElementById("loginForm")?.classList.remove("hidden");
document.getElementById("signUpForm")?.classList.add("hidden");
});
document.getElementById("signIn")?.addEventListener("click", async () => {
const emailInput = document.getElementById("emailInput") as HTMLInputElement;
const passwordInput = document.getElementById("passwordInput") as HTMLInputElement;
const result = await stackClientApp.signInWithCredential({
email: emailInput.value,
password: passwordInput.value,
});
if (result.status === "error") {
alert("Sign in failed. Please check your email and password and try again.");
} else {
window.location.href = "/";
}
});
document.getElementById("signUp")?.addEventListener("click", async () => {
const emailInput = document.getElementById("signUpEmail") as HTMLInputElement;
const passwordInput = document.getElementById("signUpPassword") as HTMLInputElement;
const result = await stackClientApp.signUpWithCredential({
email: emailInput.value,
password: passwordInput.value,
});
if (result.status === "error") {
alert("Sign up failed. Please try again.");
return;
}
const signInResult = await stackClientApp.signInWithCredential({
email: emailInput.value,
password: passwordInput.value,
});
if (signInResult.status === "error") {
alert("Account created but sign in failed. Please sign in manually.");
} else {
window.location.href = "/";
}
});
```
### Sign up with password
**password-sign-up.html:**
```html title="password-sign-up.html"
Password Sign Up
Password Sign Up
← Back to home
```
**password-sign-up-script.ts:**
```typescript title="password-sign-up-script.ts"
import { stackClientApp } from "./stack/client";
// Check if user is already signed in
stackClientApp.getUser().then((user) => {
if (user) {
window.location.href = "/";
}
});
document.getElementById("signUp")?.addEventListener("click", async () => {
const emailInput = document.getElementById("signUpEmail") as HTMLInputElement;
const passwordInput = document.getElementById("signUpPassword") as HTMLInputElement;
const result = await stackClientApp.signUpWithCredential({
email: emailInput.value,
password: passwordInput.value,
});
if (result.status === "error") {
alert("Sign up failed. Please try again.");
return;
}
const signInResult = await stackClientApp.signInWithCredential({
email: emailInput.value,
password: passwordInput.value,
});
if (signInResult.status === "error") {
alert("Account created but sign in failed. Please sign in manually.");
window.location.href = "/password-sign-in";
} else {
window.location.href = "/";
}
});
```
### Sign in with OTP/Magic Link
**otp-sign-in.html:**
```html title="otp-sign-in.html"
OTP Sign In
OTP Sign In
← Back to home
```
**otp-sign-in-script.ts:**
```typescript title="otp-sign-in-script.ts"
import { stackClientApp } from "./stack/client";
// Check if user is already signed in
stackClientApp.getUser().then((user) => {
if (user) {
window.location.href = "/";
}
});
document.getElementById("sendCode")?.addEventListener("click", async () => {
const emailInput = document.getElementById("emailInput") as HTMLInputElement;
await stackClientApp.sendMagicLinkEmail({
email: emailInput.value,
});
document.getElementById("emailStep")!.style.display = "none";
document.getElementById("codeStep")!.style.display = "block";
});
document.getElementById("verifyCode")?.addEventListener("click", async () => {
const codeInput = document.getElementById("codeInput") as HTMLInputElement;
const result = await stackClientApp.signInWithMagicLink({
code: codeInput.value,
});
if (result.status === "error") {
alert("Verification failed. Please check the code and try again.");
} else {
window.location.href = "/";
}
});
```
### OAuth sign in
**oauth.html:**
```html title="oauth.html"
OAuth Authentication
OAuth Authentication
← Back to home
Sign In with OAuth
```
**oauth-script.ts:**
```typescript title="oauth-script.ts"
import { stackClientApp } from "./stack/client";
// Check if user is already signed in
stackClientApp.getUser().then((user) => {
if (user) {
window.location.href = "/";
}
});
// Handle Google Sign In
document.getElementById("googleSignIn")?.addEventListener("click", async () => {
try {
await stackClientApp.signInWithOAuth('google');
} catch (error) {
console.error("Google sign in failed:", error);
alert("Failed to initialize Google sign in");
}
});
// Handle OAuth redirect
window.addEventListener("load", async () => {
try {
const params = new URLSearchParams(window.location.search);
const code = params.get("code");
const state = params.get("state");
if (code && state) {
const user = await stackClientApp.callOAuthCallback();
if (user) {
window.location.href = "/";
}
}
} catch (error) {
console.error("Failed to handle OAuth redirect:", error);
alert("Authentication failed. Please try again.");
}
});
```
# CLI Authentication
URL: /docs/others/cli-authentication
Source: /vercel/path0/docs/content/docs/(guides)/others/cli-authentication.mdx
How to authenticate a command line application using Stack Auth
***
title: CLI Authentication
description: How to authenticate a command line application using Stack Auth
----------------------------------------------------------------------------
If you're building a command line application that runs in a terminal, you can use Stack Auth to let your users log in to their accounts.
To do so, we provide a Python template that you can use as a starting point. [Download it here](https://github.com/hexclave/stack-auth/tree/main/docs/public/stack-auth-cli-template.py) and copy it into your project, for example:
```py
└─ my-python-app
├─ main.py
└─ stack_auth_cli_template.py # <- the file you just downloaded (rename to use underscores for Python import)
```
Then, you can import the `prompt_cli_login` function:
```py
from stack_auth_cli_template import prompt_cli_login
# prompt the user to log in
refresh_token = prompt_cli_login(
app_url="https://your-app-url.example.com",
project_id="your-project-id-here",
publishable_client_key="your-publishable-client-key-here",
)
if refresh_token is None:
print("User cancelled the login process. Exiting")
exit(1)
# you can also store the refresh token in a file, and only prompt the user to log in if the file doesn't exist
# you can now use the REST API with the refresh token
def stack_auth_request(method, endpoint, **kwargs):
# ... see Stack Auth's Getting Started section to see how this function should look like
# https://docs.stack-auth.com/python/getting-started/setup
def get_access_token(refresh_token):
access_token_response = stack_auth_request(
'post',
'/api/v1/auth/sessions/current/refresh',
headers={
'x-stack-refresh-token': refresh_token,
}
)
return access_token_response['access_token']
def get_user_object(access_token):
return stack_auth_request(
'get',
'/api/v1/users/me',
headers={
'x-stack-access-token': access_token,
}
)
user = get_user_object(get_access_token(refresh_token))
print("The user is logged in as", user['display_name'] or user['primary_email'])
```
# Convex
URL: /docs/others/convex
Source: /vercel/path0/docs/content/docs/(guides)/others/convex.mdx
Integrate Stack Auth with Convex
***
title: Convex
description: Integrate Stack Auth with Convex
---------------------------------------------
This guide shows how to integrate Stack Auth with Convex.
### 1) Create a Convex + Next.js app
First, initialize a new Convex + Next.js app:
```bash title="Terminal"
npm create convex@latest # make sure to choose "Next.js" and "No auth" when asked — we will add auth later
```
Then, run `npx convex dev` to start the Convex backend, and `npm run dev` to start the development server.
### 2) Install Stack Auth
Next, install Stack Auth using the setup wizard:
```bash
cd my-app/ # replace with your app name
npx @stackframe/stack-cli@latest init
```
### 3) Create a Stack Auth project
[Create a new Stack Auth project](https://app.stack-auth.com). Get the project ID & API key environment variables from the dashboard.
* Set the `.env.local` file to the environment variables.
* In Convex, go to the dashboard of your project's deployment, and also set the environment variables there.
### 4) Update code
Next, update or create a file in `convex/auth.config.ts`:
```ts
import { getConvexProvidersConfig } from "@stackframe/js"; // Vanilla JS
// or: import { getConvexProvidersConfig } from "@stackframe/react"; // React
// or: import { getConvexProvidersConfig } from "@stackframe/stack"; // Next.js
export default {
providers: getConvexProvidersConfig({
projectId: process.env.STACK_PROJECT_ID, // or: process.env.NEXT_PUBLIC_STACK_PROJECT_ID
}),
}
```
Then, update your Convex client to use Stack Auth:
```ts
convexClient.setAuth(stackClientApp.getConvexClientAuth({})); // browser JS
convexReactClient.setAuth(stackClientApp.getConvexClientAuth({})); // React
convexHttpClient.setAuth(stackClientApp.getConvexHttpClientAuth({ tokenStore: requestObject })); // HTTP, see Stack Auth docs for more information on tokenStore
```
### 5) Done!
Done! Now, you'll be able to access Stack Auth's functionality from your frontend & backend:
```ts
// MyPage.tsx
export function MyPage() {
// see https://docs.stack-auth.com for more information on how to use Stack Auth
const user = useUser();
return Your email is {user.email}
;
}
// myFunctions.ts
export const myQuery = query({
handler: async (ctx, args) => {
// In queries & mutations, use the special `getPartialUser` function to get user info
const obj = await stackServerApp.getPartialUser({ from: "convex", ctx });
return JSON.stringify(obj);
},
});
```
You can find the production-ready template with Stack-Auth, Convex & Shadcn pre-configured [here on GitHub](https://github.com/developing-gamer/next-convex-stack-template).
# MCP Setup
URL: /docs/others/mcp-setup
Source: /vercel/path0/docs/content/docs/(guides)/others/mcp-setup.mdx
***
## title: MCP Setup
+

Set up Stack Auth's Model Context Protocol (MCP) server to get intelligent code assistance in your development environment.
The MCP server exposes a single tool, **`ask_stack_auth`**, which sends your question to the same Stack Auth documentation AI used on [docs.stack-auth.com](https://docs.stack-auth.com).
Cursor
VS Code
Codex
Claude Code
Claude Desktop
Windsurf
ChatGPT
Gemini CLI
Configure Stack Auth MCP in Cursor IDE for enhanced code assistance.
}>Add to Cursor
**Manual Installation**
Add the following to your `mcp.json` file:
```json title="mcp.json"
{
"mcpServers": {
"stack-auth": {
"url": "https://mcp.stack-auth.com/mcp"
}
}
}
```
Configure Stack Auth MCP in VSCode IDE for enhanced code assistance.
}>Add to VS Code
**Manual Installation**
Open a terminal and run the following command:
```sh title="Terminal"
code --add-mcp '{"type":"http","name":"stack-auth","url":"https://mcp.stack-auth.com/mcp"}'
```
Then, from inside VS Code, open the .vscode/mcp.json file and click "Start server".
Configure Stack Auth MCP in Codex CLI and the Codex IDE extension. The configuration is shared between both.
Open a terminal and run the following command:
```sh title="Terminal"
codex mcp add stack-auth --url https://mcp.stack-auth.com/mcp
```
Verify it is configured:
```sh title="Terminal"
codex mcp list
```
**Manual Installation**
Alternatively, add the following to `~/.codex/config.toml`:
```toml title="config.toml"
[mcp_servers.stack-auth]
url = "https://mcp.stack-auth.com/mcp"
```
Open a terminal and run the following command:
```sh title="Terminal"
claude mcp add --transport http stack-auth https://mcp.stack-auth.com/mcp
```
From within Claude Code, you can use the /mcp command to get more information about the server.
Open Claude Desktop and navigate to Settings > Connectors > Add Custom Connector.
Enter the name as stack-auth and the remote MCP server URL as [https://mcp.stack-auth.com/mcp](https://mcp.stack-auth.com/mcp).
Copy the following JSON to your Windsurf MCP config file:
```json title="mcp.json"
{
"mcpServers": {
"stack-auth": {
"serverUrl": "https://mcp.stack-auth.com/mcp"
}
}
}
```
In Team, Enterprise, and Edu workspaces, only workspace owners and admins have permission to set this.
Navigate to **Settings > Connectors**
Add a custom connector with the server URL: `https://mcp.stack-auth.com/mcp`
After this, it should be visible in Composer > Deep research Tool.
Connectors can only be used with **Deep Research**
Add the following JSON to your Gemini CLI configuration file (\~/.gemini/settings.json):
```json title="settings.json"
{
"mcpServers": {
"stack-auth": {
"httpUrl": "https://mcp.stack-auth.com/mcp",
"headers": {
"Accept": "application/json, text/event-stream"
}
}
}
}
```
## Markdown Instructions
If you want to include instructions for all clients in your project's README.md file, feel free to copy the following markdown:
{`
Cursor
#### Installation Link
[](cursor://anysphere.cursor-deeplink/mcp/install?name=stack-auth&config=eyJ1cmwiOiJodHRwczovL21jcC5zdGFjay1hdXRoLmNvbS9tY3AifQ==)
#### Manual Installation
Add the following to your \`mcp.json\` file:
\`\`\`json
{
"mcpServers": {
"stack-auth": {
"url": "https://mcp.stack-auth.com/mcp"
}
}
}
\`\`\`
VSCode
#### Installation Link
[](https://insiders.vscode.dev/redirect?url=vscode:mcp/install?%7B%22type%22%3A%22http%22%2C%22name%22%3A%22stack-auth%22%2C%22url%22%3A%22https%3A%2F%2Fmcp.stack-auth.com%2Fmcp%22%7D)
#### Manual Installation
Open a terminal and run the following command:
\`\`\`
code --add-mcp '{"type":"http","name":"stack-auth","url":"https://mcp.stack-auth.com/mcp"}'
\`\`\`
Then, from inside VS Code, open the .vscode/mcp.json file and click "Start server".
Codex
Open a terminal and run the following command:
\`\`\`
codex mcp add stack-auth --url https://mcp.stack-auth.com/mcp
\`\`\`
Verify it is configured:
\`\`\`
codex mcp list
\`\`\`
Alternatively, add the following to \`~/.codex/config.toml\`:
\`\`\`toml
[mcp_servers.stack-auth]
url = "https://mcp.stack-auth.com/mcp"
\`\`\`
Claude Code
Open a terminal and run the following command:
\`\`\`
claude mcp add --transport http stack-auth https://mcp.stack-auth.com/mcp
\`\`\`
From within Claude Code, you can use the \`/mcp\` command to get more information about the server.
Claude Desktop
Open Claude Desktop and navigate to Settings > Connectors > Add Custom Connector.
Enter the name as \`stack-auth\` and the remote MCP server URL as \`https://mcp.stack-auth.com/mcp\`.
Windsurf
Copy the following JSON to your Windsurf MCP config file:
\`\`\`json
{
"mcpServers": {
"stack-auth": {
"serverUrl": "https://mcp.stack-auth.com/mcp"
}
}
}
\`\`\`
ChatGPT
*Note: In Team, Enterprise, and Edu workspaces, only workspace owners and admins have permission*
- Navigate to **Settings > Connectors**
- Add a custom connector with the server URL: \`https://mcp.stack-auth.com/mcp\`
- It should then be visible in the Composer > Deep research tool
- You may need to add the server as a source
*Connectors can only be used with **Deep Research***
Gemini CLI
Add the following JSON to your Gemini CLI configuration file (\`~/.gemini/settings.json\`):
\`\`\`json
{
"mcpServers": {
"stack-auth": {
"httpUrl": "https://mcp.stack-auth.com/mcp",
"headers": {
"Accept": "application/json, text/event-stream"
}
}
}
}
\`\`\`
by [](https://hyprmcp.com/)`}
## Features
The Stack Auth MCP server exposes **`ask_stack_auth`**, which answers questions using live documentation retrieval and the docs-site AI assistant. It can help with:
* **Authentication flows**: Sign-in, sign-up, and user management
* **APIs and SDKs**: Endpoints, examples, and framework integration
* **Best practices**: Security and configuration guidance
# Self-host
URL: /docs/others/self-host
Source: /vercel/path0/docs/content/docs/(guides)/others/self-host.mdx
***
title: Self-host
lastModified: "2026-01-10"
--------------------------
**If you self-host, YOU will be responsible for updating Stack Auth and its dependencies.** Security patches, bug fixes, and new features require manual updates on your infrastructure. If you would like premium support to help with this, [contact us](mailto:team@stack-auth.com).
Stack Auth is fully open-source and can be self-hosted on your own infrastructure. This guide will introduce each component of the project and how to set them up.
If you are unsure whether you should self-host, here are some things to consider:
* **Complexity**: Stack Auth is a complex project with many interdependent services. Self-hosting requires managing these services and ensuring they work together seamlessly.
* **Updates**: Stack Auth is a rapidly evolving project with frequent feature and fix releases. Self-hosting requires you to manage updates and apply them timely.
* **Reliability**: Self-hosting requires you to ensure the reliability of your infrastructure. Downtimes and outages can be costly to handle.
* **Security**: Self-hosting requires ensuring the security of your infrastructure. A compromised service can affect your users.
For most users, we recommend using [Stack Auth's cloud hosted solution](https://app.stack-auth.com). However, if you understand the above challenges and are comfortable managing them, follow the instructions below to self-host!
## Services
On a high level, Stack Auth is composed of the following services:
* **API backend**: The core of Stack Auth, providing the REST API that the dashboard and your app connect to. This is what [api.stack-auth.com](https://api.stack-auth.com) provides.
* **Dashboard**: The interface for managing users, teams, auth methods, etc. This is available at [app.stack-auth.com](https://app.stack-auth.com).
* **Client SDK**: An SDK used to connect your app to the Stack Auth API backend, wrapping API calls and providing easy-to-use interfaces. More details [here](../getting-started/setup.mdx).
* **Postgres database**: Used to store all user data. We use [Prisma](https://prisma.io) as the ORM and manage the database schema migrations.
* **Svix**: Used to send webhooks. Svix is open-source and can be self-hosted, but also offers a cloud hosted solution. More on Svix [here](https://svix.com)
* **Email server**: We use [Inbucket](https://inbucket.org) as a local email server for development and a separate SMTP server for production. Any email service supporting SMTP will work.
* **S3 storage**: We use [S3Mock](https://github.com/adobe/S3Mock) as a local S3 storage for development and a separate S3 storage for production. Any S3 storage will work.
## Run with Docker
Stack Auth provides a [pre-configured Docker](https://hub.docker.com/r/stackauth/server) image that bundles the dashboard and API backend into a single container. To complete the setup, you'll need to provide your own PostgreSQL database, and optionally configure an email server and Svix instance for webhooks.
1. Use a cloud hosted Postgres or start a example Postgres database. Don't use this setting in production:
```bash title="Terminal"
docker run -d --name db -e POSTGRES_USER=postgres -e POSTGRES_PASSWORD=password -e POSTGRES_DB=stackframe -p 5432:5432 postgres:latest
```
2. Get the [example environment file](https://github.com/hexclave/stack-auth/tree/main/docker/server/.env.example) and modify it to your needs (for security, you MUST edit at least the `STACK_SERVER_SECRET` value). You must also supply a `STACK_FREESTYLE_API_KEY` in order to send emails with Stack Auth (can be generated on [freestyle](https://freestyle.sh)). See the [full template here](https://github.com/hexclave/stack-auth/blob/dev/docker/server/.env).
3. Run the Docker container:
```bash title="Terminal"
docker run --env-file -p 8101:8101 -p 8102:8102 stackauth/server:latest
```
For M-series Mac users, you might need to add `--platform linux/x86_64` to the `docker run` command.
For Linux users, you might need to add `--add-host=host.docker.internal:host-gateway` to the `docker run` command in order to connect to the local Postgres database.
Now you can open the dashboard at [http://localhost:8101](http://localhost:8101) and the API backend on port 8102.
Now, login with your admin account on the dashboard and follow the [normal setup process](../getting-started/setup.mdx). Add `NEXT_PUBLIC_STACK_API_URL=https://your-backend-url.com` to your app's environment variables so that it connects to your API backend instead of the default Stack Auth API backend ([https://api.stack-auth.com](https://api.stack-auth.com)).
## Local development
### Setup
Clone the repository and check out the directory:
```bash title="Terminal"
git clone git@github.com:stack-auth/stack-auth.git
cd stack-auth
```
Pre-populated .env files for the setup below are available and used by default in `.env.development` in each of the packages. (Note: If you're creating a production build (eg. with `pnpm run build`), you must supply the environment variables manually.)
In a new terminal:
```bash title="Terminal"
pnpm install
# Run build to build everything once
pnpm run build:dev
# reset & start the dependencies (DB, Inbucket, etc.) as Docker containers, seeding the DB with the Prisma schema
pnpm run start-deps
# pnpm run restart-deps
# pnpm run stop-deps
# Start the dev server
pnpm run dev
# For systems with limited resources, you can run a minimal development setup with just the backend and dashboard
# pnpm run dev:basic
# In a different terminal, run tests in watch mode
pnpm run test
```
You can now open the dev launchpad at [http://localhost:8100](http://localhost:8100). From there, you can navigate to the dashboard at [http://localhost:8101](http://localhost:8101), API on port 8102, demo on port 8103, docs on port 8104, Inbucket (e-mails) on port 8105, and Prisma Studio on port 8106. See the dev launchpad for a list of all running services.
Your IDE may show an error on all `@stackframe/XYZ` imports. To fix this, simply restart the TypeScript language server; for example, in VSCode you can open the command palette (Ctrl+Shift+P) and run `Developer: Reload Window` or `TypeScript: Restart TS server`.
You can also open Prisma Studio to see the database interface and edit data directly:
```bash title="Terminal"
pnpm run prisma studio
```
## Run individual services
### Database, Svix, email
Deploy these services with your preferred platform. Copy the URLs/API keys—you'll need them in the next step.
### API backend
Clone the repository and check out the root directory:
```bash title="Terminal"
git clone git@github.com:stack-auth/stack-auth.git
cd stack-auth
```
Set all the necessary environment variables (you can check out `apps/backend/.env`). Note that `NEXT_PUBLIC_STACK_API_URL` should be the URL of your deployed domain (e.g., [https://your-backend-url.com](https://your-backend-url.com)).
Build and start the server:
```bash title="Terminal"
pnpm install
pnpm build:backend
pnpm start:backend
```
### Dashboard
Clone the repository (if you are running it on a separate server, or skip this step if you are using the same server as the API backend) and check out the dashboard directory:
```bash title="Terminal"
git clone git@github.com:stack-auth/stack-auth.git
cd stack-auth
```
Set all the necessary environment variables (you can check out `apps/dashboard/.env`). Note that `NEXT_PUBLIC_STACK_API_URL` should be the URL of your deployed backend (e.g., [https://your-backend-url.com](https://your-backend-url.com)).
Build and start the server:
```bash title="Terminal"
pnpm install
pnpm build:dashboard
pnpm start:dashboard
```
### Initialize the database
You need to initialize the database with the following command with the backend environment variables set:
```bash title="Terminal"
pnpm db:init
```
Now you can go to the dashboard (e.g., [https://your-dashboard-url.com](https://your-dashboard-url.com)) and sign up for an account.
To manage your dashboard configs with this account, manually go into the database, find the user you just created, and add `{ managedProjectIds: ["internal"] }` to the `serverMetadata` jsonb column.
Go back to the dashboard, refresh the page, and you should see the "Stack Dashboard" project. We recommend disabling new user sign-ups to your internal project to avoid unauthorized account and project creations.
Now, create a new project for your app and follow the [normal setup process](../getting-started/setup.mdx). Add `NEXT_PUBLIC_STACK_API_URL=https://your-backend-url.com` to your app's environment variables so that it connects to your API backend instead of the default Stack Auth API backend ([https://api.stack-auth.com](https://api.stack-auth.com)).
# Supabase
URL: /docs/others/supabase
Source: /vercel/path0/docs/content/docs/(guides)/others/supabase.mdx
Integrate Stack Auth with Supabase RLS
***
title: Supabase
description: Integrate Stack Auth with Supabase RLS
---------------------------------------------------
This guide shows how to integrate Stack Auth with Supabase row level security (RLS).
This guide only focuses on the RLS/JWT integration and does not sync user data between Supabase and Stack. You should use [webhooks](/concepts/webhooks) to achieve data sync.
## Setup
Let's create a sample table and some RLS policies to demonstrate how to integrate Stack Auth with Supabase RLS. You can apply the same logic to your own tables and policies.
### Setup Supabase
First, let's create a Supabase project, then go to the [SQL Editor](https://supabase.com/dashboard/project/_/sql/new) and create a new table with some sample data and RLS policies.
```sql title="Supabase SQL Editor"
-- Create the 'data' table
CREATE TABLE data (
id bigint PRIMARY KEY,
text text NOT NULL,
user_id UUID
);
-- Insert sample data
INSERT INTO data (id, text, user_id) VALUES
(1, 'Everyone can see this', NULL),
(2, 'Only authenticated users can see this', NULL),
(3, 'Only user with specific id can see this', NULL);
-- Enable Row Level Security
ALTER TABLE data ENABLE ROW LEVEL SECURITY;
-- Allow everyone to read the first row
CREATE POLICY "Public read" ON "public"."data" TO public
USING (id = 1);
-- Allow authenticated users to read the second row
CREATE POLICY "Authenticated access" ON "public"."data" TO authenticated
USING (id = 2);
-- Allow only the owner of the row to read it
CREATE POLICY "User access" ON "public"."data" TO authenticated
USING (id = 3 AND auth.uid() = user_id);
```
### Setup a new Next.js project
Now let's create a new Next.js project and install Stack Auth and Supabase client. (more details on [Next.js setup](https://nextjs.org/docs/getting-started/installation), [Stack Auth setup](../getting-started/setup.mdx), and [Supabase setup](https://supabase.com/docs/guides/getting-started/quickstarts/nextjs))
```bash title="Terminal"
npx create-next-app@latest -e with-supabase stack-supabase
cd stack-supabase
npx @stackframe/stack-cli@latest init
```
Now copy the environment variables from the Supabase dashboard to the `.env.local` file:
* `NEXT_PUBLIC_SUPABASE_URL`
* `NEXT_PUBLIC_SUPABASE_ANON_KEY`
* `SUPABASE_JWT_SECRET`
Copy environment variables from the Stack dashboard to the `.env.local` file.
* `NEXT_PUBLIC_STACK_PROJECT_ID`
* `NEXT_PUBLIC_STACK_PUBLISHABLE_CLIENT_KEY`
* `STACK_SECRET_SERVER_KEY`
### Set up Supbase client
Now let's create a server action that mints a supabase JWT with the Stack Auth user ID if the user is authenticated.
```tsx title="/utils/actions.ts"
'use server';
import { stackServerApp } from "@/stack/server";
import * as jose from "jose";
export const getSupabaseJwt = async () => {
const user = await stackServerApp.getUser();
if (!user) {
return null;
}
const token = await new jose.SignJWT({
sub: user.id,
role: "authenticated",
})
.setProtectedHeader({ alg: "HS256" })
.setIssuedAt()
.setExpirationTime('1h')
.sign(new TextEncoder().encode(process.env.SUPABASE_JWT_SECRET));
return token;
};
```
And now create a helper function to create a Supabase client with the JWT signed by the server action
```tsx title="/utils/supabase-client.ts"
import { createBrowserClient } from "@supabase/ssr";
import { getSupabaseJwt } from "./actions";
export const createSupabaseClient = () => {
return createBrowserClient(
process.env.NEXT_PUBLIC_SUPABASE_URL!,
process.env.NEXT_PUBLIC_SUPABASE_ANON_KEY!,
{ accessToken: async () => await getSupabaseJwt() || "" }
);
}
```
### Fetch data from Supabase
Let's create an example page that fetches data from Supabase and displays it.
```tsx title="/app/page.tsx"
'use client';
import { createSupabaseClient } from "@/utils/supabase-client";
import { useStackApp, useUser } from "@stackframe/stack";
import Link from "next/link";
import { useEffect, useState } from "react";
export default function Page() {
const app = useStackApp();
const user = useUser();
const supabase = createSupabaseClient();
const [data, setData] = useState(null);
useEffect(() => {
supabase.from("data").select().then(({ data }) => setData(data ?? []));
}, []);
const listContent = data === null ?
Loading...
:
data.length === 0 ?
No notes found
:
data.map((note) => {note.text});
return (
{
user ?
<>
You are signed in
User ID: {user.id}
Sign Out
:
Sign In
}
Supabase data
Sign In URL: {stackApp.urls.signIn}
;
}
```
# useUser
URL: /docs/sdk/hooks/use-user
Source: /vercel/path0/docs/content/docs/sdk/hooks/use-user.mdx
***
## title: useUser
This standalone React hook is an alias for `useStackApp().useUser()`. It only exists for convenience; it does not have any additional functionality.
For more information, please refer to the [documentation for `stackClientApp.useUser()`](../objects/stack-app.mdx#stackclientappuseuseroptions).
# StackApp
URL: /docs/sdk/objects/stack-app
Source: /vercel/path0/docs/content/docs/sdk/objects/stack-app.mdx
***
title: StackApp
full: true
----------
This is a detailed reference for the `StackApp` object. If you're looking for a more high-level overview, please read the [respective page in the Concepts section](../../concepts/stack-app.mdx).
## Overview
* [StackClientApp](#stackclientapp) - Client-level permissions for frontend code
* [StackServerApp](#stackserverapp) - Server-level permissions with full access
***
# StackClientApp
A [`StackApp`](../../concepts/stack-app.mdx) with client-level permissions. It contains most of the useful methods and hooks for your client-side code.
{/* IF_PLATFORM: react-like */}
Most commonly you get an instance of `StackClientApp` by calling [`useStackApp()`](../hooks/use-stack-app.mdx) in a Client Component.
{/* END_PLATFORM */}
## Table of Contents
; //$stack-link-to:#stackclientappgetuseroptions
// NEXT_LINE_PLATFORM react-like
⤷ useUser([options]): User; //$stack-link-to:#stackclientappuseuseroptions
getProject(): Promise; //$stack-link-to:#stackclientappgetproject
// NEXT_LINE_PLATFORM react-like
⤷ useProject(): Project; //$stack-link-to:#stackclientappuseproject
signInWithOAuth(provider): void; //$stack-link-to:#stackclientappsigninwithoauthprovider
signInWithCredential([options]): Promise<...>; //$stack-link-to:#stackclientappsigninwithcredentialoptions
signUpWithCredential([options]): Promise<...>; //$stack-link-to:#stackclientappsignupwithcredentialoptions
sendForgotPasswordEmail(email): Promise<...>; //$stack-link-to:#stackclientappsendforgotpasswordemailemail
sendMagicLinkEmail(email): Promise<...>; //$stack-link-to:#stackclientappsendmagiclinkemailemail
};`}
/>
## Constructor
Creates a new `StackClientApp` instance.
Because each app creates a new connection to Stack Auth's backend, you should re-use existing instances wherever possible.
{/* IF_PLATFORM: react-like */}
This object is not usually constructed directly. More commonly, you would construct a [`StackServerApp`](#stackserverapp) instead, pass it into a [``](../../components/stack-provider.mdx), and then use `useStackApp()` hook to obtain a `StackClientApp`.
The [setup wizard](../../getting-started/setup.mdx) does these steps for you, so you don't need to worry about it unless you are manually setting up Stack Auth.
If you're building a client-only app and don't have a [`SECRET_SERVER_KEY`](../../rest-api/overview#should-i-use-client-or-server-access-type), you can construct a `StackClientApp` directly.
{/* END_PLATFORM */}
**Parameters:**
An object containing multiple properties.
```typescript
declare new(options: {
tokenStore: "nextjs-cookie" | "cookie" | { accessToken: string, refreshToken: string } | Request;
baseUrl?: string;
projectId?: string;
publishableClientKey?: string;
urls: {
...
};
noAutomaticPrefetch?: boolean;
}): StackClientApp;
```
Creating new app
Using useStackApp
```typescript
const stackClientApp = new StackClientApp({
tokenStore: "nextjs-cookie",
baseUrl: "https://api.stack-auth.com",
projectId: "123",
publishableClientKey: "123",
urls: {
home: "/",
},
});
```
{/* IF_PLATFORM: react-like */}
```typescript
"use client";
function MyReactComponent() {
const stackClientApp = useStackApp();
}
```
{/* END_PLATFORM */}
Gets the current user.
**Parameters:**
* `options?` (object) - Optional configuration
* `or?` - What to do if user not found: `"return-null"` | `"redirect"` | `"throw"`
**Returns:** `Promise` - The current user, or `null` if not signed in
```typescript
declare function getUser(
options?: {
or?: "return-null" | "redirect" | "throw"
}
): Promise;
```
```typescript
// Basic usage
const userOrNull = await stackClientApp.getUser();
console.log(userOrNull); // null if not signed in
// With redirect on no user
const user = await stackClientApp.getUser({ or: "redirect" });
console.log(user); // always defined; redirects to sign-in page if not signed in
```
{/* IF_PLATFORM: react-like */}
React hook version of `getUser()`. Functionally equivalent to [`getUser()`](#stackclientappgetuseroptions), but as a React hook.
Equivalent to the [`useUser()`](../hooks/use-user.mdx) standalone hook (which is an alias for `useStackApp().useUser()`).
**Parameters:**
* `options?` (object) - Same as `getUser()`
**Returns:** `CurrentUser | null`
```typescript
declare function useUser(
options?: {
or?: "return-null" | "redirect" | "throw"
}
): CurrentUser | null;
```
Basic Usage
With Redirect
Page Protection
```jsx
"use client";
function MyReactComponent() {
const user = useUser();
return user ? Hello, {user.name}
: Not signed in
;
}
```
```tsx
"use client";
function MyReactComponent() {
const user = useUser();
console.log(user); // null if not signed in
const user = useUser({ or: "redirect" }); // redirects to sign-in page if necessary
console.log(user); // always defined
const user = useUser({ or: "throw" }); // throws an error if not signed in
console.log(user); // always defined
}
```
```tsx
"use client";
function MyProtectedComponent() {
// Note: This component is protected on the client-side.
// It does not protect against malicious users, since
// they can just comment out the `useUser` call in their
// browser's developer console.
//
// For server-side protection, see the Stack Auth documentation.
useUser({ or: "redirect" });
return You can only see this if you are authenticated
;
}
```
{/* END_PLATFORM */}
Gets the current project.
**Parameters:**
* No parameters
**Returns:** `Promise`
```typescript
declare function getProject(): Promise;
```
```typescript
const project = await stackClientApp.getProject();
```
{/* IF_PLATFORM: react-like */}
React hook version of `getProject()`.
**Parameters:**
* No parameters
**Returns:** `Project`
```typescript
declare function useProject(): Project;
```
getting the current project in a react component
```typescript
function MyReactComponent() {
const project = useProject();
}
```
{/* END_PLATFORM */}
Initiates the OAuth sign-in process with the specified provider.
**Parameters:**
* `provider` (string) - The OAuth provider type
**Returns:** `Promise`
```typescript
declare function signInWithOAuth(provider: string): Promise;
```
```typescript
await stackClientApp.signInWithOAuth("google");
```
Sign in using email and password credentials.
**Parameters:**
* `options` (object)
* `email` (string) - User's email
* `password` (string) - User's password
* `noRedirect?` (boolean) - Whether to skip redirect after sign-in
**Returns:** `Promise>`
```typescript
declare function signInWithCredential(options: {
email: string;
password: string;
noRedirect?: boolean;
}): Promise>;
```
```typescript
const result = await stackClientApp.signInWithCredential({
email: "test@example.com",
password: "password",
});
if (result.status === "error") {
console.error("Sign in failed", result.error.message);
}
```
Sign up using email and password credentials.
**Parameters:**
* `options` (object)
* `email` (string) - User's email
* `password` (string) - User's password
* `noRedirect?` (boolean) - Whether to skip redirect after sign-up
**Returns:** `Promise>`
```typescript
declare function signUpWithCredential(options: {
email: string;
password: string;
noRedirect?: boolean;
}): Promise>;
```
```typescript
const result = await stackClientApp.signUpWithCredential({
email: "test@example.com",
password: "password",
});
if (result.status === "error") {
console.error("Sign up failed", result.error.message);
}
```
Send a forgot password email to an email address.
**Parameters:**
* `email` (string) - The email to send the forgot password email to
**Returns:** `Promise>`
```typescript
declare function sendForgotPasswordEmail(email: string): Promise>;
```
```typescript
const result = await stackClientApp.sendForgotPasswordEmail("test@example.com");
if (result.status === "success") {
console.log("Forgot password email sent");
} else {
console.error("Failed to send forgot password email", result.error.message);
}
```
Send a magic link/OTP sign-in email to an email address.
**Parameters:**
* `email` (string) - The email to send the magic link to
**Returns:** `Promise>`
```typescript
declare function sendMagicLinkEmail(email: string): Promise>;
```
```typescript
const result = await stackClientApp.sendMagicLinkEmail("test@example.com");
```
***
# StackServerApp
Like `StackClientApp`, but with [server permissions](../../concepts/stack-app.mdx#client-vs-server). Has full read and write access to all users.
Since this functionality should only be available in environments you trust (ie. your own server), it requires a [`SECRET_SERVER_KEY`](../../rest-api/overview.mdx).
In some cases, you may want to use a [`StackServerApp`](#stackserverapp) on the client; an example for this is an internal dashboard that only your own employees have access to.
We generally recommend against doing this unless you are aware of and protected against the (potentially severe) security implications of
exposing [`SECRET_SERVER_KEY`](../../rest-api/overview.mdx) on the client.
## Table of Contents
; //$stack-link-to:#stackserverappgetuseridoptions
// NEXT_LINE_PLATFORM react-like
⤷ useUser([id][, options]): ServerUser; //$stack-link-to:#stackserverappuseuseridoptions
listUsers([options]): Promise; //$stack-link-to:#stackserverapplistusersoptions
// NEXT_LINE_PLATFORM react-like
⤷ useUsers([options]): ServerUser[]; //$stack-link-to:#stackserverappuseusersoptions
createUser([options]): Promise; //$stack-link-to:#stackserverappcreateuseroptions
sendEmail(options): Promise>; //$stack-link-to:#stackserverappsendemailoptions
getTeam(id): Promise; //$stack-link-to:#stackserverappgetteamid
// NEXT_LINE_PLATFORM react-like
⤷ useTeam(id): ServerTeam; //$stack-link-to:#stackserverappuseteamid
listTeams([options]): Promise; //$stack-link-to:#stackserverapplistteamsoptions
// NEXT_LINE_PLATFORM react-like
⤷ useTeams([options]): ServerTeam[]; //$stack-link-to:#stackserverappuseteamsoptions
listTeamsPaginated([options]): Promise<{ items: ServerTeam[], nextCursor: string | null }>; //$stack-link-to:#stackserverapplistteamspaginatedoptions
// NEXT_LINE_PLATFORM react-like
⤷ useTeamsPaginated([options]): { items: ServerTeam[], nextCursor: string | null }; //$stack-link-to:#stackserverappuseteamspaginatedoptions
createTeam([options]): Promise; //$stack-link-to:#stackserverappcreateteamoptions
}`}
/>
## Constructor
Creates a new `StackClientApp` instance.
**Parameters:**
An object containing multiple properties.
The secret server key of the app, as found on Stack Auth's dashboard. Defaults to the value of the `SECRET_SERVER_KEY` environment variable.
```typescript
declare new(options: {
tokenStore: "nextjs-cookie" | "cookie" | { accessToken: string, refreshToken: string } | Request;
baseUrl?: string;
projectId?: string;
publishableClientKey?: string;
urls: {
...
};
noAutomaticPrefetch?: boolean;
}): StackServerApp;
```
Create a StackServerApp with a custom sign-in page
```typescript
const stackServerApp = new StackServerApp({
tokenStore: "nextjs-cookie",
urls: {
signIn: '/my-custom-sign-in-page',
},
});
```
Enhanced version of `StackClientApp.getUser()` with server permissions.
**Overloads:**
1. `getUser(id: string): Promise` - Get user by ID
2. `getUser(options?: { or?: "return-null" | "redirect" | "throw" }): Promise` - Get current user
```typescript
// This function has two overloads:
declare function getUser(id: string): Promise;
declare function getUser(
options?: {
or?: "return-null" | "redirect" | "throw"
}
): Promise;
```
Get Current User
Get User by ID
```typescript
const user = await stackServerApp.getUser();
console.log(user); // CurrentServerUser
```
```typescript
const user = await stackServerApp.getUser("12345678-1234-1234-1234-123456789abc");
console.log(user); // ServerUser
```
{/* IF_PLATFORM react-like */}
Functionally equivalent to [`getUser()`](#stackserverappgetuserid-options), but as a React hook.
This should be used on the server-side only.
{/* END_PLATFORM */}
Lists all users on the project.
**Parameters:**
An object containing multiple properties.
The cursor to start the result set from.
The maximum number of items to return. If not provided, it will return all users.
The field to sort the results by. Currently, only `signedUpAt` is supported.
Whether to sort the results in descending order.
A query to filter the results by. This is a free-text search on the user's display name and emails.
**Returns:** `Promise`
```typescript
declare function listUsers(options?: {
cursor?: string;
limit?: number;
orderBy?: "signedUpAt";
desc?: boolean;
query?: string;
}): Promise;
```
```typescript
const users = await stackServerApp.listUsers({ limit: 20 });
console.log(users);
if (users.nextCursor) {
const nextPageUsers = await stackServerApp.listUsers({
cursor: users.nextCursor,
limit: 20
});
console.log(nextPageUsers);
}
```
{/* IF_PLATFORM react-like */}
Functionally equivalent to [`listUsers()`](#stackserverapplistusersoptions), but as a React hook.
This should be used on the server-side only.
{/* END_PLATFORM */}
Creates a new user from the server.
**Parameters:**
* `options?` (object)
* `primaryEmail?` (string) - User's primary email
* `primaryEmailVerified?` (boolean) - Whether email is verified
* `primaryEmailAuthEnabled?` (boolean) - Whether email auth is enabled
* `password?` (string) - User's password
* `otpAuthEnabled?` (boolean) - Enable OTP/magic link auth
* `displayName?` (string) - User's display name
**Returns:** `Promise`
```typescript
declare function createUser(options?: {
primaryEmail?: string;
primaryEmailVerified?: boolean;
primaryEmailAuthEnabled?: boolean;
password?: string;
otpAuthEnabled?: boolean;
displayName?: string;
}): Promise;
```
Password Auth
Magic Link Auth
```typescript
const user = await stackServerApp.createUser({
primaryEmail: "test@example.com",
primaryEmailAuthEnabled: true,
password: "password123",
});
```
```typescript
const user = await stackServerApp.createUser({
primaryEmail: "test@example.com",
primaryEmailVerified: true,
primaryEmailAuthEnabled: true,
otpAuthEnabled: true,
});
```
Send custom emails to users. You can send either custom HTML emails or use predefined templates with variables.
**Parameters:**
* `options` ([SendEmailOptions](../types/email#sendemailoptions)) - Email configuration and content
**Returns:** `Promise>`
The method returns a `Result` object that can contain specific error types:
* `RequiresCustomEmailServer` - No custom email server configured
* `SchemaError` - Invalid email data provided
* `UserIdDoesNotExist` - One or more user IDs don't exist
```typescript
declare function sendEmail(options: SendEmailOptions): Promise>;
```
Send HTML Email
Send Template Email
```typescript
const result = await stackServerApp.sendEmail({
userIds: ['user-1', 'user-2'],
subject: 'Welcome to our platform!',
html: 'Welcome!
Thanks for joining us.
',
});
if (result.status === 'error') {
console.error('Failed to send email:', result.error);
}
```
```typescript
const result = await stackServerApp.sendEmail({
userIds: ['user-1'],
templateId: 'welcome-template',
variables: {
userName: 'John Doe',
activationUrl: 'https://app.com/activate/token123',
},
});
if (result.status === 'error') {
console.error('Failed to send email:', result.error);
}
```
## Team Management
Get a team by its ID.
**Parameters:**
* `id` (string) - Team ID
**Returns:** `Promise`
```typescript
declare function getTeam(id: string): Promise;
```
```typescript
const team = await stackServerApp.getTeam("team_id_123");
```
{/* IF_PLATFORM react-like */}
Functionally equivalent to [`getTeam(id)`](#stackserverappgetteamid), but as a React hook.
This should be used on the server-side only.
{/* END_PLATFORM */}
Lists all teams on the current project.
**Parameters:**
The field to sort the results by. Currently, only `createdAt` is supported.
Whether to sort the results in descending order.
**Returns:** `Promise`
For cursor-based pagination over teams, see [`listTeamsPaginated`](#stackserverapplistteamspaginatedoptions).
```typescript
declare function listTeams(options?: {
orderBy?: "createdAt";
desc?: boolean;
}): Promise;
```
```typescript
const teams = await stackServerApp.listTeams();
console.log(teams);
```
{/* IF_PLATFORM react-like */}
Functionally equivalent to [`listTeams()`](#stackserverapplistteamsoptions), but as a React hook.
This should be used on the server-side only.
{/* END_PLATFORM */}
Lists teams on the current project with cursor-based pagination, optional filtering, and ordering. The returned array carries an extra `nextCursor` property; pass it back as `cursor` to load the next page.
**Parameters:**
The cursor to start the result set from. Use `nextCursor` from a previous response.
The maximum number of items to return. If omitted, all matching teams are returned.
The field to sort the results by. Currently, only `createdAt` is supported.
Whether to sort the results in descending order.
A free-text query that matches against the team's display name (and team ID if the query is a UUID).
**Returns:** `Promise<{ items: ServerTeam[]; nextCursor: string | null }>`
```typescript
declare function listTeamsPaginated(options?: {
cursor?: string;
limit?: number;
orderBy?: "createdAt";
desc?: boolean;
query?: string;
}): Promise<{ items: ServerTeam[]; nextCursor: string | null }>;
```
```typescript
const { items, nextCursor } = await stackServerApp.listTeamsPaginated({ limit: 20 });
console.log(items);
if (nextCursor) {
const nextPage = await stackServerApp.listTeamsPaginated({
cursor: nextCursor,
limit: 20,
});
console.log(nextPage.items);
}
```
{/* IF_PLATFORM react-like */}
Functionally equivalent to [`listTeamsPaginated()`](#stackserverapplistteamspaginatedoptions), but as a React hook.
This should be used on the server-side only.
{/* END_PLATFORM */}
Creates a team without adding a user to it.
**Parameters:**
* `data` (object)
* `displayName` (string) - Team display name
* `profileImageUrl?` (string | null) - Team profile image URL
**Returns:** `Promise`
```typescript
declare function createTeam(data: {
displayName: string;
profileImageUrl?: string | null;
}): Promise;
```
```typescript
const team = await stackServerApp.createTeam({
displayName: "New Team",
profileImageUrl: "https://example.com/profile.jpg",
});
```
# ApiKey
URL: /docs/sdk/types/api-key
Source: /vercel/path0/docs/content/docs/sdk/types/api-key.mdx
***
title: ApiKey
full: true
----------
`ApiKey` represents an authentication token that allows programmatic access to your application's backend. API keys can be associated with individual users or teams.
On this page:
* [`ApiKey`](#apikey)
* Types:
* [`UserApiKey`](#userapikey)
* [`TeamApiKey`](#teamapikey)
***
# `ApiKey`
API keys provide a way for users to authenticate with your backend services without using their primary credentials. They can be created for individual users or for teams, allowing programmatic access to your application.
API keys can be obtained through:
* [`user.createApiKey()`](../types/user.mdx#currentusercreateapikeyoptions)
* [`user.listApiKeys()`](../types/user.mdx#currentuserlistapikeys)
* [`user.useApiKeys()`](../types/user.mdx#currentuseruseapikeys) (React hook)
* [`team.createApiKey()`](../types/team.mdx#teamcreateapikeyoptions)
* [`team.listApiKeys()`](../types/team.mdx#teamlistapikeys)
* [`team.useApiKeys()`](../types/team.mdx#teamuseapikeys) (React hook)
### Table of Contents
= {
id: string; //$stack-link-to:#apikeyid
description: string; //$stack-link-to:#apikeydescription
expiresAt?: Date; //$stack-link-to:#apikeyexpiresat
manuallyRevokedAt: Date | null; //$stack-link-to:#apikeymanuallyrevokedat
createdAt: Date; //$stack-link-to:#apikeycreatedat
value: IsFirstView extends true ? string : { lastFour: string }; //$stack-link-to:#apikeyvalue
// User or Team properties based on Type
...(Type extends "user" ? {
type: "user";
userId: string; //$stack-link-to:#apikeyuserid
} : {
type: "team";
teamId: string; //$stack-link-to:#apikeyteamid
})
// Methods
isValid(): boolean; //$stack-link-to:#apikeyisvalid
whyInvalid(): "manually-revoked" | "expired" | null; //$stack-link-to:#apikeywhyinvalid
revoke(): Promise; //$stack-link-to:#apikeyrevoke
update(options): Promise; //$stack-link-to:#apikeyupdateoptions
};`}
/>
***
The unique identifier for this API key.
```typescript
declare const id: string;
```
A human-readable description of the API key's purpose.
```typescript
declare const description: string;
```
The date and time when this API key will expire. If not set, the key does not expire.
```typescript
declare const expiresAt?: Date;
```
The date and time when this API key was manually revoked. If null, the key has not been revoked.
```typescript
declare const manuallyRevokedAt: Date | null;
```
The date and time when this API key was created.
```typescript
declare const createdAt: Date;
```
The value of the API key. When the key is first created, this is the full API key string. After that, only the last four characters are available for security reasons.
```typescript
// On first creation
declare const value: string;
// On subsequent retrievals
declare const value: { lastFour: string };
```
For user API keys, the ID of the user that owns this API key.
```typescript
declare const userId: string;
```
For team API keys, the ID of the team that owns this API key.
```typescript
declare const teamId: string;
```
Checks if the API key is still valid (not expired and not revoked).
### Parameters
None.
### Returns
`boolean`: True if the key is valid, false otherwise.
```typescript
declare function isValid(): boolean;
```
```typescript Checking if an API key is valid
if (apiKey.isValid()) {
console.log("API key is still valid");
} else {
console.log("API key is invalid");
}
```
Returns the reason why the API key is invalid, or null if it is valid.
### Parameters
None.
### Returns
`"manually-revoked" | "expired" | null`: The reason the key is invalid, or null if it's valid.
```typescript
declare function whyInvalid(): "manually-revoked" | "expired" | null;
```
```typescript Checking why an API key is invalid
const reason = apiKey.whyInvalid();
if (reason) {
console.log(`API key is invalid because it was ${reason}`);
} else {
console.log("API key is valid");
}
```
Revokes the API key, preventing it from being used for authentication.
### Parameters
None.
### Returns
`Promise`
```typescript
declare function revoke(): Promise;
```
```typescript Revoking an API key
await apiKey.revoke();
console.log("API key has been revoked");
```
Updates the API key properties.
### Parameters
An object containing properties for updating.
A new description for the API key.
A new expiration date, or null to remove the expiration.
Set to true to revoke the API key.
### Returns
`Promise`
```typescript
declare function update(options: {
description?: string;
expiresAt?: Date | null;
revoked?: boolean;
}): Promise;
```
```typescript Updating an API key
await apiKey.update({
description: "Updated description",
expiresAt: new Date(Date.now() + 60 * 24 * 60 * 60 * 1000), // 60 days
});
```
***
# Types
A type alias for an API key owned by a user.
```typescript
type UserApiKey = ApiKey<"user", false>;
```
A type alias for a newly created user API key, which includes the full key value instead of just the last four characters.
```typescript
type UserApiKeyFirstView = ApiKey<"user", true>;
```
A type alias for an API key owned by a team.
```typescript
type TeamApiKey = ApiKey<"team", false>;
```
A type alias for a newly created team API key, which includes the full key value instead of just the last four characters.
```typescript
type TeamApiKeyFirstView = ApiKey<"team", true>;
```
***
# Creation Options
When creating an API key using [`user.createApiKey()`](../types/user.mdx#currentusercreatekeyoptions) or [`team.createApiKey()`](../types/team.mdx#teamcreatekeyoptions), you need to provide an options object.
The options object for creating an API key.
### Properties
A human-readable description of the API key's purpose.
The date when the API key will expire. Use null for keys that don't expire.
Whether the API key is public. Defaults to false.
* **Secret API Keys** (default) are monitored by Stack Auth's secret scanner, which can revoke them if detected in public code repositories.
* **Public API Keys** are designed for client-side code where exposure is not a concern.
```typescript
type ApiKeyCreationOptions = {
description: string;
expiresAt: Date | null;
isPublic?: boolean;
};
```
```typescript Creating a user API key
// Get the current user
const user = await stackApp.getUser();
// Create a secret API key (default)
const secretKey = await user.createApiKey({
description: "Backend integration",
expiresAt: new Date(Date.now() + 90 * 24 * 60 * 60 * 1000), // 90 days
isPublic: false,
});
// Create a public API key
const publicKey = await user.createApiKey({
description: "Client-side access",
expiresAt: new Date(Date.now() + 30 * 24 * 60 * 60 * 1000), // 30 days
isPublic: true,
});
```
# ConnectedAccount
URL: /docs/sdk/types/connected-account
Source: /vercel/path0/docs/content/docs/sdk/types/connected-account.mdx
***
title: ConnectedAccount
full: true
----------
`OAuthConnection` represents an OAuth connection to an external provider (like Google, GitHub, etc.) that is linked to a user. You can use connected accounts to access the user's data on those platforms, such as reading Google Drive files or sending emails via Gmail.
For a guide on how to use connected accounts, see the [OAuth guide](../../apps/oauth).
On this page:
* [`Connection`](#connection)
* [`OAuthConnection`](#oauthconnection)
# `Connection`
Basic information about a connected account. This is the base type that `OAuthConnection` extends.
### Table of Contents
The provider config ID. This is the same as `provider` and exists for backward compatibility.
```typescript
declare const id: string;
```
The provider config ID (e.g., `"google"`, `"github"`).
```typescript
declare const provider: string;
```
The account ID from the OAuth provider (e.g., the Google user ID).
```typescript
declare const providerAccountId: string;
```
***
# `OAuthConnection`
Extends `Connection` with methods to retrieve OAuth access tokens. Get it with:
* [`user.getConnectedAccount({ provider, providerAccountId })`](../types/user.mdx#currentusergetconnectedaccount)
* [`user.useConnectedAccount({ provider, providerAccountId })`](../types/user.mdx#currentuseruseconnectedaccount) {/* THIS_LINE_PLATFORM react-like */}
* [`user.listConnectedAccounts()`](../types/user.mdx#currentuserlistconnectedaccounts)
* [`user.useConnectedAccounts()`](../types/user.mdx#currentuseruseconnectedaccounts) {/* THIS_LINE_PLATFORM react-like */}
* [`user.getOrLinkConnectedAccount(provider)`](../types/user.mdx#currentusergetorlinkconnectedaccount)
* [`user.useOrLinkConnectedAccount(provider)`](../types/user.mdx#currentuseruseorlinkconnectedaccount) {/* THIS_LINE_PLATFORM react-like */}
### Table of Contents
; //$stack-link-to:#oauthconnectiongetaccesstokenoptions
useAccessToken(options?): Result; //$stack-link-to:#oauthconnectionuseaccesstokenoptions
};`}
/>
***
Gets an OAuth access token for this connected account. The token can be used to call the provider's APIs on the user's behalf.
Returns a `Result` object:
* On success: `{ status: "ok", data: { accessToken: string } }`
* On error: `{ status: "error", error: OAuthAccessTokenNotAvailable }` if the refresh token has been revoked/expired or the requested scopes are not available.
### Parameters
If provided, only returns a token that has all of these scopes. If the current token doesn't have the required scopes, the result will be an error.
### Returns
`Promise>`
```typescript
declare function getAccessToken(options?: {
scopes?: string[];
}): Promise>;
```
```typescript Getting an access token
const result = await account.getAccessToken();
if (result.status === "ok") {
const { accessToken } = result.data;
// Use accessToken to call provider APIs
}
```
```typescript With scopes
const result = await account.getAccessToken({
scopes: ["https://www.googleapis.com/auth/drive.readonly"],
});
```
{/* THIS_LINE_PLATFORM react-like */}
React hook version of `getAccessToken`. Returns the access token result reactively.
Returns a `Result` object:
* On success: `{ status: "ok", data: { accessToken: string } }`
* On error: `{ status: "error", error: OAuthAccessTokenNotAvailable }` if the refresh token has been revoked/expired or the requested scopes are not available.
### Parameters
If provided, only returns a token that has all of these scopes.
### Returns
`Result<{ accessToken: string }, OAuthAccessTokenNotAvailable>`
```typescript
declare function useAccessToken(options?: {
scopes?: string[];
}): Result<
{ accessToken: string },
OAuthAccessTokenNotAvailable
>;
```
```tsx Using the access token hook
function MyComponent() {
const user = useUser({ or: "redirect" });
const accounts = user.useConnectedAccounts();
const googleAccount = accounts.find(
a => a.provider === "google"
);
const result = googleAccount?.useAccessToken();
if (result?.status === "ok") {
return Token: {result.data.accessToken}
;
}
return No Google token available
;
}
```
# ContactChannel
URL: /docs/sdk/types/contact-channel
Source: /vercel/path0/docs/content/docs/sdk/types/contact-channel.mdx
***
title: ContactChannel
full: true
----------
`ContactChannel` represents a user's contact information, such as an email address or phone number. Some auth methods, like OTP/magic link or password, use contact channels for authentication.
On this page:
* [`ContactChannel`](#contactchannel)
* [`ServerContactChannel`](#servercontactchannel)
# `ContactChannel`
Basic information about a contact channel, as seen by a user themselves.
Usually obtained by calling [`user.listContactChannels()`](../types/user.mdx#currentuserlistcontactchannels)
or [`user.useContactChannels()`](../types/user.mdx#currentuserusecontactchannels) {/* THIS_LINE_PLATFORM react-like */}
.
### Table of Contents
; //$stack-link-to:#contactchannelsendverificationemail
update(options): Promise; //$stack-link-to:#contactchannelupdateoptions
delete(): Promise; //$stack-link-to:#contactchanneldelete
};`}
/>
The id of the contact channel as a `string`.
```typescript
declare const id: string;
```
The value of the contact channel. If type is `"email"`, this is an email address.
```typescript
declare const value: string;
```
The type of the contact channel. Currently always `"email"`.
```typescript
declare const type: 'email';
```
Indicates whether the contact channel is the user's primary contact channel. If an email is set to primary, it will be the value on the `user.primaryEmail` field.
```typescript
declare const isPrimary: boolean;
```
Indicates whether the contact channel is verified.
```typescript
declare const isVerified: boolean;
```
Indicates whether the contact channel is used for authentication. If set to `true`, the user can use this contact channel with OTP or password to sign in.
```typescript
declare const usedForAuth: boolean;
```
Sends a verification email to this contact channel. Once the user clicks the verification link in the email, the contact channel will be marked as verified.
### Parameters
None.
### Returns
`Promise`
```typescript
declare function sendVerificationEmail(): Promise;
```
```typescript Sending verification email
await contactChannel.sendVerificationEmail();
```
Updates the contact channel. After updating the value, the contact channel will be marked as unverified.
### Parameters
An object containing properties for updating.
The new value of the contact channel.
The new type of the contact channel. Currently always `"email"`.
Indicates whether the contact channel is used for authentication.
Indicates whether the contact channel is the user's primary contact channel.
### Returns
`Promise`
```typescript
declare function update(options: {
value?: string;
type?: 'email';
usedForAuth?: boolean;
isPrimary?: boolean;
}): Promise;
```
```typescript Updating contact channel
await contactChannel.update({
value: "new-email@example.com",
usedForAuth: true,
});
```
Deletes the contact channel.
### Parameters
None.
### Returns
`Promise`
```typescript
declare function delete(): Promise;
```
```typescript Deleting contact channel
await contactChannel.delete();
```
# `ServerContactChannel`
Like `ContactChannel`, but includes additional methods and properties that require the `SECRET_SERVER_KEY`.
Usually obtained by calling [`serverUser.listContactChannels()`](../types/user.mdx#serveruserlistcontactchannels)
or [`serverUser.useContactChannels()`](../types/user.mdx#serveruserusecontactchannels) {/* THIS_LINE_PLATFORM react-like */}
.
### Table of Contents
; //$stack-link-to:#servercontactchannelupdateoptions
};`}
/>
***
Updates the contact channel.
This method is similar to the one on `ContactChannel`, but also allows setting the `isVerified` property.
### Parameters
An object containing properties for updating.
The new value of the contact channel.
The new type of the contact channel. Currently always `"email"`.
Indicates whether the contact channel is used for authentication.
Indicates whether the contact channel is verified.
Indicates whether the contact channel is the user's primary contact channel.
### Returns
`Promise`
```typescript
declare function update(options: {
value?: string;
type?: 'email';
usedForAuth?: boolean;
isVerified?: boolean;
isPrimary?: boolean;
}): Promise;
```
```typescript Updating server contact channel
await serverContactChannel.update({
value: "new-email@example.com",
usedForAuth: true,
isVerified: true,
});
```
# Customer
URL: /docs/sdk/types/customer
Source: /vercel/path0/docs/content/docs/sdk/types/customer.mdx
***
title: Customer
full: true
----------
The `Customer` interface provides payment and item management functionality that is shared between users and teams. Both [`CurrentUser`](../types/user.mdx#currentuser) and [`Team`](../types/team.mdx#team) types extend this interface, allowing them to create checkout URLs and manage items.
On this page:
* [Customer](#customer)
***
# `Customer`
The `Customer` interface defines the payment-related functionality available to both users and teams. It provides methods for creating checkout URLs for purchases and managing quantifiable items like credits, API calls, or subscription allowances.
This interface is automatically available on:
* [`CurrentUser`](../types/user.mdx#currentuser) objects
* [`Team`](../types/team.mdx#team) objects
* [`ServerUser`](../types/user.mdx#serveruser) objects (with additional server-side capabilities)
* [`ServerTeam`](../types/team.mdx#serverteam) objects (with additional server-side capabilities)
### Table of Contents
; //$stack-link-to:#customercreatecheckouturl
getItem(itemId): Promise- ; //$stack-link-to:#customergetitem
// NEXT_LINE_PLATFORM react-like
⤷ useItem(itemId): Item; //$stack-link-to:#customeruseitem
};`}
/>
The unique identifier for the customer. For users, this is the user ID; for teams, this is the team ID.
```typescript
declare const id: string;
```
Creates a secure checkout URL for purchasing a product. This method integrates with Stripe to generate a payment link that handles the entire purchase flow.
The checkout URL will redirect users to a Stripe-hosted payment page where they can complete their purchase. After successful payment, users will be redirected back to your application.
### Parameters
Options for creating the checkout URL.
The ID of the product to purchase, as configured in your Stack Auth project settings.
### Returns
`Promise`: A secure URL that redirects to the Stripe checkout page for the specified product.
```typescript
declare function createCheckoutUrl(options: {
productId: string;
}): Promise;
```
```typescript User purchasing a subscription
const user = useUser({ or: "redirect" });
const handleUpgrade = async () => {
try {
const checkoutUrl = await user.createCheckoutUrl({
productId: "prod_premium_monthly",
});
// Redirect to Stripe checkout
window.location.href = checkoutUrl;
} catch (error) {
console.error("Failed to create checkout URL:", error);
}
};
```
```typescript Team purchasing additional seats
const team = await user.getTeam("team_123");
const purchaseSeats = async () => {
const checkoutUrl = await team.createCheckoutUrl({
productId: "prod_additional_seats",
});
// Open checkout in new tab
window.open(checkoutUrl, '_blank');
};
```
Retrieves information about a specific item associated with this customer. Items represent quantifiable resources such as credits, API calls, storage quotas, or subscription allowances.
### Parameters
The ID of the item to retrieve, as configured in your Stack Auth project settings.
### Returns
`Promise
- `: An [`Item`](../types/item.mdx#item) object containing the display name, current quantity, and other details.
```typescript
declare function getItem(itemId: string): Promise- ;
```
```typescript Checking user credits
const user = useUser({ or: "redirect" });
const checkCredits = async () => {
const credits = await user.getItem("credits");
console.log(`Available credits: ${credits.nonNegativeQuantity}`);
console.log(`Actual balance: ${credits.quantity}`);
};
```
```typescript Checking team API quota
const team = await user.getTeam("team_123");
const apiQuota = await team.getItem("api_calls");
if (apiQuota.nonNegativeQuantity < 100) {
console.warn("Team is running low on API calls");
}
```
{/* IF_PLATFORM next */}
Retrieves information about a specific item associated with this customer, used as a React hook. This provides real-time updates when the item quantity changes.
### Parameters
The ID of the item to retrieve.
### Returns
`Item`: An [`Item`](../types/item.mdx#item) object containing the display name, current quantity, and other details.
```typescript
declare function useItem(itemId: string): Item;
```
```typescript Real-time credits display
function CreditsWidget() {
const user = useUser({ or: "redirect" });
const credits = user.useItem("credits");
return (
Available Credits
{credits.nonNegativeQuantity}
{credits.displayName}
);
}
```
```typescript Team quota monitoring
function TeamQuotaStatus({ teamId }: { teamId: string }) {
const user = useUser({ or: "redirect" });
const team = user.useTeam(teamId);
const apiCalls = team.useItem("api_calls");
const usagePercentage = (apiCalls.quantity / 10000) * 100;
return (
{apiCalls.quantity.toLocaleString()} / 10,000 API calls used
);
}
```
{/* END_PLATFORM */}
## Usage Notes
### Payment Flow
When using `createCheckoutUrl()`, the typical flow is:
1. **Create checkout URL**: Call `createCheckoutUrl()` with the desired product ID
2. **Redirect to Stripe**: Direct the user to the returned URL
3. **User completes payment**: Stripe handles the payment process
4. **Webhook processing**: Stack Auth receives webhook notifications from Stripe
5. **Item allocation**: Purchased items are automatically added to the customer's account
6. **User returns**: User is redirected back to your application
### Item Management
Items are automatically managed through the payment system:
* **Purchases**: When a user completes a purchase, associated items are automatically added
* **Subscriptions**: Recurring subscriptions automatically replenish items at the specified intervals
* **Manual allocation**: Server-side code can manually adjust item quantities using [`ServerItem`](../types/item.mdx#serveritem) methods
### Security Considerations
* **Client-side safety**: All payment operations are designed to be safe for client-side use
* **Server validation**: Critical operations should always be validated on the server side
* **Race conditions**: Use [`tryDecreaseQuantity()`](../types/item.mdx#serveritemtrydecreasequantity) for atomic, race-condition-free item consumption
# Email
URL: /docs/sdk/types/email
Source: /vercel/path0/docs/content/docs/sdk/types/email.mdx
***
title: Email
full: true
----------
This is a detailed reference for email-related types in Stack Auth. If you're looking for a more high-level overview, please refer to our [guide on the email system](../../concepts/emails.mdx).
On this page:
* [SendEmailOptions](#sendemailoptions)
***
# `SendEmailOptions`
Options for sending emails via the `sendEmail` method on `StackServerApp`.
### Table of Contents
; //$stack-link-to:#sendemailoptionsvariables
};`}
/>
An array of user IDs that will receive the email. All users must exist in your Stack Auth project.
```typescript
userIds: string[]
```
```typescript
{
userIds: ['user-1', 'user-2', 'user-3'],
// ... other options
}
```
Optional theme ID to apply to the email. Use `null` for no theme, `false` to use the default theme, or a string ID for a specific theme.
```typescript
themeId?: string | null | false
```
```typescript
{
themeId: 'corporate-theme-id',
// or
themeId: null, // no theme
// or
themeId: false, // default theme
// ... other options
}
```
Optional email subject line. If using a template, this overrides the template's default subject.
```typescript
subject?: string
```
```typescript
{
subject: 'Welcome to our platform!',
// ... other options
}
```
Optional notification category name for user preferences. Users can opt in or out of specific categories through their account settings.
```typescript
notificationCategoryName?: string
```
```typescript
{
notificationCategoryName: 'product_updates',
// ... other options
}
```
Custom HTML content for the email. Use this option when you want to send a custom HTML email instead of using a template. Cannot be used together with `templateId` or `variables`.
```typescript
html?: string
```
```typescript
{
userIds: ['user-1'],
html: 'Welcome!
Thanks for joining us.
',
subject: 'Welcome to our platform'
}
```
ID of the email template to use. Use this option when you want to send a template-based email with variables. Cannot be used together with `html`.
```typescript
templateId?: string
```
```typescript
{
userIds: ['user-1'],
templateId: 'welcome-template',
variables: {
userName: 'John Doe',
activationUrl: 'https://app.com/activate/token123'
}
}
```
Optional variables to substitute in the template. Only used when `templateId` is provided.
```typescript
variables?: Record
```
```typescript
{
templateId: 'welcome-template',
variables: {
userName: 'John Doe',
activationUrl: 'https://app.com/activate/token123',
supportEmail: 'support@yourapp.com'
}
}
```
# Item
URL: /docs/sdk/types/item
Source: /vercel/path0/docs/content/docs/sdk/types/item.mdx
***
title: Item
full: true
----------
Items represent quantifiable resources in your application, such as credits, API calls, storage quotas, or subscription allowances. They can be associated with users, teams, or custom customers and are managed through Stack Auth's payment system.
On this page:
* [Item](#item)
* [ServerItem](#serveritem)
***
# `Item`
The `Item` type represents a quantifiable resource that can be consumed or managed within your application. Items are typically obtained through purchases, subscriptions, or manual allocation.
Items can be retrieved through:
* [`user.getItem()`](../types/user.mdx#currentusergetitem)
* [`user.useItem()`](../types/user.mdx#currentuseruseitem) (React hook)
* [`team.getItem()`](../types/team.mdx#teamgetitem)
* [`team.useItem()`](../types/team.mdx#teamuseitem) (React hook)
### Table of Contents
The human-readable name of the item as configured in your Stack Auth project settings.
```typescript
declare const displayName: string;
```
The current quantity of the item. This value can be negative, which is useful for tracking overdrafts or pending charges.
For example, if a user has 100 credits but makes a purchase that costs 150 credits, the quantity might temporarily be -50 until the purchase is processed.
```typescript
declare const quantity: number;
```
The quantity clamped to a minimum of 0. This is equivalent to `Math.max(0, quantity)` and is useful for display purposes when you don't want to show negative values to users.
Use this when you want to display available resources without confusing users with negative numbers.
```typescript
declare const nonNegativeQuantity: number;
```
***
# `ServerItem`
The `ServerItem` type extends `Item` with additional server-side methods for modifying quantities. This type is only available in server-side contexts and provides race-condition-safe operations for managing item quantities.
Server items can be retrieved through:
* [`serverUser.getItem()`](../types/user.mdx#serverusergetitem)
* [`serverUser.useItem()`](../types/user.mdx#serveruseruseitem) (React hook)
* [`serverTeam.getItem()`](../types/team.mdx#serverteamgetitem)
* [`serverTeam.useItem()`](../types/team.mdx#serverteamuseitem) (React hook)
### Table of Contents
; //$stack-link-to:#serveritemincreasequantity
decreaseQuantity(amount): Promise; //$stack-link-to:#serveritemdecreasequantity
tryDecreaseQuantity(amount): Promise; //$stack-link-to:#serveritemtrydecreasequantity
};`}
/>
Increases the item quantity by the specified amount. This operation is atomic and safe for concurrent use.
### Parameters
The amount to increase the quantity by. Must be a positive number.
### Returns
`Promise`
```typescript
declare function increaseQuantity(amount: number): Promise;
```
```typescript Adding credits to a user
const user = await stackServerApp.getUser({ userId: "user_123" });
const credits = await user.getItem("credits");
// Add 100 credits
await credits.increaseQuantity(100);
```
Decreases the item quantity by the specified amount. This operation allows the quantity to go negative.
**Note**: If you want to prevent the quantity from going below zero, use [`tryDecreaseQuantity()`](#serveritemtrydecreasequantity) instead, as it provides race-condition-free protection against negative quantities.
### Parameters
The amount to decrease the quantity by. Must be a positive number.
### Returns
`Promise`
```typescript
declare function decreaseQuantity(amount: number): Promise;
```
```typescript Consuming user credits
const user = await stackServerApp.getUser({ userId: "user_123" });
const credits = await user.getItem("credits");
// Consume 50 credits (allows negative balance)
await credits.decreaseQuantity(50);
```
Attempts to decrease the item quantity by the specified amount, but only if the result would be non-negative. Returns `true` if the operation succeeded, `false` if it would result in a negative quantity.
This method is race-condition-safe and is ideal for implementing prepaid credit systems where you need to ensure sufficient balance before allowing an operation.
### Parameters
The amount to decrease the quantity by. Must be a positive number.
### Returns
`Promise`: `true` if the quantity was successfully decreased, `false` if the operation would result in a negative quantity.
```typescript
declare function tryDecreaseQuantity(amount: number): Promise;
```
```typescript Safe credit consumption
const user = await stackServerApp.getUser({ userId: "user_123" });
const credits = await user.getItem("credits");
// Try to consume 50 credits, only if sufficient balance
const success = await credits.tryDecreaseQuantity(50);
if (success) {
console.log("Credits consumed successfully");
// Proceed with the operation
} else {
console.log("Insufficient credits");
// Handle insufficient balance
throw new Error("Not enough credits available");
}
```
```typescript API rate limiting with credits
async function handleApiCall(userId: string) {
const user = await stackServerApp.getUser({ userId });
const apiCalls = await user.getItem("api_calls");
// Check if user has API calls remaining
const canProceed = await apiCalls.tryDecreaseQuantity(1);
if (!canProceed) {
throw new Error("API rate limit exceeded. Please upgrade your plan.");
}
// Process the API call
return processApiRequest();
}
```
# Project
URL: /docs/sdk/types/project
Source: /vercel/path0/docs/content/docs/sdk/types/project.mdx
***
title: Project
full: true
----------
The `Project` object contains the information and configuration of a project, such as the name, description, and enabled authentication methods.
Each [Stack app](../../concepts/stack-app.mdx) corresponds to a project. You can obtain its `Project` object by calling [`stackApp.getProject()`](../objects/stack-app.mdx#stackappgetproject)
or [`stackApp.useProject()`](../objects/stack-app.mdx#stackappuseproject) {/* THIS_LINE_PLATFORM react-like */}
.
### Table of Contents
***
The unique ID of the project as a `string`.
```typescript
declare const id: string;
```
The display name of the project as a `string`.
```typescript
declare const displayName: string;
```
The configuration settings for the project.
### Properties
Indicates if sign-up is enabled for the project.
Specifies if credential-based authentication is enabled for the project.
States whether magic link authentication is enabled for the project.
Determines if client-side team creation is permitted within the project.
Indicates if client-side user deletion is enabled for the project.
```typescript
declare const config: {
signUpEnabled: boolean;
credentialEnabled: boolean;
magicLinkEnabled: boolean;
clientTeamCreationEnabled: boolean;
clientUserDeletionEnabled: boolean;
};
```
# TeamPermission
URL: /docs/sdk/types/team-permission
Source: /vercel/path0/docs/content/docs/sdk/types/team-permission.mdx
***
title: TeamPermission
full: true
----------
The `TeamPermission` object represents a permission that a user has within a team. Currently, it contains only an `id` to specify the permission.
You can get `TeamPermission` objects by calling functions such as `user.getPermission(...)` or `user.listPermissions()`.
### Table of Contents
***
The identifier of the permission as a `string`.
```typescript
declare const id: string;
```
# TeamProfile
URL: /docs/sdk/types/team-profile
Source: /vercel/path0/docs/content/docs/sdk/types/team-profile.mdx
***
title: TeamProfile
full: true
----------
This is a detailed reference for the `TeamProfile` and `ServerTeamProfile` objects.
On this page:
* [TeamProfile](#teamprofile)
* [ServerTeamProfile](#serverteamprofile)
# `TeamProfile`
The `TeamProfile` object represents the profile of a user within the context of a team. It includes the user's profile information specific to the team and can be accessed through the `teamUser.teamProfile` property on a `TeamUser` object.
### Table of Contents
***
The display name of the user within the team context as a `string` or `null` if no display name is set.
```typescript
declare const displayName: string | null;
```
The profile image URL of the user within the team context as a `string`, or `null` if no profile image is set.
```typescript
declare const profileImageUrl: string | null;
```
***
# `ServerTeamProfile`
The `ServerTeamProfile` object is currently the same as `TeamProfile`.
### Table of Contents
***
# TeamUser
URL: /docs/sdk/types/team-user
Source: /vercel/path0/docs/content/docs/sdk/types/team-user.mdx
***
title: TeamUser
full: true
----------
On this page:
* [TeamUser](#teamuser)
* [ServerTeamUser](#serverteamuser)
***
# `TeamUser`
The `TeamUser` object is used on the client side to represent a user in the context of a team, providing minimal information about the user, including their ID and team-specific profile.
It is usually obtained by calling
`team.useUsers()` or {/* THIS_LINE_PLATFORM react-like */}
`team.listUsers()` on a [`Team` object](../types/team.mdx#team).
### Table of Contents
***
The ID of the user.
```typescript
declare const id: string;
```
The team profile of the user as a `TeamProfile` object.
```typescript
declare const teamProfile: TeamProfile;
```
***
# `ServerTeamUser`
The `ServerTeamUser` object is used on the server side to represent a user within a team. Besides the team profile, it also includes all the functionality of a [`ServerUser`](../types/user.mdx#serveruser).
It is usually obtained by calling `serverTeam.listUsers()` on a [`ServerTeam` object](../types/team.mdx#serverteam).
### Table of Contents
***
The team profile of the user as a `ServerTeamProfile` object.
```typescript
declare const teamProfile: ServerTeamProfile;
```
# Team
URL: /docs/sdk/types/team
Source: /vercel/path0/docs/content/docs/sdk/types/team.mdx
***
title: Team
full: true
----------
This is a detailed reference for the `Team` object. If you're looking for a more high-level overview, please refer to our [guide on teams](../../concepts/orgs-and-teams.mdx).
On this page:
* [Team](#team)
* [ServerTeam](#serverteam)
***
# `Team`
A `Team` object contains basic information and functions about a team, to the extent of which a member of the team would have access to it.
You can get `Team` objects with the
`user.useTeams()` or {/* THIS_LINE_PLATFORM react-like */}
`user.listTeams()` functions. The created team will then inherit the permissions of that user; for example, the `team.update(...)` function can only succeed if the user is allowed to make updates to the team.
### Table of Contents
; //$stack-link-to:#teamupdate
inviteUser(options): Promise; //$stack-link-to:#teaminviteuser
listUsers(): Promise; //$stack-link-to:#teamlistusers
// NEXT_LINE_PLATFORM react-like
⤷ useUsers(): TeamUser[]; //$stack-link-to:#teamuseusers
listInvitations(): Promise<{ ... }[]>; //$stack-link-to:#teamlistinvitations
// NEXT_LINE_PLATFORM react-like
⤷ useInvitations(): { ... }[]; //$stack-link-to:#teamuseinvitations
createApiKey(options): Promise; //$stack-link-to:#teamcreateapikey
listApiKeys(): Promise; //$stack-link-to:#teamlistapikeys
// NEXT_LINE_PLATFORM react-like
⤷ useApiKeys(): TeamApiKey[]; //$stack-link-to:#teamuseapikeys
createCheckoutUrl(options): Promise; //$stack-link-to:#teamcreatecheckouturl
getItem(itemId): Promise- ; //$stack-link-to:#teamgetitem
// NEXT_LINE_PLATFORM react-like
⤷ useItem(itemId): Item; //$stack-link-to:#teamuseitem
};`}
/>
The team ID as a `string`. This value is always unique.
```typescript
declare const id: string;
```
The display name of the team as a `string`.
```typescript
declare const displayName: string;
```
The profile image URL of the team as a `string`, or `null` if no profile image is set.
```typescript
declare const profileImageUrl: string | null;
```
The client metadata of the team as a `Json` object.
```typescript
declare const clientMetadata: Json;
```
The client read-only metadata of the team as a `Json` object.
```typescript
declare const clientReadOnlyMetadata: Json;
```
Updates the team information.
Note that this operation requires the current user to have the `$update_team` permission. If the user lacks this permission, an error will be thrown.
### Parameters
The fields to update.
The display name of the team.
The profile image URL of the team.
The client metadata of the team.
### Returns
`Promise`
```typescript
declare function update(options: {
displayName?: string;
profileImageUrl?: string | null;
clientMetadata?: Json;
}): Promise;
```
```typescript Updating team details
await team.update({
displayName: 'New Team Name',
profileImageUrl: 'https://example.com/profile.png',
clientMetadata: {
address: '123 Main St, Anytown, USA',
},
});
```
Sends an invitation email to a user to join the team.
Note that this operation requires the current user to have the `$invite_members` permission. If the user lacks this permission, an error will be thrown.
An invitation email containing a magic link will be sent to the specified user. If the user has an existing account, they will be automatically added to the team upon clicking the link. For users without an account, the link will guide them through the sign-up process before adding them to the team.
### Parameters
An object containing multiple properties.
The email of the user to invite.
The URL where users will be redirected after accepting the team invitation.
Required when calling `inviteUser()` in the server environment since the URL cannot be automatically determined.
Example: `https://your-app-url.com/handler/team-invitation`
### Returns
`Promise`
```typescript
declare function inviteUser(options: {
email: string;
callbackUrl?: string;
}): Promise;
```
```typescript Sending a team invitation
await team.inviteUser({
email: 'user@example.com',
});
```
Gets a list of users in the team.
Note that this operation requires the current user to have the `$read_members` permission. If the user lacks this permission, an error will be thrown.
### Parameters
None.
### Returns
`Promise`
```typescript
declare function listUsers(): Promise;
```
```typescript Listing team members
const users = await team.listUsers();
users.forEach(user => {
console.log(user.id, user.teamProfile.displayName);
});
```
{/* IF_PLATFORM next */}
Functionally equivalent to [`listUsers()`](#teamlistusers), but as a React hook.
### Parameters
None.
### Returns
`TeamUser[]`
```typescript
declare function useUsers(): TeamUser[];
```
```typescript Listing team members in React component
const users = team.useUsers();
users.forEach(user => {
console.log(user.id, user.teamProfile.displayName);
});
```
{/* END_PLATFORM */}
Gets a list of invitations to the team.
Note that this operation requires the current user to have the `$read_members` and `$invite_members` permissions. If the user lacks this permission, an error will be thrown.
### Parameters
None.
### Returns
`Promise<{ id: string, email: string, expiresAt: Date }[]>`
```typescript
declare function listInvitations(): Promise<{ id: string, email: string, expiresAt: Date }[]>;
```
```typescript Listing team invitations
const invitations = await team.listInvitations();
invitations.forEach(invitation => {
console.log(invitation.id, invitation.email);
});
```
{/* IF_PLATFORM next */}
Functionally equivalent to [`listInvitations()`](#teamlistinvitations), but as a React hook.
### Parameters
None.
### Returns
`{ id: string, email: string, expiresAt: Date }[]`
```typescript
declare function useInvitations(): { id: string, email: string, expiresAt: Date }[];
```
```typescript Listing team invitations in React component
const invitations = team.useInvitations();
invitations.forEach(invitation => {
console.log(invitation.id, invitation.email);
});
```
{/* END_PLATFORM */}
Creates a new API key for the team.
### Parameters
An object containing multiple properties.
The name of the API key.
The description of the API key.
The expiration date of the API key.
### Returns
`Promise`
```typescript
declare function createApiKey(options: {
name: string;
description: string;
expiresAt: Date;
}): Promise;
```
```typescript Creating a new API key
await team.createApiKey({
name: 'New API Key',
description: 'This is a new API key',
expiresAt: new Date('2024-01-01'),
});
```
Gets a list of API keys for the team.
### Parameters
None.
### Returns
`Promise`
```typescript
declare function listApiKeys(): Promise;
```
```typescript Listing API keys
const apiKeys = await team.listApiKeys();
apiKeys.forEach(key => {
console.log(key.id, key.name);
});
```
{/* IF_PLATFORM next */}
Functionally equivalent to [`listApiKeys()`](#teamlistapikeys), but as a React hook.
### Parameters
None.
### Returns
`TeamApiKey[]`
```typescript
declare function useApiKeys(): TeamApiKey[];
```
```typescript Using API keys in React component
const apiKeys = team.useApiKeys();
apiKeys.forEach(key => {
console.log(key.id, key.name);
});
```
{/* END_PLATFORM */}
Creates a checkout URL for the team to purchase products. This method integrates with Stripe to generate a secure payment link for team-level purchases.
Note that this operation requires the current user to have appropriate permissions for team purchases. The specific permission requirements depend on your project configuration.
### Parameters
Options for creating the checkout URL.
The ID of the product to purchase.
### Returns
`Promise`: A URL that redirects to the Stripe checkout page for the specified product.
```typescript
declare function createCheckoutUrl(options: {
productId: string;
}): Promise;
```
```typescript Team purchasing additional seats
const checkoutUrl = await team.createCheckoutUrl({
productId: "prod_team_seats",
});
// Redirect to checkout
window.location.href = checkoutUrl;
```
Retrieves information about a specific item (such as credits, API quotas, storage limits, etc.) for the team.
### Parameters
The ID of the item to retrieve.
### Returns
`Promise
- `: The item object containing display name, quantity, and other details.
```typescript
declare function getItem(itemId: string): Promise- ;
```
```typescript Checking team API quota
const apiQuota = await team.getItem("api_calls");
console.log(`Team has ${apiQuota.quantity} API calls remaining`);
if (apiQuota.nonNegativeQuantity < 100) {
console.warn("Team is running low on API calls");
}
```
{/* IF_PLATFORM next */}
Retrieves information about a specific item for the team, used as a React hook.
### Parameters
The ID of the item to retrieve.
### Returns
`Item`: The item object containing display name, quantity, and other details.
```typescript
declare function useItem(itemId: string): Item;
```
```typescript Team quota monitoring component
function TeamQuotaDisplay({ team }: { team: Team }) {
const storage = team.useItem("storage_gb");
return (
Team Storage Usage
{storage.quantity} GB used
Plan: {storage.displayName}
);
}
```
{/* END_PLATFORM */}
***
# `ServerTeam`
Like [`Team`](#team), but with [server permissions](../../concepts/stack-app.mdx#client-vs-server). Has full read and write access to everything.
Calling `serverUser.getTeam(...)` and `serverUser.listTeams()` will return `ServerTeam` objects if the user is a [`ServerUser`](../types/user.mdx#serveruser). Alternatively, you can call `stackServerApp.getTeam('team_id_123')` or `stackServerApp.listTeams()` to query all teams of the project.
`ServerTeam` extends the `Team` object, providing additional functions and properties as detailed below. It's important to note that while the `Team` object's functions may require specific user permissions, the corresponding functions in `ServerTeam` can be executed without these permission checks. This allows for more flexible and unrestricted team management on the server side.
### Table of Contents
; //$stack-link-to:#serverteamlistusers
// NEXT_LINE_PLATFORM react-like
⤷ useUsers(): ServerTeamUser[]; //$stack-link-to:#serverteamuseusers
addUser(userId): Promise; //$stack-link-to:#serverteamadduseruserid
removeUser(userId): Promise; //$stack-link-to:#serverteamremoveuseruserid
delete(): Promise; //$stack-link-to:#serverteamdelete
};`}
/>
The date and time when the team was created.
```typescript
declare const createdAt: Date;
```
The server metadata of the team as a `Json` object.
```typescript
declare const serverMetadata: Json;
```
Gets a list of users in the team.
This is similar to the `listUsers` method on the `Team` object, but it returns `ServerTeamUser` objects instead of `TeamUser` objects and does not require any permissions.
### Parameters
None.
### Returns
`Promise`
```typescript
declare function listUsers(): Promise;
```
```typescript Listing server team members
const users = await team.listUsers();
users.forEach(user => {
console.log(user.id, user.teamProfile.displayName);
});
```
{/* IF_PLATFORM next */}
Functionally equivalent to [`listUsers()`](#serverteamlistusers), but as a React hook.
### Parameters
None.
### Returns
`ServerTeamUser[]`
```typescript
declare function useUsers(): ServerTeamUser[];
```
```typescript Using server team members in React component
const users = team.useUsers();
users.forEach(user => {
console.log(user.id, user.teamProfile.displayName);
});
```
{/* END_PLATFORM */}
Adds a user to the team directly without sending an invitation email.
### Parameters
The ID of the user to add.
### Returns
`Promise`
```typescript
declare function addUser(userId: string): Promise;
```
```typescript Adding a user to the team
await team.addUser('user_id_123');
```
Removes a user from the team.
### Parameters
The ID of the user to remove.
### Returns
`Promise`
```typescript
declare function removeUser(userId: string): Promise;
```
### Examples
```typescript Removing a user from the team
await team.removeUser('user_id_123');
```
Deletes the team.
### Parameters
None.
### Returns
`Promise`
```typescript
declare function delete(): Promise;
```
```typescript Deleting a team
await team.delete();
```
# User
URL: /docs/sdk/types/user
Source: /vercel/path0/docs/content/docs/sdk/types/user.mdx
***
title: User
full: true
----------
This is a detailed reference for the `User` object. If you're looking for a more high-level overview, please refer to our guide on users [here](../../getting-started/users.mdx).
On this page:
* [CurrentUser](#currentuser)
* [ServerUser](#serveruser)
* [CurrentServerUser](#currentserveruser)
# `CurrentUser`
Use `useUser()` to get `CurrentUser` (client). Use `stackServerApp.getUser()` to get `CurrentServerUser` (server).
### Table of Contents
; //$stack-link-to:#currentuserupdate
updatePassword(data): Promise; //$stack-link-to:#currentuserupdatepassword
getAuthorizationHeader(): Promise; //$stack-link-to:#currentusergetauthorizationheader
// NEXT_LINE_PLATFORM react-like
⤷ useAuthorizationHeader(): string | null; //$stack-link-to:#currentuseruseauthorizationheader
getAuthHeaders(): Promise>; //$stack-link-to:#currentusergetauthheaders
getAuthJson(): Promise<{ accessToken: string | null }>; //$stack-link-to:#currentusergetauthjson
signOut([options]): Promise; //$stack-link-to:#currentusersignout
delete(): Promise; //$stack-link-to:#currentuserdelete
getTeam(id): Promise; //$stack-link-to:#currentusergetteam
// NEXT_LINE_PLATFORM react-like
⤷ useTeam(id): Team | null; //$stack-link-to:#currentuseruseteam
listTeams(): Promise; //$stack-link-to:#currentuserlistteams
// NEXT_LINE_PLATFORM react-like
⤷ useTeams(): Team[]; //$stack-link-to:#currentuseruseteams
setSelectedTeam(team): Promise; //$stack-link-to:#currentusersetselectedteam
createTeam(data): Promise; //$stack-link-to:#currentusercreateteam
leaveTeam(team): Promise; //$stack-link-to:#currentuserleaveteam
getTeamProfile(team): Promise; //$stack-link-to:#currentusergetteamprofile
// NEXT_LINE_PLATFORM react-like
⤷ useTeamProfile(team): EditableTeamMemberProfile; //$stack-link-to:#currentuseruseteamprofile
hasPermission(scope, permissionId): Promise; //$stack-link-to:#currentuserhaspermission
getPermission(scope, permissionId[, options]): Promise; //$stack-link-to:#currentusergetpermission
// NEXT_LINE_PLATFORM react-like
⤷ usePermission(scope, permissionId[, options]): TeamPermission | null; //$stack-link-to:#currentuserusepermission
listPermissions(scope[, options]): Promise; //$stack-link-to:#currentuserlistpermissions
// NEXT_LINE_PLATFORM react-like
⤷ usePermissions(scope[, options]): TeamPermission[]; //$stack-link-to:#currentuserusepermissions
listContactChannels(): Promise; //$stack-link-to:#currentuserlistcontactchannels
// NEXT_LINE_PLATFORM react-like
⤷ useContactChannels(): ContactChannel[]; //$stack-link-to:#currentuserusecontactchannels
getConnectedAccount(account): Promise; //$stack-link-to:#currentusergetconnectedaccount
// NEXT_LINE_PLATFORM react-like
⤷ useConnectedAccount(account): OAuthConnection | null; //$stack-link-to:#currentuseruseconnectedaccount
listConnectedAccounts(): Promise; //$stack-link-to:#currentuserlistconnectedaccounts
// NEXT_LINE_PLATFORM react-like
⤷ useConnectedAccounts(): OAuthConnection[]; //$stack-link-to:#currentuseruseconnectedaccounts
linkConnectedAccount(provider[, options]): Promise; //$stack-link-to:#currentuserlinkconnectedaccount
getOrLinkConnectedAccount(provider[, options]): Promise; //$stack-link-to:#currentusergetorlinkconnectedaccount
// NEXT_LINE_PLATFORM react-like
⤷ useOrLinkConnectedAccount(provider[, options]): OAuthConnection; //$stack-link-to:#currentuseruseorlinkconnectedaccount
createApiKey(options): Promise; //$stack-link-to:#currentusercreateapikey
listApiKeys(): Promise; //$stack-link-to:#currentuserlistapikeys
// NEXT_LINE_PLATFORM react-like
⤷ useApiKeys(): UserApiKey[]; //$stack-link-to:#currentuseruseapikeys
createCheckoutUrl(options): Promise; //$stack-link-to:#currentusercreatecheckouturl
getItem(itemId): Promise- ; //$stack-link-to:#currentusergetitem
// NEXT_LINE_PLATFORM react-like
⤷ useItem(itemId): Item; //$stack-link-to:#currentuseruseitem
};`}
/>
The user ID as a `string`. This is the unique identifier of the user.
```typescript
declare const id: string;
```
The display name of the user as a `string` or `null` if not set. The user can modify this value.
```typescript
declare const displayName: string | null;
```
The primary email of the user as a `string` or `null`. Note that this is not necessarily unique.
```typescript
declare const primaryEmail: string | null;
```
A `boolean` indicating whether the primary email of the user is verified.
```typescript
declare const primaryEmailVerified: boolean;
```
The profile image URL of the user as a `string` or `null` if no profile image is set.
```typescript
declare const profileImageUrl: string | null;
```
The date and time when the user signed up, as a `Date`.
```typescript
declare const signedUpAt: Date;
```
A `boolean` indicating whether the user has a password set.
```typescript
declare const hasPassword: boolean;
```
The client metadata of the user as an `object`. This metadata is visible on the client side but should not contain sensitive or server-only information.
```typescript
declare const clientMetadata: Json;
```
Read-only metadata visible on the client side. This metadata can only be modified on the server side.
```typescript
declare const clientReadOnlyMetadata: Json;
```
The currently selected team for the user, if applicable, as a `Team` object or `null` if no team is selected.
```typescript
declare const selectedTeam: Team | null;
```
Updates the user information.
### Parameters
The fields to update.
The new display name for the user.
Custom metadata visible to the client.
The ID of the team to set as selected, or `null` to clear selection.
The URL of the user's new profile image, or `null` to remove it.
### Returns
`Promise`
```typescript
declare function update(data: {
displayName?: string;
clientMetadata?: Json;
selectedTeamId?: string | null;
profileImageUrl?: string | null;
}): Promise;
```
```typescript Updating user details
await user.update({
displayName: "New Display Name",
clientMetadata: {
address: "123 Main St",
},
});
```
Gets the team with the specified ID.
### Parameters
The ID of the team to get.
### Returns
`Promise`: The team object, or `null` if the team is not found or the user is not a member of the team.
```typescript
declare function getTeam(id: string): Promise;
```
```typescript Getting a team by ID
const team = await user.getTeam("teamId");
```
{/* IF_PLATFORM next */}
Gets the team with the given ID. This is the same as `getTeam` but is used as a React hook.
### Parameters
The ID of the team to get.
### Returns
`Team | null`: The team object, or `null` if the team is not found or the user is not a member of the team.
```typescript
declare function useTeam(id: string): Team | null;
```
```typescript Using a team in a React component
const team = user.useTeam("teamId");
```
{/* END_PLATFORM */}
Lists all the teams the user is a member of.
### Parameters
None.
### Returns
`Promise`: The list of teams.
```typescript
declare function listTeams(): Promise;
```
```typescript Listing all teams
const teams = await user.listTeams();
```
{/* IF_PLATFORM next */}
Lists all the teams the user is a member of. This is the same as `listTeams` but is used as a React hook.
### Parameters
None.
### Returns
`Team[]`: The list of teams.
```typescript
declare function useTeams(): Team[];
```
```typescript Using teams in a React component
const teams = user.useTeams();
```
{/* END_PLATFORM */}
Sets the currently selected team for the user.
### Parameters
The team to set as selected, or `null` to clear selection.
### Returns
`Promise`
```typescript
declare function setSelectedTeam(team: Team | null): Promise;
```
```typescript Setting the selected team
const team = await user.getTeam("team_id_123");
await user.setSelectedTeam(team);
```
Creates a new team for the user. The user will be added to the team and given creator permissions.
**Note**: If client-side team creation is disabled in the Stack dashboard, this will throw an error.
### Parameters
The data for creating the team.
The display name for the team.
The URL of the team's profile image, or `null` to remove it.
### Returns
`Promise`: The created team.
```typescript
declare function createTeam(data: {
displayName: string;
profileImageUrl?: string | null;
}): Promise;
```
```typescript Creating a new team
const team = await user.createTeam({
displayName: "New Team",
profileImageUrl: "https://example.com/profile.jpg",
});
```
Allows the user to leave a team. If the user is not a member of the team, this will throw an error.
### Parameters
The team to leave.
### Returns
`Promise`
```typescript
declare function leaveTeam(team: Team): Promise;
```
```typescript Leaving a team
await user.leaveTeam(team);
```
Retrieves the user's profile within a specific team.
### Parameters
The team to retrieve the profile for.
### Returns
`Promise`: The user's editable profile for the specified team.
```typescript
declare function getTeamProfile(team: Team): Promise;
```
```typescript Getting a team profile
const profile = await user.getTeamProfile(team);
```
{/* IF_PLATFORM next */}
Retrieves the user's profile within a specific team. This is the same as `getTeamProfile` but is used as a React hook.
### Parameters
The team to retrieve the profile for.
### Returns
`EditableTeamMemberProfile`: The user's editable profile for the specified team.
```typescript
declare function useTeamProfile(team: Team): EditableTeamMemberProfile;
```
```typescript Using a team profile in React
const profile = user.useTeamProfile(team);
```
{/* END_PLATFORM */}
Checks if the user has a specific permission for a team.
### Parameters
The team to check the permission for.
The ID of the permission to check.
### Returns
`Promise`: Whether the user has the specified permission.
```typescript
declare function hasPermission(scope: Team, permissionId: string): Promise;
```
```typescript Checking user permission
const hasPermission = await user.hasPermission(team, "permissionId");
```
Retrieves a specific permission for a user within a team.
### Parameters
The team to retrieve the permission for.
The ID of the permission to retrieve.
An object containing multiple properties.
Whether to retrieve the permission recursively. Default is `true`.
### Returns
`Promise`: The permission object, or `null` if not found.
```typescript
declare function getPermission(scope: Team, permissionId: string, options?: { recursive?: boolean }): Promise;
```
```typescript Getting a permission
const permission = await user.getPermission(team, "read_secret_info");
```
{/* IF_PLATFORM next */}
Retrieves a specific permission for a user within a team, used as a React hook.
### Parameters
The team to retrieve the permission for.
The ID of the permission to retrieve.
An object containing multiple properties.
Whether to retrieve the permission recursively. Default is `true`.
### Returns
`TeamPermission | null`: The permission object, or `null` if not found.
```typescript
declare function usePermission(scope: Team, permissionId: string, options?: { recursive?: boolean }): TeamPermission | null;
```
```typescript Using a permission in React
const permission = user.usePermission(team, "read_secret_info");
```
{/* END_PLATFORM */}
Lists all permissions the user has for a specified team.
### Parameters
The team to list permissions for.
An object containing multiple properties.
Whether to list the permissions recursively. Default is `true`.
### Returns
`Promise`: An array of permissions.
```typescript
declare function listPermissions(scope: Team, options?: { recursive?: boolean }): Promise;
```
```typescript Listing user permissions
const permissions = await user.listPermissions(team);
```
{/* IF_PLATFORM next */}
Lists all permissions the user has for a specified team, used as a React hook.
### Parameters
The team to retrieve permissions for.
An object containing multiple properties.
Whether to list the permissions recursively. Default is `true`.
### Returns
`TeamPermission[]`: An array of permissions.
```typescript
declare function usePermissions(scope: Team, options?: { recursive?: boolean }): TeamPermission[];
```
```typescript Using permissions in a React component
const permissions = user.usePermissions(team);
```
{/* END_PLATFORM */}
Lists all the contact channels of the user.
### Parameters
No parameters.
### Returns
`Promise`: An array of contact channels.
```typescript
declare function listContactChannels(): Promise;
```
```typescript Listing contact channels
const contactChannels = await user.listContactChannels();
```
{/* IF_PLATFORM next */}
Lists all the contact channels of the user, used as a React hook.
### Parameters
No parameters.
### Returns
`ContactChannel[]`: An array of contact channels.
```typescript
declare function useContactChannels(): ContactChannel[];
```
```typescript Using contact channels in React
const contactChannels = user.useContactChannels();
```
{/* END_PLATFORM */}
Gets a specific connected account by provider and provider account ID. Returns `null` if not found.
For more details on connected accounts, see the [ConnectedAccount type reference](../types/connected-account.mdx) and the [OAuth guide](../../apps/oauth).
### Parameters
The provider config ID (e.g., `"google"`, `"github"`).
The account ID from the OAuth provider.
### Returns
`Promise`
```typescript
declare function getConnectedAccount(account: {
provider: string,
providerAccountId: string,
}): Promise;
```
```typescript Getting a connected account
const account = await user.getConnectedAccount({
provider: "google",
providerAccountId: "123456",
});
if (account) {
const result = await account.getAccessToken();
}
```
{/* IF_PLATFORM react-like */}
React hook version of `getConnectedAccount`. Returns a specific connected account by provider and provider account ID, or `null` if not found.
### Parameters
The provider config ID (e.g., `"google"`, `"github"`).
The account ID from the OAuth provider.
### Returns
`OAuthConnection | null`
```typescript
declare function useConnectedAccount(account: {
provider: string,
providerAccountId: string,
}): OAuthConnection | null;
```
```tsx Using a connected account in React
const account = user.useConnectedAccount({
provider: "google",
providerAccountId: "123456",
});
```
{/* END_PLATFORM */}
Lists all connected accounts for this user. Only returns accounts for providers that have `allowConnectedAccounts` enabled.
### Parameters
None.
### Returns
`Promise`
```typescript
declare function listConnectedAccounts(): Promise;
```
```typescript Listing connected accounts
const accounts = await user.listConnectedAccounts();
for (const account of accounts) {
console.log(account.provider, account.providerAccountId);
}
```
{/* IF_PLATFORM react-like */}
React hook to list all connected accounts for this user.
### Parameters
None.
### Returns
`OAuthConnection[]`
```typescript
declare function useConnectedAccounts(): OAuthConnection[];
```
```tsx Using connected accounts in React
const accounts = user.useConnectedAccounts();
```
{/* END_PLATFORM */}
Redirects the user to the OAuth flow to link a new connected account. This function always redirects and never returns.
### Parameters
The provider to link (e.g., `"google"`, `"github"`).
OAuth scopes to request during the linking flow.
### Returns
`Promise` (always redirects)
```typescript
declare function linkConnectedAccount(
provider: string,
options?: { scopes?: string[] },
): Promise;
```
```typescript Linking a Google account
await user.linkConnectedAccount("google", {
scopes: ["https://www.googleapis.com/auth/drive.readonly"],
});
```
Gets a connected account for the given provider, or redirects the user to the OAuth flow to link one if none exists or the token/scopes are insufficient.
### Parameters
The provider to get or link (e.g., `"google"`, `"github"`).
OAuth scopes to require. If the existing account doesn't have these scopes, the user will be redirected to re-authorize.
### Returns
`Promise`
```typescript
declare function getOrLinkConnectedAccount(
provider: string,
options?: { scopes?: string[] },
): Promise;
```
```typescript Get or link a Google account with Drive access
const account = await user.getOrLinkConnectedAccount("google", {
scopes: ["https://www.googleapis.com/auth/drive.readonly"],
});
const result = await account.getAccessToken();
```
{/* IF_PLATFORM react-like */}
React hook version of `getOrLinkConnectedAccount`. Returns a connected account for the given provider, or redirects the user to link one if none exists or the token/scopes are insufficient.
### Parameters
The provider to get or link (e.g., `"google"`, `"github"`).
OAuth scopes to require.
### Returns
`OAuthConnection`
```typescript
declare function useOrLinkConnectedAccount(
provider: string,
options?: { scopes?: string[] },
): OAuthConnection;
```
```tsx Using or linking a connected account in React
const account = user.useOrLinkConnectedAccount("google", {
scopes: ["https://www.googleapis.com/auth/drive.readonly"],
});
const result = account.useAccessToken();
```
{/* END_PLATFORM */}
Creates a new API key for the user, which can be used for programmatic access to your application's backend.
### Parameters
Options for creating the API key.
A human-readable description of the API key's purpose.
The date when the API key will expire. Use null for keys that don't expire.
Whether the API key is public. Defaults to false.
* **Secret API Keys** (default) begin with `sk_` and are monitored by Stack Auth's secret scanner, which can revoke them if detected in public code repositories.
* **Public API Keys** begin with `pk_` and are designed for client-side code where exposure is not a concern.
### Returns
`Promise`: The newly created API key. Note that this is the only time the full API key value will be visible.
```typescript
declare function createApiKey(options: {
description: string;
expiresAt: Date | null;
isPublic?: boolean;
}): Promise;
```
```typescript Creating an API key
const apiKey = await user.createApiKey({
description: "Backend integration",
expiresAt: new Date(Date.now() + 90 * 24 * 60 * 60 * 1000), // 90 days
isPublic: false,
});
// Save the API key value securely, as it won't be retrievable later
console.log("API Key:", apiKey.value);
```
Lists all API keys that belong to the user.
### Parameters
None.
### Returns
`Promise`: An array of API keys belonging to the user.
```typescript
declare function listApiKeys(): Promise;
```
```typescript Listing API keys
const apiKeys = await user.listApiKeys();
console.log(`You have ${apiKeys.length} API keys`);
// Find keys that are about to expire
const soonToExpire = apiKeys.filter(key =>
key.expiresAt && key.expiresAt.getTime() - Date.now() < 7 * 24 * 60 * 60 * 1000
);
```
{/* IF_PLATFORM next */}
Lists all API keys that belong to the user, used as a React hook.
### Parameters
None.
### Returns
`UserApiKey[]`: An array of API keys belonging to the user.
```typescript
declare function useApiKeys(): UserApiKey[];
```
```typescript Using API keys in a React component
function ApiKeysList() {
const user = useUser();
const apiKeys = user.useApiKeys();
return (
Your API Keys ({apiKeys.length})
{apiKeys.map(key => (
-
{key.description} - Last four: {key.value.lastFour}
{key.isValid() ? ' (valid)' : ` (invalid: ${key.whyInvalid()})`}
))}
);
}
```
{/* END_PLATFORM */}
Updates the user's password.
### Parameters
The fields required for updating the password.
The current password of the user.
The new password for the user.
### Returns
`Promise`: Returns an error object if the operation fails, otherwise returns `void`.
```typescript
declare function updatePassword(data: {
oldPassword: string;
newPassword: string;
}): Promise;
```
```typescript Updating user password
const error = await user.updatePassword({
oldPassword: "currentPassword",
newPassword: "newPassword",
});
if (error) {
console.error("Error updating password", error);
} else {
console.log("Password updated successfully");
}
```
Returns the value for the HTTP `Authorization` header for authenticated requests to external servers.
Most commonly used in cross-origin requests. Similar to `getAuthJson`, but specifically for HTTP requests.
If you are using `tokenStore: "cookie"`, you don't need this for same-origin requests. However, most
browsers now disable third-party cookies by default, so we must pass authentication tokens by header instead
if the client and server are on different origins.
This function returns the header value in this format:
`Bearer stackauth_<base64(getAuthJson())>`, or `null` if the user is not signed in.
You can use this with `fetch` or other HTTP request libraries to send authenticated requests.
On the server, you can then pass in the `Request` object to the `tokenStore` option
of your Stack app. Please note that CORS does not allow most headers by default, so you
must include `authorization` in the [`Access-Control-Allow-Headers` header](https://developer.mozilla.org/en-US/docs/Web/HTTP/Headers/Access-Control-Allow-Headers)
of the CORS preflight response.
If you are not using HTTP (and hence cannot set headers), use `getAuthJson()` instead.
### Parameters
No parameters.
### Returns
`Promise`: A `Bearer stackauth_...` authorization header value, or `null` if not signed in.
```typescript
declare function getAuthorizationHeader(): Promise;
```
```typescript Passing an authorization header to an external server
// client
const authorizationHeader = await user.getAuthorizationHeader();
const res = await fetch("https://api.example.com", {
headers: {
...(authorizationHeader ? { Authorization: authorizationHeader } : {})
// you can also add your own headers here
},
});
// server
function handleRequest(req: Request) {
const user = await stackServerApp.getUser({ tokenStore: req });
return new Response("Welcome, " + user.displayName);
}
```
React hook equivalent of `getAuthorizationHeader()`.
Returns the value for the HTTP `Authorization` header for authenticated requests to external servers,
or `null` if the user is not signed in. Use it when a React component needs to call an API on a
different origin and same-origin cookies are not enough.
### Parameters
No parameters.
### Returns
`string | null`: A `Bearer stackauth_...` authorization header value, or `null` if not signed in.
```typescript
declare function useAuthorizationHeader(): string | null;
```
```tsx Passing an authorization header from React
function ExternalApiButton() {
const authorizationHeader = user.useAuthorizationHeader();
return (
);
}
```
**Deprecated:** Use `getAuthorizationHeader()` instead.
Returns legacy headers for cross-origin authenticated requests. This is kept for backwards compatibility with
existing `x-stack-auth` integrations.
### Parameters
No parameters.
### Returns
`Promise>`: An object containing the legacy authentication headers.
```typescript
declare function getAuthHeaders(): Promise>;
```
```typescript Legacy x-stack-auth integration
const headers = await user.getAuthHeaders();
const res = await fetch("https://api.example.com", { headers });
```
Creates a JSON-serializable object containing the information to authenticate a user on an external server.
While `getAuthorizationHeader` is the recommended way to send authentication tokens over HTTP, your app may use
a different protocol, for example WebSockets or gRPC. This function returns a token object that can be JSON-serialized and sent to the server in any way you like.
On the server, you can pass in this token object into the `tokenStore` option to fetch user details.
### Parameters
No parameters.
### Returns
`Promise<{ accessToken: string | null }>`: An object containing the access token.
```typescript
declare function getAuthJson(): Promise<{ accessToken: string | null }>;
```
```typescript Passing auth tokens over an RPC call
// client
const res = await rpcCall(rpcEndpoint, {
data: {
auth: await user.getAuthJson(),
},
});
// server
function handleRequest(data) {
const user = await stackServerApp.getUser({ tokenStore: data.auth });
return new Response("Welcome, " + user.displayName);
}
```
Signs out the user and clears the session.
### Parameters
An object containing multiple properties.
The URL to redirect to after signing out. Defaults to the `afterSignOut` URL from the Stack app's `urls` object.
### Returns
`Promise`
```typescript
declare function signOut(options?: { redirectUrl?: string }): Promise;
```
```typescript Signing out
await user.signOut();
```
Deletes the user. This action is irreversible and can only be used if client-side user deletion is enabled in the Stack dashboard.
### Parameters
No parameters.
### Returns
`Promise`
```typescript
declare function delete(): Promise;
```
```typescript Deleting the user
await user.delete();
```
Creates a checkout URL for purchasing a product. This method integrates with Stripe to generate a secure payment link.
### Parameters
Options for creating the checkout URL.
The ID of the product to purchase.
### Returns
`Promise`: A URL that redirects to the Stripe checkout page for the specified product.
```typescript
declare function createCheckoutUrl(options: {
productId: string;
}): Promise;
```
```typescript Creating a checkout URL
const checkoutUrl = await user.createCheckoutUrl({
productId: "prod_premium_plan",
});
// Redirect user to checkout
window.location.href = checkoutUrl;
```
Retrieves information about a specific item (such as credits, subscription quantities, etc.) for the user.
### Parameters
The ID of the item to retrieve.
### Returns
`Promise- `: The item object containing display name, quantity, and other details.
```typescript
declare function getItem(itemId: string): Promise- ;
```
```typescript Getting user credits
const credits = await user.getItem("credits");
console.log(`User has ${credits.quantity} credits`);
console.log(`Non-negative quantity: ${credits.nonNegativeQuantity}`);
```
{/* IF_PLATFORM next */}
Retrieves information about a specific item for the user, used as a React hook.
### Parameters
The ID of the item to retrieve.
### Returns
`Item`: The item object containing display name, quantity, and other details.
```typescript
declare function useItem(itemId: string): Item;
```
```typescript Using credits in a React component
function CreditsDisplay() {
const user = useUser();
const credits = user.useItem("credits");
return (
Available Credits: {credits.quantity}
Display Name: {credits.displayName}
);
}
```
{/* END_PLATFORM */}
***
# `ServerUser`
The `ServerUser` object contains most `CurrentUser` properties and methods with the exception of those that require an active session (`getAuthJson` and `signOut`). It also contains some additional functions that require [server-level permissions](/docs/concepts/stack-app#client-vs-server).
### Table of Contents
//$stack-link-to:#currentuser
& {
lastActiveAt: Date; //$stack-link-to:#serveruserlastactiveat
serverMetadata: Json; //$stack-link-to:#serveruserservermetadata
update(data): Promise; //$stack-link-to:#serveruserupdate
listContactChannels(): Promise; //$stack-link-to:#serveruserlistcontactchannels
// NEXT_LINE_PLATFORM react-like
⤷ useContactChannels(): ContactChannel[]; //$stack-link-to:#serveruserusecontactchannels
listTeamsPaginated([options]): Promise<{ items: ServerTeam[]; nextCursor: string | null }>; //$stack-link-to:#serveruserlistteamspaginated
// NEXT_LINE_PLATFORM react-like
⤷ useTeamsPaginated([options]): { items: ServerTeam[]; nextCursor: string | null }; //$stack-link-to:#serveruseruseteamspaginated
grantPermission(scope, permissionId): Promise; //$stack-link-to:#serverusergrantpermission
revokePermission(scope, permissionId): Promise; //$stack-link-to:#serveruserrevokepermission
};`}
/>
The last active date and time of the user as a `Date`.
```typescript
declare const lastActiveAt: Date;
```
The server metadata of the user, accessible only on the server side.
```typescript
declare const serverMetadata: Json;
```
Updates the user's information on the server side. This is similar to the `CurrentUser.update()` method but includes additional capabilities, such as updating server metadata or setting a new password directly.
### Parameters
The fields to update.
The new display name for the user.
The new primary email for the user.
Whether the primary email is verified.
Whether auth should be enabled for the primary email.
The new password for the user.
The ID of the team to set as selected, or `null` to clear selection.
The URL of the user's new profile image, or `null` to remove.
Metadata visible on the client side.
Metadata that is read-only on the client but modifiable on the server side.
Metadata only accessible and modifiable on the server side.
### Returns
`Promise`
```typescript
declare function update(data: {
displayName?: string;
profileImageUrl?: string | null;
primaryEmail?: string,
primaryEmailVerified?: boolean,
primaryEmailAuthEnabled?: boolean,
password?: string;
selectedTeamId?: string | null;
clientMetadata?: Json;
clientReadOnlyMetadata?: Json;
serverMetadata?: Json;
}): Promise;
```
```typescript Updating user details on the server
await serverUser.update({
displayName: "Updated Display Name",
password: "newSecurePassword",
serverMetadata: {
internalNote: "Confidential information",
},
});
```
Lists all the contact channels of the user on the server side. This is similar to `CurrentUser.listContactChannels()` but returns a list of `ServerContactChannel` objects, which may include additional server-only details.
### Parameters
No parameters.
### Returns
`Promise`: An array of server-specific contact channels.
```typescript
declare function listContactChannels(): Promise;
```
```typescript Listing server-specific contact channels
const contactChannels = await serverUser.listContactChannels();
```
{/* IF_PLATFORM next */}
Functionally equivalent to [`listContactChannels()`](#serveruserlistcontactchannels), but as a React hook.
```typescript
declare function useContactChannels(): ContactChannel[];
```
{/* END_PLATFORM */}
Lists the teams the user belongs to with cursor-based pagination, optional filtering, and ordering. The returned array carries an extra `nextCursor` property; pass it back as `cursor` to load the next page.
For unpaginated access (returning all matching teams), use `listTeams()`.
### Parameters
Cursor returned as `nextCursor` from a previous response.
Maximum number of items to return. If omitted, all matching teams are returned.
The field to sort results by.
Whether to sort in descending order.
Free-text search on the team's display name (and team ID if the query is a UUID).
### Returns
`Promise<{ items: ServerTeam[]; nextCursor: string | null }>`
```typescript
declare function listTeamsPaginated(options?: {
cursor?: string;
limit?: number;
orderBy?: "createdAt";
desc?: boolean;
query?: string;
}): Promise<{ items: ServerTeam[]; nextCursor: string | null }>;
```
```typescript
const teams = await serverUser.listTeamsPaginated({ limit: 20 });
if (teams.nextCursor) {
const next = await serverUser.listTeamsPaginated({
cursor: teams.nextCursor,
limit: 20,
});
}
```
{/* IF_PLATFORM react-like */}
Functionally equivalent to [`listTeamsPaginated()`](#serveruserlistteamspaginated), but as a React hook.
```typescript
declare function useTeamsPaginated(options?: {
cursor?: string;
limit?: number;
orderBy?: "createdAt";
desc?: boolean;
query?: string;
}): { items: ServerTeam[]; nextCursor: string | null };
```
{/* END_PLATFORM */}
Grants a specific permission to the user for a given team.
### Parameters
The team to grant the permission for.
The ID of the permission to grant.
### Returns
`Promise`
```typescript
declare function grantPermission(scope: Team, permissionId: string): Promise;
```
```typescript Granting permission to a user
await serverUser.grantPermission(team, "read_secret_info");
```
Revokes a specific permission from the user for a given team.
### Parameters
The team to revoke the permission from.
The ID of the permission to revoke.
### Returns
`Promise`
```typescript
declare function revokePermission(scope: Team, permissionId: string): Promise;
```
```typescript Revoking permission from a user
await serverUser.revokePermission(team, "read_secret_info");
```
Creates a new API key for the user, which can be used for programmatic access to your application's backend.
### Parameters
Options for creating the API key.
A human-readable description of the API key's purpose.
The date when the API key will expire. Use null for keys that don't expire.
Whether the API key is public. Defaults to false.
* **Secret API Keys** (default) begin with `sk_` and are monitored by Stack Auth's secret scanner, which can revoke them if detected in public code repositories.
* **Public API Keys** begin with `pk_` and are designed for client-side code where exposure is not a concern.
### Returns
`Promise`: The newly created API key. Note that this is the only time the full API key value will be visible.
```typescript
declare function createApiKey(options: {
description: string;
expiresAt: Date | null;
isPublic?: boolean;
}): Promise;
```
```typescript Creating an API key
const apiKey = await serverUser.createApiKey({
description: "Backend integration",
expiresAt: new Date(Date.now() + 90 * 24 * 60 * 60 * 1000), // 90 days
isPublic: false,
});
// Save the API key value securely, as it won't be retrievable later
console.log("API Key:", apiKey.value);
```
Lists all API keys that belong to the user.
### Parameters
None.
### Returns
`Promise`: An array of API keys belonging to the user.
```typescript
declare function listApiKeys(): Promise;
```
```typescript Listing API keys
const apiKeys = await serverUser.listApiKeys();
console.log(`You have ${apiKeys.length} API keys`);
// Find keys that are about to expire
const soonToExpire = apiKeys.filter(key =>
key.expiresAt && key.expiresAt.getTime() - Date.now() < 7 * 24 * 60 * 60 * 1000
);
```
{/* IF_PLATFORM next */}
Lists all API keys that belong to the user, used as a React hook.
### Parameters
None.
### Returns
`UserApiKey[]`: An array of API keys belonging to the user.
```typescript
declare function useApiKeys(): UserApiKey[];
```
```typescript Using API keys in a React component
function ApiKeysList() {
const user = useUser();
const apiKeys = user.useApiKeys();
return (
Your API Keys ({apiKeys.length})
{apiKeys.map(key => (
-
{key.description} - Last four: {key.value.lastFour}
{key.isValid() ? ' (valid)' : ` (invalid: ${key.whyInvalid()})`}
))}
);
}
```
{/* END_PLATFORM */}
***
# `CurrentServerUser`
The `CurrentServerUser` object combines all the properties and methods of both `CurrentUser` and `ServerUser`. You can obtain a `CurrentServerUser` by calling `stackServerApp.getUser()` on the server side.
### Table of Contents
# Apple
URL: /docs/concepts/auth-providers/apple
Source: /vercel/path0/docs/content/docs/(guides)/concepts/auth-providers/apple.mdx
***
## title: "Apple"
This guide explains how to set up Apple as an authentication provider with Stack Auth. Sign in with Apple allows users to sign in to your application using their Apple ID.
You will need to create an Apple Developer account, and generate an Apple Services ID, Apple Private Key, Apple Team ID, and Apple Key ID.
## Integration Steps
### Create an Apple App ID and Services ID
1. Log in to the [Apple Developer Portal](https://developer.apple.com/).
2. Navigate to **Certificates, IDs & Profiles**.
3. In the sidebar, select **Identifiers** and click the "+" button to register a new identifier.
4. Select **App IDs** and click **Continue**.
5. Select **App** as the type and click **Continue**.
6. Give your app a description and a Bundle ID (e.g., com.yourdomain.app).
7. Scroll down and enable **Sign in with Apple**, then click **Continue**, then **Register**.
8. In the top-right of the Identifiers page, switch to **Services IDs**.
9. Click the "+" button to create a new Service ID and click **Continue**.
10. Give it a description and an identifier (note: this cannot be the same as your App ID's bundle ID).
11. Click **Continue**, then **Register**.
12. From the list, select your new Service ID.
13. Enable **Sign in with Apple** by checking the box.
14. Click **Configure** next to Sign in with Apple.
15. Register your domains (add api.stack-auth.com).
16. Add the return URL: `https://api.stack-auth.com/api/v1/auth/oauth/callback/apple`
17. Click **Done**, then **Continue**, and then **Save**.
### Create a Private Key
1. In the sidebar, select **Keys** and click the "+" button.
2. Give your key a name and usage description.
3. Scroll down to enable **Sign in with Apple** and click **Configure**.
4. Select your Primary App ID that you created earlier and click **Save**.
5. Click **Continue**, then **Register**.
6. On the next page, **download your key file (.p8)**. This is critical as you won't be able to download it again.
7. Note your **Key ID** displayed on this page.
8. Click **Done**.
9. Find your **Account ID** at the very top-right of the Apple Developer Portal page.
### Generate Your Client Secret
Use the tool below to generate your Apple Client Secret. You'll need:
* **Team ID**: Your Apple Developer account ID found at the top-right of the portal
* **Service ID**: The identifier of your Service ID (found in Identifiers > Service IDs)
* **Key ID**: The ID of the private key you just created
* **Private Key File**: Upload the .p8 private key file you downloaded
Copy the generated secret immediately - you'll need it for the next step.
### Enable Apple OAuth in Stack Auth
1. On the Stack Auth dashboard, select **Auth Methods** in the left sidebar.
2. Click **Add SSO Providers** and select **Apple** as the provider.
3. Set the **Client ID** (your Service ID identifier), **Client Secret** (the generated secret from Supabase), and **Team ID** (your Apple Developer Team ID).
## Native App Configuration (iOS/macOS)
Native iOS and macOS apps using the Stack Auth Swift SDK require Bundle ID configuration in addition to the web OAuth setup above. Native apps use Apple's native Sign in with Apple flow (`ASAuthorizationController`) instead of web-based OAuth.
Bundle IDs are only required for native iOS/macOS apps. Web applications only need the Service ID configuration described above.
### Add Your Bundle IDs
1. On the Stack Auth dashboard, navigate to **Auth Methods** and select your Apple provider.
2. In the Apple configuration modal, add your app's **Bundle ID** (e.g., `com.yourdomain.app`). This is the same Bundle ID from your App ID in Apple Developer Portal (Step 1 above).
3. If you have multiple apps (e.g., separate iOS and macOS apps), add all their Bundle IDs.
4. Click **Save**.
Your native app can now use `signInWithOAuth(provider: "apple")` from the Swift SDK.
### Need More Help?
* Check the [Sign in with Apple Documentation](https://developer.apple.com/sign-in-with-apple/get-started/)
* Join our [Discord](https://discord.stack-auth.com)
# Bitbucket
URL: /docs/concepts/auth-providers/bitbucket
Source: /vercel/path0/docs/content/docs/(guides)/concepts/auth-providers/bitbucket.mdx
***
## title: "Bitbucket"
This guide explains how to set up Bitbucket as an authentication provider with Stack Auth. Bitbucket OAuth allows users to sign in to your application using their Bitbucket account.
## Integration Steps
### Create a Bitbucket OAuth App
1. Log in to your [Bitbucket Workspaces account](https://bitbucket.org/account/workspaces/).
2. Under **Workspaces**, find your workspace and select **Manage**.
3. In the left sidebar, scroll down and select **OAuth consumers**.
4. Click **Add consumer**.
5. Fill out the form with the following details:
* **Name**: Choose a name for your application
* **Description**: Add a brief description of your application
* **Callback URL**: Enter `https://api.stack-auth.com/api/v1/auth/oauth/callback/bitbucket`
* **Permissions**: Under **Account**, select at minimum **Email** and **Read**
6. Click **Save**.
7. You'll be redirected to the OAuth consumers page. Select your newly created consumer to view its details.
8. Note the **Key** (Client ID) and **Secret** values. Save these somewhere secure as you'll need them for the next steps.
### Enable Bitbucket OAuth in Stack Auth
1. On the Stack Auth dashboard, select **Auth Methods** in the left sidebar.
2. Click **Add SSO Providers** and select **Bitbucket** as the provider.
3. Set the **Client ID** (the Key from your Bitbucket OAuth consumer) and **Client Secret** you obtained from Bitbucket earlier.
### Need More Help?
* Check the [Bitbucket OAuth documentation](https://developer.atlassian.com/cloud/bitbucket/oauth-2/)
* Join our [Discord](https://discord.stack-auth.com)
# Discord
URL: /docs/concepts/auth-providers/discord
Source: /vercel/path0/docs/content/docs/(guides)/concepts/auth-providers/discord.mdx
***
## title: "Discord"
This guide explains how to set up Discord as an authentication provider with Stack Auth. Discord OAuth2 allows users to sign in to your application using their Discord account.
## Integration Steps
### Create a Discord Developer App
1. Navigate to the [Discord Developer Portal](https://discord.com/developers/applications).
2. Click the **New Application** button in the top-right corner.
3. Enter a name for your application and click **Create**. You will be redirected to the General Information page.
4. Select **OAuth2** in the left sidebar.
5. Under **Redirects** add `https://api.stack-auth.com/api/v1/auth/oauth/callback/discord`
6. In the **OAuth2** section, enable the required scopes: 'identify' and 'email'
7. Click **Save Changes**
8. Save the **Client ID** and **Client Secret**. You may need to select **Reset Secret** to generate a new one.
### Enable Discord OAuth2 in Stack Auth
1. On the Stack Auth dashboard, select **Auth Methods** in the left sidebar.
2. Click **Add SSO Providers** and select **Discord** as the provider.
3. Set the **Client ID** and **Client Secret** you obtained from the Discord Developer Portal earlier.
### User Profile Data
When a user signs in with Discord, Stack Auth will create a user profile with the following data:
* **User ID**: Discord's unique user ID
* **Username**: The user's Discord username
* **Avatar**: The user's Discord avatar (if available)
* **Email**: The user's email if the 'email' scope is requested
### Need More Help?
* Check the [Discord OAuth2 Documentation](https://discord.com/developers/docs/topics/oauth2)
* Visit our [Discord Support Channel](https://discord.stack-auth.com)
# Facebook
URL: /docs/concepts/auth-providers/facebook
Source: /vercel/path0/docs/content/docs/(guides)/concepts/auth-providers/facebook.mdx
***
## title: "Facebook"
This guide explains how to set up Facebook as an authentication provider with Stack Auth. Facebook OAuth allows users to sign in to your application using their Facebook account.
## Integration Steps
### Create a Facebook OAuth App
1. Navigate to the [Facebook Developers Portal](https://developers.facebook.com/).
2. In the top-right, select **My Apps** and then **Create App**.
3. You'll be redirected to the Create an app process.
4. In the **App details** step, select the app type (typically **Consumer** for authentication), fill out the necessary information, and select **Next**.
5. In the **Use Cases** step, select **Authenticate and request data from users with Facebook Login** and then select **Next**.
6. In the **Business** step, select the business portfolio to connect to your app and then select **Next**.
7. In the **Finalize** step, select **Go to dashboard**. You'll be redirected to the app's Dashboard page.
8. In the left sidenav, select **Use cases**.
9. Next to **Authenticate and request data from users with Facebook Login**, select **Customize**.
10. On the Permissions tab, next to **email**, select **Add** to allow Stack Auth to read your user's primary email address.
11. In the left sidenav, under **Facebook Login**, select **Settings**.
12. In the **Client OAuth settings** section, in the **Valid OAuth Redirect URIs** field, add `https://api.stack-auth.com/api/v1/auth/oauth/callback/facebook`
13. Select **Save changes**.
14. In the left sidenav, select **App settings** (hover over the settings icon), and then select **Basic**.
15. Note your **App ID** and **App Secret** for the next steps.
### Enable Facebook OAuth in Stack Auth
1. On the Stack Auth dashboard, select **Auth Methods** in the left sidebar.
2. Click **Add SSO Providers** and select **Facebook** as the provider.
3. Set the **App ID** and **App Secret** you obtained from the Facebook Developers Portal earlier.
### Need More Help?
* Check the [Facebook Login Documentation](https://developers.facebook.com/docs/facebook-login/)
* Join our [Discord](https://discord.stack-auth.com)
# GitHub
URL: /docs/concepts/auth-providers/github
Source: /vercel/path0/docs/content/docs/(guides)/concepts/auth-providers/github.mdx
***
title: "GitHub"
lastModified: "2026-01-13"
--------------------------
This guide explains how to set up GitHub as an authentication provider with Stack Auth. GitHub allows users to sign in to your Stack Auth-enabled app using their GitHub account.
For Development purposes, Stack Auth uses shared keys for this provider. Shared keys are automatically created by Stack, but show Stack's logo on the OAuth sign-in page.
You should replace these before you go into production.
## Integration Steps
If you are unsure if you need to create a GitHub App, or a GitHub OAuth App, check the [Differences On GitHub](https://docs.github.com/en/apps/oauth-apps/building-oauth-apps/differences-between-github-apps-and-oauth-apps).
More than likely, you will want to create a GitHub App. The installation process is the same for both.
### Create a GitHub App
1. Navigate to your [GitHub Developer App Settings](https://github.com/settings/apps).
2. Click the **New GitHub App** button.
3. Enter a name for your application, homepage URL, and a description.
4. For **Authorization callback URL**, add `https://api.stack-auth.com/api/v1/auth/oauth/callback/github`
5. For permissions, at a **minimum**, you will need **Account Permissions > Email Addresses** set to **Read Only**. Your sign-in flow will not work without this permission.
6. Select **Any Account** under the ***Where can this GitHub App be installed*** section.
7. Click **Create GitHub App**
8. Save the **Client ID** and click **Generate a new client secret** to create your **Client Secret**.
### Enable GitHub Provider in Stack Auth
1. On the Stack Auth dashboard, select **Auth Methods** in the left sidebar.
2. Click **Add SSO Providers** and select **GitHub** as the provider.
3. Set the **Client ID** and **Client Secret** you obtained from your GitHub App earlier.
***
### Create an OAuth App
1. Navigate to your [GitHub Developer Settings](https://github.com/settings/developers).
2. Click the **New OAuth App** button.
3. Enter a name for your application, homepage URL, and a description.
4. For **Authorization callback URL**, add `https://api.stack-auth.com/api/v1/auth/oauth/callback/github`
5. Click **Register application**
6. Save the **Client ID** and click **Generate a new client secret** to create your **Client Secret**.
### Enable GitHub OAuth in Stack Auth
1. On the Stack Auth dashboard, select **Auth Methods** in the left sidebar.
2. Click **Add SSO Providers** and select **GitHub** as the provider.
3. Set the **Client ID** and **Client Secret** you obtained from GitHub earlier.
### Need More Help?
* Check the [GitHub OAuth Documentation](https://docs.github.com/en/developers/apps/building-oauth-apps/authorizing-oauth-apps)
* Join our [Discord](https://discord.stack-auth.com)
# GitLab
URL: /docs/concepts/auth-providers/gitlab
Source: /vercel/path0/docs/content/docs/(guides)/concepts/auth-providers/gitlab.mdx
***
## title: "GitLab"
This guide explains how to set up GitLab as an authentication provider with Stack Auth. GitLab OAuth allows users to sign in to your application using their GitLab account.
## Integration Steps
### Create a GitLab OAuth App
1. Log in to your GitLab account.
2. In the top-right corner, click on your profile picture and select **Preferences**.
3. In the left sidebar, select **Applications** > **Add new application**.
4. Fill out the form with the following details:
* **Name**: Choose a name for your application
* **Redirect URI**: Enter `https://api.stack-auth.com/api/v1/auth/oauth/callback/gitlab`
* **Scopes**: Select at minimum the `profile` and `email` scopes
5. Click **Save application**.
6. GitLab will display your **Application ID** and **Secret**. Make note of these values as you'll need them for the next steps.
7. If you're using a self-hosted GitLab instance, you'll also need the URL of your GitLab instance.
### Enable GitLab OAuth in Stack Auth
1. On the Stack Auth dashboard, select **Auth Methods** in the left sidebar.
2. Click **Add SSO Providers** and select **GitLab** as the provider.
3. Set the **Application ID** and **Secret** you obtained from GitLab earlier.
4. If you're using a self-hosted GitLab instance, you'll also need to provide the URL for your instance. For gitlab.com, you can leave this field blank or use the default value.
### Need More Help?
* Check the [GitLab OAuth 2.0 documentation](https://docs.gitlab.com/ee/api/oauth2.html)
* Join our [Discord](https://discord.stack-auth.com)
# Google
URL: /docs/concepts/auth-providers/google
Source: /vercel/path0/docs/content/docs/(guides)/concepts/auth-providers/google.mdx
***
## title: "Google"
This guide explains how to set up Google as an authentication provider with Stack Auth. Google OAuth2 allows users to sign in to your application using their Google account.
For Development purposes, Stack Auth uses shared keys for this provider. Shared keys are automatically created by Stack, but show Stack's logo on the OAuth sign-in page.
You should replace these before you go into production.
## Integration Steps
### Create a Google OAuth2 App
1. Navigate to the [Google Cloud Console](https://console.cloud.google.com/).
2. Create a new project or select an existing one.
3. In the sidebar, navigate to **APIs & Services** > **Credentials**.
4. Click **Create Credentials** and select **OAuth client ID**.
5. Select **Web application** as the application type.
6. Enter a name for your OAuth client.
7. Under **Authorized redirect URIs**, add `https://api.stack-auth.com/api/v1/auth/oauth/callback/google`
8. Click **Create**.
9. Save the **Client ID** and **Client Secret** that are displayed.
### Enable Google OAuth2 in Stack Auth
1. On the Stack Auth dashboard, select **Auth Methods** in the left sidebar.
2. Click **Add SSO Providers** and select **Google** as the provider.
3. Set the **Client ID** and **Client Secret** you obtained from Google Cloud Console earlier.
### Need More Help?
* Check the [Google OAuth2 Documentation](https://developers.google.com/identity/protocols/oauth2)
* Join our [Discord](https://discord.stack-auth.com)
# Auth Providers Overview
URL: /docs/concepts/auth-providers
Source: /vercel/path0/docs/content/docs/(guides)/concepts/auth-providers/index.mdx
***
title: "Auth Providers Overview"
icon: Plug
----------
Stack Auth supports a wide range of authentication providers to help you add secure authentication to your application. This documentation covers all the supported providers and how to configure them.
## OAuth Providers
## Other Authentication Methods
Each provider has its own setup process and configuration requirements. Select a provider from the navigation to learn more about how to configure it with Stack Auth.
# LinkedIn
URL: /docs/concepts/auth-providers/linkedin
Source: /vercel/path0/docs/content/docs/(guides)/concepts/auth-providers/linkedin.mdx
***
## title: "LinkedIn"
This guide explains how to set up LinkedIn as an authentication provider with Stack Auth. LinkedIn OAuth2 allows users to sign in to your application using their LinkedIn account.
## Integration Steps
### Create a LinkedIn OAuth App
1. Log in to the [LinkedIn Developer Portal](https://www.linkedin.com/developers/apps).
2. Click **Create app** to create a new application.
3. Enter your **App name** and select a **LinkedIn Page** to associate with your app (or create a new one).
4. Upload an **App logo** (required for production apps).
5. Enter the **App description** and your **Business email**.
6. Check the **Legal agreement** box and click **Create app**.
7. On your app's dashboard, click **Auth** tab from the left sidebar.
8. Under **OAuth 2.0 settings**, add the following redirect URL: `https://api.stack-auth.com/api/v1/auth/oauth/callback/linkedin`
9. Under **Products**, request access to **Sign In with LinkedIn** by clicking **Request access**. Complete any required information.
10. Under **OAuth 2.0 scopes**, make sure at least the following scopes are selected:
* `r_emailaddress`
* `r_liteprofile`
11. Once approved, navigate to the **Auth** tab again to find your **Client ID** and **Client Secret**.
### Enable LinkedIn OAuth in Stack Auth
1. On the Stack Auth dashboard, select **Auth Methods** in the left sidebar.
2. Click **Add SSO Providers** and select **LinkedIn** as the provider.
3. Set the **Client ID** and **Client Secret** you obtained from the LinkedIn Developer Portal earlier.
### Need More Help?
* Check the [LinkedIn OAuth2 Documentation](https://learn.microsoft.com/en-us/linkedin/shared/authentication/authorization-code-flow)
* Join our [Discord](https://discord.stack-auth.com)
# Microsoft
URL: /docs/concepts/auth-providers/microsoft
Source: /vercel/path0/docs/content/docs/(guides)/concepts/auth-providers/microsoft.mdx
***
## title: "Microsoft"
This guide explains how to set up Microsoft as an authentication provider with Stack Auth. Microsoft OAuth allows users to sign in to your application using their Microsoft account.
For Development purposes, Stack Auth uses shared keys for this provider. Shared keys are automatically created by Stack, but show Stack's logo on the OAuth sign-in page.
You should replace these before you go into production.
## Integration Steps
### Create a Microsoft OAuth App
1. Navigate to the [Microsoft Entra admin center](https://entra.microsoft.com/) (formerly Azure AD).
2. In the left sidebar, go to **Applications** > **App registrations**.
3. Click **New registration** at the top of the page.
4. Enter a name for your application.
5. Under **Supported account types**, select the option that best suits your needs (typically **Accounts in any organizational directory and personal Microsoft accounts**).
6. In the **Redirect URI** section, select **Web** as the platform and enter `https://api.stack-auth.com/api/v1/auth/oauth/callback/microsoft`
7. Click **Register** to create the application.
8. You'll be redirected to the app's Overview page. Note the **Application (client) ID** displayed at the top.
9. In the left sidebar, click **Certificates & secrets**.
10. Under **Client secrets**, click **New client secret**.
11. Add a description, select an expiration period, and click **Add**.
12. Copy the **Value** of the client secret immediately (you won't be able to see it again).
### Enable Microsoft OAuth in Stack Auth
1. On the Stack Auth dashboard, select **Auth Methods** in the left sidebar.
2. Click **Add SSO Providers** and select **Microsoft** as the provider.
3. Set the **Client ID** (Application ID) and **Client Secret** you obtained from the Microsoft Entra admin center.
### Need More Help?
* Check the [Microsoft identity platform Documentation](https://docs.microsoft.com/en-us/azure/active-directory/develop/)
* Join our [Discord](https://discord.stack-auth.com)
# Passkey
URL: /docs/concepts/auth-providers/passkey
Source: /vercel/path0/docs/content/docs/(guides)/concepts/auth-providers/passkey.mdx
***
## title: "Passkey"
This guide explains how to set up Passkey authentication with Stack Auth. Passkeys allow users to sign in to your application securely using biometrics, mobile devices, or security keys.
Passkeys provide a more secure and convenient authentication method compared to traditional passwords by using WebAuthn standard.
## Integration Steps
### Enable Passkey Authentication in Stack Auth
1. Log in to the [Stack Auth dashboard](https://app.stack-auth.com/).
2. Select your project from the dashboard.
3. In the left sidebar, select **Auth Methods**.
4. Find the **Passkey** authentication method and toggle it to enable.
5. Save your changes.
### Implement Passkey Authentication in Your Application
1. Make sure you've installed the Stack Auth SDK in your application:
```bash
npm install @stackframe/stack
```
2. Add Passkey support to your sign-in component by using the built-in Stack Auth components or creating your own implementation with the SDK.
Using built-in components:
```jsx
import { SignIn } from "@stackframe/stack";
export default function SignInPage() {
return ;
}
```
The built-in components will automatically show the passkey option when it's enabled in your project.
## How Passkey Authentication Works
1. **Registration**: When a user creates a new passkey, their device generates a unique public-private key pair. The private key stays on the user's device, while the public key is sent to Stack Auth's servers.
2. **Authentication**: When a user wants to sign in, Stack Auth sends a challenge to the user's device. The device uses the private key to sign the challenge, and sends the signature back to Stack Auth for verification.
3. **Cross-device authentication**: Users can create passkeys on one device and use them to sign in on another device using QR codes or nearby device detection.
For the most up-to-date compatibility information, refer to the [WebAuthn browser compatibility chart](https://caniuse.com/webauthn).
# Spotify
URL: /docs/concepts/auth-providers/spotify
Source: /vercel/path0/docs/content/docs/(guides)/concepts/auth-providers/spotify.mdx
***
## title: "Spotify"
This guide explains how to set up Spotify as an authentication provider with Stack Auth. Spotify OAuth allows users to sign in to your application using their Spotify account.
For Development purposes, Stack Auth uses shared keys for this provider. Shared keys are automatically created by Stack, but show Stack's logo on the OAuth sign-in page.
You should replace these before you go into production.
## Integration Steps
### Create a Spotify OAuth App
1. Navigate to the [Spotify Developer Dashboard](https://developer.spotify.com/dashboard/).
2. Log in with your Spotify account.
3. Click **Create app** to create a new application.
4. Enter an **App name** and **App description**.
5. Under **Redirect URI**, add `https://api.stack-auth.com/api/v1/auth/oauth/callback/spotify`
6. Check the agreement checkbox and click **Create**.
7. You'll be redirected to your app's dashboard. Note your **Client ID** displayed on this page.
8. Click **Settings** to view more details about your app.
9. In the settings page, you can view your **Client Secret** by clicking **Show client secret**.
10. If needed, you can adjust the app settings, including adding additional redirect URIs.
### Enable Spotify OAuth in Stack Auth
1. On the Stack Auth dashboard, select **Auth Methods** in the left sidebar.
2. Click **Add SSO Providers** and select **Spotify** as the provider.
3. Set the **Client ID** and **Client Secret** you obtained from the Spotify Developer Dashboard earlier.
### Need More Help?
* Check the [Spotify Web API Authorization Documentation](https://developer.spotify.com/documentation/general/guides/authorization/)
* Join our [Discord](https://discord.stack-auth.com)
# Twitch
URL: /docs/concepts/auth-providers/twitch
Source: /vercel/path0/docs/content/docs/(guides)/concepts/auth-providers/twitch.mdx
***
## title: "Twitch"
This guide explains how to set up Twitch as an authentication provider with Stack Auth. Twitch OAuth allows users to sign in to your application using their Twitch account.
## Integration Steps
### Create a Twitch OAuth App
1. Navigate to the [Twitch Developer Console](https://dev.twitch.tv/console).
2. Log in with your Twitch account.
3. Navigate to **Applications** and click **Register New Application**.
4. Enter a **Name** and select a **Category**.
5. Under **OAuth Redirect URLs**, add `https://api.stack-auth.com/api/v1/auth/oauth/callback/twitch`
6. Click **Create**.
7. You'll be redirected to your app's dashboard.
8. Click **Manage** of the app you just created to view more details about your app.
9. Click "New Secret" to generate a new secret.
10. Copy and save the **Client ID** and **Client Secret**.
### Enable Twitch OAuth in Stack Auth
1. On the Stack Auth dashboard, select **Auth Methods** in the left sidebar.
2. Click **Add SSO Providers** and select **Twitch** as the provider.
3. Set the **Client ID** and **Client Secret** you obtained from the Twitch Developer Console earlier.
### Need More Help?
* Check the [Twitch OAuth Documentation](https://dev.twitch.tv/docs/authentication/getting-tokens-oauth/)
* Join our [Discord](https://discord.stack-auth.com)
# Two-Factor Authentication (2FA)
URL: /docs/concepts/auth-providers/two-factor-auth
Source: /vercel/path0/docs/content/docs/(guides)/concepts/auth-providers/two-factor-auth.mdx
***
## title: "Two-Factor Authentication (2FA)"
This guide explains how Two-Factor Authentication (2FA) works with Stack Auth. 2FA adds an extra layer of security by requiring users to provide a verification code in addition to their password.
Stack Auth implements TOTP (Time-based One-Time Password) for two-factor authentication, which is compatible with standard authenticator apps like Google Authenticator, Microsoft Authenticator, and Authy. 2FA is enabled by default at the platform level and can be configured by individual users.
## Integration Steps
### No Developer Configuration Required
2FA is enabled by default on the Stack Auth platform. Unlike other authentication methods, you don't need to enable it specifically for your project.
### Implement User Settings in Your Application
To allow your users to set up 2FA for their accounts:
1. Make sure you've installed the Stack Auth SDK in your application:
```bash
npm install @stackframe/stack
```
2. Use the Stack Auth components to give users access to their account settings, where they can enable 2FA:
```jsx
import { AccountSettings } from "@stackframe/stack";
export default function SettingsPage() {
return ;
}
```
3. The built-in Stack Auth components will handle the entire 2FA setup process, including QR code generation, verification, and recovery codes.
## How Stack Auth 2FA Works
Stack Auth uses the industry-standard TOTP (Time-based One-Time Password) algorithm for two-factor authentication:
1. **User Setup**: When a user enables 2FA in their account settings, Stack Auth generates a secret key that is shared with the user's authenticator app (usually via a QR code).
2. **Code Generation**: The authenticator app generates a 6-digit code that changes every 30 seconds, based on the shared secret and the current time.
## Recommended Authenticator Apps
The following authenticator apps are compatible with Stack Auth 2FA:
* Google Authenticator (Android, iOS)
* Microsoft Authenticator (Android, iOS)
* Authy (Android, iOS, desktop)
* 1Password (Android, iOS, desktop)
* LastPass Authenticator (Android, iOS)
# X (Twitter)
URL: /docs/concepts/auth-providers/x-twitter
Source: /vercel/path0/docs/content/docs/(guides)/concepts/auth-providers/x-twitter.mdx
***
## title: "X (Twitter)"
This guide explains how to set up X (formerly Twitter) as an authentication provider with Stack Auth. X OAuth 2.0 allows users to sign in to your application using their X account.
## Integration Steps
### Create an X Developer Account and Project
1. Log in to the [X Developer Portal](https://developer.twitter.com/).
2. Navigate to the [Developer Portal Dashboard](https://developer.twitter.com/en/portal/dashboard).
3. Click on **+ Create Project** to create a new project.
4. Enter a name for your project and select **Web App, Automated App or Bot** as the use case, then click **Next**.
5. Enter a description for your project and click **Next**.
6. Name your app and click **Next**.
7. In the **App settings** section, find your API Key and Secret. These will serve as your OAuth 2.0 Client ID and Client Secret.
8. In the left sidebar, click on your project, then select the app you just created.
9. Click on the **Settings** tab and scroll to the **User authentication settings**.
10. Click **Set up** or **Edit** if already configured.
11. Enable **OAuth 2.0** and set the following details:
* **Type of App**: Web App
* **Callback URL / Redirect URL**: `https://api.stack-auth.com/api/v1/auth/oauth/callback/x`
* **Website URL**: Your website's URL
12. Under **App permissions**, select your scopes.
13. Click **Save** to apply your changes.
### Enable X OAuth in Stack Auth
1. On the Stack Auth dashboard, select **Auth Methods** in the left sidebar.
2. Click **Add SSO Providers** and select **X (Twitter)** as the provider.
3. Set the **Client ID** (your API Key) and **Client Secret** you obtained from the X Developer Portal earlier.
### Need More Help?
* Check the [X OAuth 2.0 documentation](https://developer.twitter.com/en/docs/authentication/oauth-2-0)
* Join our [Discord](https://discord.stack-auth.com)
# Forgot Password
URL: /docs/customization/page-examples/forgot-password
Source: /vercel/path0/docs/content/docs/(guides)/customization/page-examples/forgot-password.mdx
***
## title: Forgot Password
This page provides examples of how to create custom "forgot password" pages for your application. The forgot password functionality allows users to request a password reset email when they can't remember their current password.
## Custom page with `ForgotPassword` component
The `ForgotPassword` component provides a complete form for users to request a password reset email. When a user submits their email, Stack Auth will send them an email with a link to reset their password.
```tsx
'use client';
import { ForgotPassword } from "@stackframe/stack";
export default function DefaultForgotPassword() {
return ;
}
```
## Integration with Application Routing
To integrate the forgot password page with your application's routing:
1. Create a route for your forgot password page (e.g., `/forgot-password`)
2. Configure Stack Auth to use your custom route in your `stack/server.ts` file:
```tsx
export const stackServerApp = new StackServerApp({
// ...
urls: {
forgotPassword: '/forgot-password',
}
});
```
This ensures that links to the forgot password page will direct users to your custom implementation. When a user submits their email, Stack Auth will send them an email with a link to the password reset page configured in your application.
## Custom forgot password form
If you need more control over the forgot password process, you can build your own form. This approach allows you to customize the UI and error handling to match your application's design.
```tsx
'use client';
import { useStackApp } from "@stackframe/stack";
import { useState } from "react";
export default function CustomForgotPasswordForm() {
const [email, setEmail] = useState('');
const [error, setError] = useState('');
const [message, setMessage] = useState('');
const app = useStackApp();
const onSubmit = async () => {
if (!email) {
setError('Please enter your email address');
setMessage('');
return;
}
try {
const result = await app.sendForgotPasswordEmail(email);
if (result?.status === 'error') {
if (result.error.code === 'user_not_found') {
// For security reasons, don't reveal if a user exists or not
setError('');
setMessage('If an account exists with this email, a password reset link has been sent.');
} else {
setError(`Error: ${result.error.message}`);
setMessage('');
}
} else {
setError('');
setMessage('Password reset email sent! Please check your inbox.');
}
} catch (err) {
const message = err instanceof Error ? err.message : 'Unknown error';
setError(`An unexpected error occurred: ${message}`);
setMessage('');
}
};
return (
);
}
```
# Page Examples
URL: /docs/customization/page-examples
Source: /vercel/path0/docs/content/docs/(guides)/customization/page-examples/index.mdx
***
## title: Page Examples
This section contains examples of how to customize various authentication pages in your Stack Auth application.
Browse the examples to learn how to:
* Create custom sign-in pages
* Build custom sign-up forms
* Implement password reset flows
* Handle forgotten password scenarios
Each example shows both the basic component usage and advanced customization techniques.
# Password Reset
URL: /docs/customization/page-examples/password-reset
Source: /vercel/path0/docs/content/docs/(guides)/customization/page-examples/password-reset.mdx
***
## title: Password Reset
This page provides examples of how to create custom password reset pages for your application. Password reset functionality allows users to securely create a new password when they've forgotten their current one.
## Custom page with `PasswordReset` component
The `PasswordReset` component provides a complete password reset form with built-in validation and error handling. This is the simplest way to add password reset functionality to your application.
```tsx
'use client';
import { PasswordReset } from "@stackframe/stack";
export default function DefaultPasswordReset() {
return ;
}
```
## Integration with Application Routing
To integrate the password reset page with your application's routing:
1. Create a route handler that extracts the reset code from the URL (e.g., `/reset-password?code=xyz123`)
2. Pass the code to your password reset component
3. Configure Stack Auth to use your custom route in your `stack/server.ts` file:
```tsx
export const stackServerApp = new StackServerApp({
// ...
urls: {
passwordReset: '/reset-password',
}
});
```
This ensures that password reset links in emails will direct users to your custom page.
## Custom password reset form
If you need more control over the password reset process, you can build your own form using the Stack Auth API. This approach allows you to customize the UI and error handling to match your application's design.
The `code` parameter used below is typically extracted from the URL query parameters. This code is sent to the user's email when they request a password reset and is required to validate the reset request.
```tsx
'use client';
import { useStackApp } from "@stackframe/stack";
import { useState } from "react";
export default function CustomPasswordResetForm({ code }: { code: string }) {
const [password, setPassword] = useState('');
const [confirmPassword, setConfirmPassword] = useState('');
const [error, setError] = useState('');
const [success, setSuccess] = useState(false);
const app = useStackApp();
const onSubmit = async () => {
if (password !== confirmPassword) {
setError('Passwords do not match');
return;
}
try {
const result = await app.resetPassword({ password, code });
if (result.status === 'error') {
setError('Failed to reset password');
return;
}
setSuccess(true);
} catch (err) {
if (err instanceof Error) {
setError(`An unexpected error occurred: ${err.message}`);
} else {
setError('An unexpected error occurred');
}
}
};
if (success) {
return Password successfully reset!
;
}
return (
);
}
```
# Sign-In Page Examples
URL: /docs/customization/page-examples/sign-in
Source: /vercel/path0/docs/content/docs/(guides)/customization/page-examples/sign-in.mdx
***
title: Sign-In Page Examples
lastModified: "2026-01-12"
--------------------------
This page provides examples of how to create custom sign-in pages for your application using Stack Auth components and functions.
## Custom page with `SignIn` component
```tsx title="app/handler/sign-in/page.tsx"
'use client';
import { SignIn } from "@stackframe/stack";
export default function DefaultSignIn() {
// optionally redirect to some other page if the user is already signed in
// const user = useUser();
// if (user) { redirect to some other page }
return ;
}
```
You can also use `useUser` at the beginning of the sign-in page to check whether the user is already signed in and redirect them to another page if they are.
## Other useful components
`CredentialSignIn`: A component that renders a complete form for signing in with email and password. It handles validation, error states, and submission automatically.
`OAuthGroup`: A component that displays a list of available OAuth provider sign-in buttons. The available provider list is automatically fetched from the server based on your project configuration.
`OAuthButton`: A component that renders a single OAuth sign-in button for a specific provider. Use this when you only want to offer specific OAuth providers.
## Custom OAuth Sign In
```tsx title="app/handler/sign-in/page.tsx"
'use client';
import { useStackApp } from "@stackframe/stack";
export default function CustomOAuthSignIn() {
const app = useStackApp();
return (
My Custom Sign In page
);
}
```
## Custom Credential Sign In
```tsx title="app/handler/sign-in/page.tsx"
'use client';
import { useStackApp } from "@stackframe/stack";
import { useState } from "react";
export default function CustomCredentialSignIn() {
const [email, setEmail] = useState('');
const [password, setPassword] = useState('');
const [error, setError] = useState('');
const app = useStackApp();
const onSubmit = async () => {
if (!password) {
setError('Please enter your password');
return;
}
// This will redirect to app.urls.afterSignIn if successful.
// You can customize the redirect URL in the StackServerApp constructor.
const result = await app.signInWithCredential({ email, password });
// It's better to handle each error code separately, but for simplicity,
// we'll just display the error message directly here.
if (result.status === 'error') {
setError(result.error.message);
}
};
return (
);
}
```
## Custom Magic Link Sign In
```tsx title="app/handler/sign-in/page.tsx"
'use client';
import { useStackApp } from "@stackframe/stack";
import { useState } from "react";
export default function CustomMagicLinkSignIn() {
const [email, setEmail] = useState('');
const [error, setError] = useState('');
const [message, setMessage] = useState('');
const app = useStackApp();
const onSubmit = async () => {
if (!email) {
setError('Please enter your email address');
return;
}
// This will send a magic link email to the user's email address.
// When they click the link, they will be redirected to your application.
const result = await app.sendMagicLinkEmail(email);
// It's better to handle each error code separately, but for simplicity,
// we'll just display the error message directly here.
if (result.status === 'error') {
setError(result.error.message);
} else {
setMessage('Magic link sent! Please check your email.');
}
};
return (
);
}
```
# Sign-Up Page Examples
URL: /docs/customization/page-examples/sign-up
Source: /vercel/path0/docs/content/docs/(guides)/customization/page-examples/sign-up.mdx
***
title: Sign-Up Page Examples
lastModified: "2026-01-12"
--------------------------
This page provides examples of how to create custom sign-up pages for your application using Stack Auth components and functions.
## Custom page with `SignUp` component
```tsx title="app/handler/sign-up/page.tsx"
'use client';
import { SignUp } from "@stackframe/stack";
export default function DefaultSignUp() {
// optionally redirect to some other page if the user is already signed in
// const user = useUser();
// if (user) { redirect to some other page }
return ;
}
```
You can also use `useUser` at the beginning of the sign-up page to check whether the user is already signed in and redirect them to another page if they are.
## Other useful components
`CredentialSignUp`: A component that renders a complete form for signing up with email and password. It handles validation, error states, and submission automatically.
`OAuthGroup`: A component that displays a list of available OAuth provider sign-up buttons. The available provider list is automatically fetched from the server based on your project configuration.
`OAuthButton`: A component that renders a single OAuth sign-up button for a specific provider. Use this when you only want to offer specific OAuth providers.
## Custom OAuth Sign Up
OAuth sign-in and sign-up share the same function. Check out the [Sign In example](/customization/page-examples/sign-in#custom-oauth-sign-in) for more information.
## Custom Credential Sign Up
```tsx title="app/handler/sign-up/page.tsx"
'use client';
import { useStackApp } from "@stackframe/stack";
import { useState } from "react";
export default function CustomCredentialSignUp() {
const [email, setEmail] = useState('');
const [password, setPassword] = useState('');
const [error, setError] = useState('');
const app = useStackApp();
const onSubmit = async () => {
if (!password) {
setError('Please enter your password');
return;
}
// This will redirect to app.urls.afterSignUp if successful.
// You can customize the redirect URL in the StackServerApp constructor.
const result = await app.signUpWithCredential({ email, password });
// It's better to handle each error code separately, but for simplicity,
// we'll just display the error message directly here.
if (result.status === 'error') {
setError(result.error.message);
}
};
return (
);
}
```
## Custom Magic Link Sign Up
Magic link sign-in and sign-up shares the same function. Check out the [Sign In example](/customization/page-examples/signin#custom-magic-link-sign-in) for more information.
# API Reference
URL: /api/overview
Source: /vercel/path0/docs/content/api/overview.mdx
Complete REST API documentation for Stack Auth
***
title: API Reference
description: Complete REST API documentation for Stack Auth
full: true
lastModified: "2026-01-16"
--------------------------
# REST API & Webhooks
Stack products a REST API for backends & frontends of any programming language or framework. This API is used to authenticate users, manage user data, and more.
## Authentication
The following authentication headers are common to every endpoint:
```http
curl https://api.stack-auth.com/api/v1/ \
-H "X-Stack-Access-Type: " \
-H "X-Stack-Project-Id: " \
-H "X-Stack-Publishable-Client-Key: pck_" \
-H "X-Stack-Secret-Server-Key: ssk_" \
-H "X-Stack-Access-Token: "
```
| Header | Type | Description |
| -------------------------------- | -------------------- | ---------------------------------------------------------------------------------------------------------- |
| `X-Stack-Access-Type` | "client" \| "server" | Required. "client" (without quotes) for the frontend API, or "server" for the backend API. |
| `X-Stack-Project-Id` | UUID | Required. The project ID as found on the Stack dashboard. |
| `X-Stack-Publishable-Client-Key` | string | Required for client access. The API key as found on the Stack dashboard. |
| `X-Stack-Secret-Server-Key` | string | Required for server access. The API key as found on the Stack dashboard. |
| `X-Stack-Access-Token` | string | Optional. The access token for the current user. If not given, the request is considered to be logged out. |
{/* IF_PLATFORM python */}
To see how to use these headers in various programming languages, see the [Getting Started guide](./../getting-started/setup.mdx).
{/* ELSE_IF_PLATFORM js-like */}
To see how to use these headers in various programming languages, see the [examples](./../concepts/backend-integration.mdx).
{/* END_IF_PLATFORM */}
## Getting Started
**Choose the right API**: Select the API category that matches your use case from the cards above
**Set up authentication**: Configure the appropriate authentication method (sessions, API keys, or webhook verification)
**Make requests**: Use the documented endpoints with proper authentication headers
**Handle responses**: Process the API responses according to the documentation and error handling guidelines
## FAQ
Any language that has the ability to send HTTP requests can use the Stack REST API. This includes JavaScript, Python, Ruby, Java, Go, C#, Dart, and many more.
**Client access type** is mostly used for client-side applications, like a browser or mobile app. The client APIs can only read and update the currently authenticated user's data, and it is usually fine to post the publishable client key in the client-side code.
**Server access type**, on the other hand, is for your backend server that you control. It has full access over all user data, and the secret server key should never be exposed to client-side code.
For more information, see the concept documentation on [StackApp](../concepts/stack-app#client-vs-server).
If you'd like to build your own version of the Stack dashboard (or update project configuration programmatically), you can use the `admin` access type. These endpoints are very dangerous and you should only use them if you know what you're doing.
For more information, see the concept documentation on [StackApp](../concepts/stack-app#client-vs-server).
Stack Auth API returns standard HTTP status codes. Common error responses include:
* `400 Bad Request` - Invalid request parameters
* `401 Unauthorized` - Invalid or missing authentication
* `403 Forbidden` - Insufficient permissions
* `404 Not Found` - Resource not found
* `429 Too Many Requests` - Rate limit exceeded
* `500 Internal Server Error` - Server error
Error responses include a JSON body with additional details about the error.
Yes, Stack Auth implements rate limiting to ensure fair usage and system stability. Rate limits vary by endpoint and access type. When you exceed the rate limit, you'll receive a `429 Too Many Requests` response with headers indicating when you can retry.
## Need Help?
* Check out our [Getting Started Guide](/docs/getting-started/setup) for initial setup
* Join our [Discord community](https://discord.stack-auth.com/) for support and discussions
# List project permissions
URL: /api/admin/permissions/project-permissions
Source: /vercel/path0/docs/content/api/admin/permissions/project-permissions.mdx
# API Documentation: List project permissions
Query and filter the permission with `user_id` and `permission_id`. `(user_id, permission_id)` together uniquely identify a permission.
## GET /project-permissions
**Summary:** List project permissions
**Description:** Query and filter the permission with `user_id` and `permission_id`. `(user_id, permission_id)` together uniquely identify a permission.
**Parameters:**
- `user_id` (query): Filter with the user ID. If set, only the permissions this user has will be returned. Client request must set `user_id=me`
- `permission_id` (query): Filter with the permission ID. If set, only the permissions with this specific ID will be returned
- `recursive` (query): Whether to list permissions recursively. If set to `false`, only the permission the users directly have will be listed. If set to `true` all the direct and indirect permissions will be listed.
**Responses:**
- 200: Successful response
# List team permissions of a user
URL: /api/admin/permissions/team-permissions
Source: /vercel/path0/docs/content/api/admin/permissions/team-permissions.mdx
# API Documentation: List team permissions of a user
Query and filter the permission with `team_id`, `user_id`, and `permission_id`. Note that this might contain the permissions with the same permission ID across different teams and users. `(team_id, user_id, permission_id)` together uniquely identify a permission.
## GET /team-permissions
**Summary:** List team permissions of a user
**Description:** Query and filter the permission with `team_id`, `user_id`, and `permission_id`. Note that this might contain the permissions with the same permission ID across different teams and users. `(team_id, user_id, permission_id)` together uniquely identify a permission.
**Parameters:**
- `team_id` (query): Filter with the team ID. If set, only the permissions of the members in a specific team will be returned.
- `user_id` (query): Filter with the user ID. If set, only the permissions this user has will be returned. Client request must set `user_id=me`
- `permission_id` (query): Filter with the permission ID. If set, only the permissions with this specific ID will be returned
- `recursive` (query): Whether to list permissions recursively. If set to `false`, only the permission the users directly have will be listed. If set to `true` all the direct and indirect permissions will be listed.
**Responses:**
- 200: Successful response
# List team invitations
URL: /api/admin/teams/team-invitations
Source: /vercel/path0/docs/content/api/admin/teams/team-invitations.mdx
# API Documentation: List team invitations
## GET /team-invitations
**Summary:** List team invitations
**Parameters:**
- `team_id` (query): The team ID to list invitations for. Required unless user_id is provided.
- `user_id` (query): List invitations sent to this user's verified emails. Must be "me" for client access. Cannot be combined with team_id.
**Responses:**
- 200: Successful response
# List team members profiles
URL: /api/admin/teams/team-member-profiles
Source: /vercel/path0/docs/content/api/admin/teams/team-member-profiles.mdx
# API Documentation: List team members profiles
List team members profiles and filter by team ID and user ID
## GET /team-member-profiles
**Summary:** List team members profiles
**Description:** List team members profiles and filter by team ID and user ID
**Parameters:**
- `user_id` (query): No description
- `team_id` (query): No description
**Responses:**
- 200: Successful response
# List OAuth providers
URL: /api/client/oauth/oauth-providers
Source: /vercel/path0/docs/content/api/client/oauth/oauth-providers.mdx
# API Documentation: List OAuth providers
Retrieves a list of all OAuth providers for a user.
## GET /oauth-providers
**Summary:** List OAuth providers
**Description:** Retrieves a list of all OAuth providers for a user.
**Parameters:**
- `user_id` (query): No description
**Responses:**
- 200: Successful response
# List project permissions
URL: /api/client/permissions/project-permissions
Source: /vercel/path0/docs/content/api/client/permissions/project-permissions.mdx
# API Documentation: List project permissions
List global permissions of the current user. `user_id=me` must be set for client requests. `(user_id, permission_id)` together uniquely identify a permission.
## GET /project-permissions
**Summary:** List project permissions
**Description:** List global permissions of the current user. `user_id=me` must be set for client requests. `(user_id, permission_id)` together uniquely identify a permission.
**Parameters:**
- `user_id` (query): Filter with the user ID. If set, only the permissions this user has will be returned. Client request must set `user_id=me`
- `permission_id` (query): Filter with the permission ID. If set, only the permissions with this specific ID will be returned
- `recursive` (query): Whether to list permissions recursively. If set to `false`, only the permission the users directly have will be listed. If set to `true` all the direct and indirect permissions will be listed.
**Responses:**
- 200: Successful response
# List team permissions
URL: /api/client/permissions/team-permissions
Source: /vercel/path0/docs/content/api/client/permissions/team-permissions.mdx
# API Documentation: List team permissions
List team permissions of the current user. `user_id=me` must be set for client requests. Note that this might contain the permissions with the same permission ID across different teams. `(team_id, user_id, permission_id)` together uniquely identify a permission.
## GET /team-permissions
**Summary:** List team permissions
**Description:** List team permissions of the current user. `user_id=me` must be set for client requests. Note that this might contain the permissions with the same permission ID across different teams. `(team_id, user_id, permission_id)` together uniquely identify a permission.
**Parameters:**
- `team_id` (query): Filter with the team ID. If set, only the permissions of the members in a specific team will be returned.
- `user_id` (query): Filter with the user ID. If set, only the permissions this user has will be returned. Client request must set `user_id=me`
- `permission_id` (query): Filter with the permission ID. If set, only the permissions with this specific ID will be returned
- `recursive` (query): Whether to list permissions recursively. If set to `false`, only the permission the users directly have will be listed. If set to `true` all the direct and indirect permissions will be listed.
**Responses:**
- 200: Successful response
# List team invitations
URL: /api/client/teams/team-invitations
Source: /vercel/path0/docs/content/api/client/teams/team-invitations.mdx
# API Documentation: List team invitations
## GET /team-invitations
**Summary:** List team invitations
**Parameters:**
- `team_id` (query): The team ID to list invitations for. Required unless user_id is provided.
- `user_id` (query): List invitations sent to this user's verified emails. Must be "me" for client access. Cannot be combined with team_id.
**Responses:**
- 200: Successful response
# List team members profiles
URL: /api/client/teams/team-member-profiles
Source: /vercel/path0/docs/content/api/client/teams/team-member-profiles.mdx
# API Documentation: List team members profiles
List team members profiles. You always need to specify a `team_id` that your are a member of on the client. You can always filter for your own profile by setting `me` as the `user_id` in the path parameters. If you want list all the profiles in a team, you need to have the `$read_members` permission in that team.
## GET /team-member-profiles
**Summary:** List team members profiles
**Description:** List team members profiles. You always need to specify a `team_id` that your are a member of on the client. You can always filter for your own profile by setting `me` as the `user_id` in the path parameters. If you want list all the profiles in a team, you need to have the `$read_members` permission in that team.
**Parameters:**
- `user_id` (query): No description
- `team_id` (query): No description
**Responses:**
- 200: Successful response
# List project permissions
URL: /api/server/permissions/project-permissions
Source: /vercel/path0/docs/content/api/server/permissions/project-permissions.mdx
# API Documentation: List project permissions
Query and filter the permission with `user_id` and `permission_id`. `(user_id, permission_id)` together uniquely identify a permission.
## GET /project-permissions
**Summary:** List project permissions
**Description:** Query and filter the permission with `user_id` and `permission_id`. `(user_id, permission_id)` together uniquely identify a permission.
**Parameters:**
- `user_id` (query): Filter with the user ID. If set, only the permissions this user has will be returned. Client request must set `user_id=me`
- `permission_id` (query): Filter with the permission ID. If set, only the permissions with this specific ID will be returned
- `recursive` (query): Whether to list permissions recursively. If set to `false`, only the permission the users directly have will be listed. If set to `true` all the direct and indirect permissions will be listed.
**Responses:**
- 200: Successful response
# List team permissions of a user
URL: /api/server/permissions/team-permissions
Source: /vercel/path0/docs/content/api/server/permissions/team-permissions.mdx
# API Documentation: List team permissions of a user
Query and filter the permission with `team_id`, `user_id`, and `permission_id`. Note that this might contain the permissions with the same permission ID across different teams and users. `(team_id, user_id, permission_id)` together uniquely identify a permission.
## GET /team-permissions
**Summary:** List team permissions of a user
**Description:** Query and filter the permission with `team_id`, `user_id`, and `permission_id`. Note that this might contain the permissions with the same permission ID across different teams and users. `(team_id, user_id, permission_id)` together uniquely identify a permission.
**Parameters:**
- `team_id` (query): Filter with the team ID. If set, only the permissions of the members in a specific team will be returned.
- `user_id` (query): Filter with the user ID. If set, only the permissions this user has will be returned. Client request must set `user_id=me`
- `permission_id` (query): Filter with the permission ID. If set, only the permissions with this specific ID will be returned
- `recursive` (query): Whether to list permissions recursively. If set to `false`, only the permission the users directly have will be listed. If set to `true` all the direct and indirect permissions will be listed.
**Responses:**
- 200: Successful response
# List team invitations
URL: /api/server/teams/team-invitations
Source: /vercel/path0/docs/content/api/server/teams/team-invitations.mdx
# API Documentation: List team invitations
## GET /team-invitations
**Summary:** List team invitations
**Parameters:**
- `team_id` (query): The team ID to list invitations for. Required unless user_id is provided.
- `user_id` (query): List invitations sent to this user's verified emails. Must be "me" for client access. Cannot be combined with team_id.
**Responses:**
- 200: Successful response
# List team members profiles
URL: /api/server/teams/team-member-profiles
Source: /vercel/path0/docs/content/api/server/teams/team-member-profiles.mdx
# API Documentation: List team members profiles
List team members profiles and filter by team ID and user ID
## GET /team-member-profiles
**Summary:** List team members profiles
**Description:** List team members profiles and filter by team ID and user ID
**Parameters:**
- `user_id` (query): No description
- `team_id` (query): No description
**Responses:**
- 200: Successful response
# team.created
URL: /api/webhooks/teams/team.created
Source: /vercel/path0/docs/content/api/webhooks/teams/team.created.mdx
This event is triggered when a team is created.
***
title: team.created
description: This event is triggered when a team is created.
full: true
\_openapi:
toc: \[]
structuredData:
headings: \[]
contents: \[]
-------------
# team.deleted
URL: /api/webhooks/teams/team.deleted
Source: /vercel/path0/docs/content/api/webhooks/teams/team.deleted.mdx
This event is triggered when a team is deleted.
***
title: team.deleted
description: This event is triggered when a team is deleted.
full: true
\_openapi:
toc: \[]
structuredData:
headings: \[]
contents: \[]
-------------
# team.updated
URL: /api/webhooks/teams/team.updated
Source: /vercel/path0/docs/content/api/webhooks/teams/team.updated.mdx
This event is triggered when a team is updated.
***
title: team.updated
description: This event is triggered when a team is updated.
full: true
\_openapi:
toc: \[]
structuredData:
headings: \[]
contents: \[]
-------------
# team_membership.created
URL: /api/webhooks/teams/team_membership.created
Source: /vercel/path0/docs/content/api/webhooks/teams/team_membership.created.mdx
This event is triggered when a user is added to a team.
***
title: team\_membership.created
description: This event is triggered when a user is added to a team.
full: true
\_openapi:
toc: \[]
structuredData:
headings: \[]
contents: \[]
-------------
# team_membership.deleted
URL: /api/webhooks/teams/team_membership.deleted
Source: /vercel/path0/docs/content/api/webhooks/teams/team_membership.deleted.mdx
This event is triggered when a user is removed from a team.
***
title: team\_membership.deleted
description: This event is triggered when a user is removed from a team.
full: true
\_openapi:
toc: \[]
structuredData:
headings: \[]
contents: \[]
-------------
# team_permission.created
URL: /api/webhooks/teams/team_permission.created
Source: /vercel/path0/docs/content/api/webhooks/teams/team_permission.created.mdx
This event is triggered when a team permission is created.
***
title: team\_permission.created
description: This event is triggered when a team permission is created.
full: true
\_openapi:
toc: \[]
structuredData:
headings: \[]
contents: \[]
-------------
# team_permission.deleted
URL: /api/webhooks/teams/team_permission.deleted
Source: /vercel/path0/docs/content/api/webhooks/teams/team_permission.deleted.mdx
This event is triggered when a team permission is deleted.
***
title: team\_permission.deleted
description: This event is triggered when a team permission is deleted.
full: true
\_openapi:
toc: \[]
structuredData:
headings: \[]
contents: \[]
-------------
# user.created
URL: /api/webhooks/users/user.created
Source: /vercel/path0/docs/content/api/webhooks/users/user.created.mdx
This event is triggered when a user is created.
***
title: user.created
description: This event is triggered when a user is created.
full: true
\_openapi:
toc: \[]
structuredData:
headings: \[]
contents: \[]
-------------
# user.deleted
URL: /api/webhooks/users/user.deleted
Source: /vercel/path0/docs/content/api/webhooks/users/user.deleted.mdx
This event is triggered when a user is deleted.
***
title: user.deleted
description: This event is triggered when a user is deleted.
full: true
\_openapi:
toc: \[]
structuredData:
headings: \[]
contents: \[]
-------------
# user.updated
URL: /api/webhooks/users/user.updated
Source: /vercel/path0/docs/content/api/webhooks/users/user.updated.mdx
This event is triggered when a user is updated.
***
title: user.updated
description: This event is triggered when a user is updated.
full: true
\_openapi:
toc: \[]
structuredData:
headings: \[]
contents: \[]
-------------
# Check team API key validity
URL: /api/admin/api-keys/team-api-keys/check
Source: /vercel/path0/docs/content/api/admin/api-keys/team-api-keys/check.mdx
# API Documentation: Check team API key validity
Validate a team API key
## POST /team-api-keys/check
**Summary:** Check team API key validity
**Description:** Validate a team API key
**Request Body:** Request body required
**Responses:**
- 200: Successful response
# List team API keys
URL: /api/admin/api-keys/team-api-keys/get
Source: /vercel/path0/docs/content/api/admin/api-keys/team-api-keys/get.mdx
# API Documentation: List team API keys
List all team API keys for the project with their metadata and status
## GET /team-api-keys
**Summary:** List team API keys
**Description:** List all team API keys for the project with their metadata and status
**Parameters:**
- `team_id` (query): No description
**Responses:**
- 200: Successful response
# Create team API key
URL: /api/admin/api-keys/team-api-keys/post
Source: /vercel/path0/docs/content/api/admin/api-keys/team-api-keys/post.mdx
# API Documentation: Create team API key
Create a new API key for a user or team
## POST /team-api-keys
**Summary:** Create team API key
**Description:** Create a new API key for a user or team
**Request Body:** Request body required
**Responses:**
- 200: Successful response
# Check user API key validity
URL: /api/admin/api-keys/user-api-keys/check
Source: /vercel/path0/docs/content/api/admin/api-keys/user-api-keys/check.mdx
# API Documentation: Check user API key validity
Validate a user API key
## POST /user-api-keys/check
**Summary:** Check user API key validity
**Description:** Validate a user API key
**Request Body:** Request body required
**Responses:**
- 200: Successful response
# List user API keys
URL: /api/admin/api-keys/user-api-keys/get
Source: /vercel/path0/docs/content/api/admin/api-keys/user-api-keys/get.mdx
# API Documentation: List user API keys
List all user API keys for the project with their metadata and status
## GET /user-api-keys
**Summary:** List user API keys
**Description:** List all user API keys for the project with their metadata and status
**Parameters:**
- `user_id` (query): No description
**Responses:**
- 200: Successful response
# Create user API key
URL: /api/admin/api-keys/user-api-keys/post
Source: /vercel/path0/docs/content/api/admin/api-keys/user-api-keys/post.mdx
# API Documentation: Create user API key
Create a new API key for a user or team
## POST /user-api-keys
**Summary:** Create user API key
**Description:** Create a new API key for a user or team
**Request Body:** Request body required
**Responses:**
- 200: Successful response
# Initiate CLI authentication
URL: /api/admin/cli-authentication/auth/cli
Source: /vercel/path0/docs/content/api/admin/cli-authentication/auth/cli.mdx
# API Documentation: Initiate CLI authentication
Create a new CLI authentication session and return polling and login codes
## POST /auth/cli
**Summary:** Initiate CLI authentication
**Description:** Create a new CLI authentication session and return polling and login codes
**Request Body:** Request body required
**Responses:**
- 200: Successful response
# List contact channels
URL: /api/admin/contact-channels/contact-channels/get
Source: /vercel/path0/docs/content/api/admin/contact-channels/contact-channels/get.mdx
# API Documentation: List contact channels
Retrieves a list of all contact channels for a user.
## GET /contact-channels
**Summary:** List contact channels
**Description:** Retrieves a list of all contact channels for a user.
**Parameters:**
- `user_id` (query): The ID of the user, or the special value `me` for the currently authenticated user
- `contact_channel_id` (query): No description
**Responses:**
- 200: Successful response
# Create a contact channel
URL: /api/admin/contact-channels/contact-channels/post
Source: /vercel/path0/docs/content/api/admin/contact-channels/contact-channels/post.mdx
# API Documentation: Create a contact channel
Add a new contact channel for a user.
## POST /contact-channels
**Summary:** Create a contact channel
**Description:** Add a new contact channel for a user.
**Parameters:**
- `user_id` (query): The ID of the user, or the special value `me` for the currently authenticated user
- `contact_channel_id` (query): No description
**Request Body:** Request body required
**Responses:**
- 201: Successful response
# Verify an email
URL: /api/admin/contact-channels/contact-channels/verify
Source: /vercel/path0/docs/content/api/admin/contact-channels/contact-channels/verify.mdx
# API Documentation: Verify an email
Verify an email address of a user
## POST /contact-channels/verify
**Summary:** Verify an email
**Description:** Verify an email address of a user
**Request Body:** Request body required
**Responses:**
- 200: Successful response
# Activate email capacity boost
URL: /api/admin/emails/emails/capacity-boost
Source: /vercel/path0/docs/content/api/admin/emails/emails/capacity-boost.mdx
# API Documentation: Activate email capacity boost
Temporarily increases email capacity by 4x for 4 hours.
## POST /emails/capacity-boost
**Summary:** Activate email capacity boost
**Description:** Temporarily increases email capacity by 4x for 4 hours.
**Responses:**
- 200: Successful response
# Get email delivery info
URL: /api/admin/emails/emails/delivery-info
Source: /vercel/path0/docs/content/api/admin/emails/emails/delivery-info.mdx
# API Documentation: Get email delivery info
Returns delivery statistics and capacity information for the current tenancy.
## GET /emails/delivery-info
**Summary:** Get email delivery info
**Description:** Returns delivery statistics and capacity information for the current tenancy.
**Responses:**
- 200: Successful response
# List email outbox
URL: /api/admin/emails/emails/outbox
Source: /vercel/path0/docs/content/api/admin/emails/emails/outbox.mdx
# API Documentation: List email outbox
Lists all emails in the outbox with optional filtering by status or simple_status.
## GET /emails/outbox
**Summary:** List email outbox
**Description:** Lists all emails in the outbox with optional filtering by status or simple_status.
**Parameters:**
- `status` (query): No description
- `simple_status` (query): No description
- `limit` (query): The maximum number of items to return. Maximum allowed is 100
- `cursor` (query): The cursor to start the result set from (email ID)
**Responses:**
- 200: Successful response
# Render email theme
URL: /api/admin/emails/emails/render-email
Source: /vercel/path0/docs/content/api/admin/emails/emails/render-email.mdx
# API Documentation: Render email theme
Renders HTML content using the specified email theme
## POST /emails/render-email
**Summary:** Render email theme
**Description:** Renders HTML content using the specified email theme
**Responses:**
- 200: Successful response
# Send email
URL: /api/admin/emails/emails/send-email
Source: /vercel/path0/docs/content/api/admin/emails/emails/send-email.mdx
# API Documentation: Send email
Send an email to a list of users. The content field should contain either {html} for HTML emails, {template_id, variables} for template-based emails, or {draft_id} for a draft email.
## POST /emails/send-email
**Summary:** Send email
**Description:** Send an email to a list of users. The content field should contain either {html} for HTML emails, {template_id, variables} for template-based emails, or {draft_id} for a draft email.
**Responses:**
- 200: Successful response
# List OAuth providers
URL: /api/admin/oauth/oauth-providers/get
Source: /vercel/path0/docs/content/api/admin/oauth/oauth-providers/get.mdx
# API Documentation: List OAuth providers
Retrieves a list of all OAuth providers for a user.
## GET /oauth-providers
**Summary:** List OAuth providers
**Description:** Retrieves a list of all OAuth providers for a user.
**Parameters:**
- `user_id` (query): No description
**Responses:**
- 200: Successful response
# Create an OAuth provider
URL: /api/admin/oauth/oauth-providers/post
Source: /vercel/path0/docs/content/api/admin/oauth/oauth-providers/post.mdx
# API Documentation: Create an OAuth provider
Add a new OAuth provider for a user.
## POST /oauth-providers
**Summary:** Create an OAuth provider
**Description:** Add a new OAuth provider for a user.
**Request Body:** Request body required
**Responses:**
- 201: Successful response
# List project permission definitions
URL: /api/admin/permissions/project-permission-definitions/get
Source: /vercel/path0/docs/content/api/admin/permissions/project-permission-definitions/get.mdx
# API Documentation: List project permission definitions
Query and filter project permission definitions (the equivalent of listing permissions on the Stack dashboard)
## GET /project-permission-definitions
**Summary:** List project permission definitions
**Description:** Query and filter project permission definitions (the equivalent of listing permissions on the Stack dashboard)
**Responses:**
- 200: Successful response
# Create a new project permission definition
URL: /api/admin/permissions/project-permission-definitions/post
Source: /vercel/path0/docs/content/api/admin/permissions/project-permission-definitions/post.mdx
# API Documentation: Create a new project permission definition
Create a new project permission definition (the equivalent of creating a new permission on the Stack dashboard)
## POST /project-permission-definitions
**Summary:** Create a new project permission definition
**Description:** Create a new project permission definition (the equivalent of creating a new permission on the Stack dashboard)
**Request Body:** Request body required
**Responses:**
- 201: Successful response
# List team permission definitions
URL: /api/admin/permissions/team-permission-definitions/get
Source: /vercel/path0/docs/content/api/admin/permissions/team-permission-definitions/get.mdx
# API Documentation: List team permission definitions
Query and filter the permission with team_id, user_id, and permission_id (the equivalent of listing permissions on the Stack dashboard)
## GET /team-permission-definitions
**Summary:** List team permission definitions
**Description:** Query and filter the permission with team_id, user_id, and permission_id (the equivalent of listing permissions on the Stack dashboard)
**Parameters:**
- `limit` (query): Maximum number of items to return (capped at 200). When set, the response is paginated via cursor.
- `cursor` (query): Cursor (permission id) to start the next page from. Requires `limit` to also be set.
- `query` (query): Free-text filter applied to permission id and description (case-insensitive).
**Responses:**
- 200: Successful response
# Create a new team permission definition
URL: /api/admin/permissions/team-permission-definitions/post
Source: /vercel/path0/docs/content/api/admin/permissions/team-permission-definitions/post.mdx
# API Documentation: Create a new team permission definition
Create a new permission definition (the equivalent of creating a new permission on the Stack dashboard)
## POST /team-permission-definitions
**Summary:** Create a new team permission definition
**Description:** Create a new permission definition (the equivalent of creating a new permission on the Stack dashboard)
**Request Body:** Request body required
**Responses:**
- 201: Successful response
# Get the current project
URL: /api/admin/projects/projects/current
Source: /vercel/path0/docs/content/api/admin/projects/projects/current.mdx
# API Documentation: Get the current project
Get the current project information including display name, OAuth providers and authentication methods. Useful for displaying the available login options to the user.
## GET /projects/current
**Summary:** Get the current project
**Description:** Get the current project information including display name, OAuth providers and authentication methods. Useful for displaying the available login options to the user.
**Responses:**
- 200: Successful response
# Accept the team invitation
URL: /api/admin/teams/team-invitations/accept
Source: /vercel/path0/docs/content/api/admin/teams/team-invitations/accept.mdx
# API Documentation: Accept the team invitation
Accept invitation and add user to the team
## POST /team-invitations/accept
**Summary:** Accept the team invitation
**Description:** Accept invitation and add user to the team
**Request Body:** Request body required
**Responses:**
- 200: Successful response
# Delete a team invitation
URL: /api/admin/teams/team-invitations/id
Source: /vercel/path0/docs/content/api/admin/teams/team-invitations/id.mdx
# API Documentation: Delete a team invitation
## DELETE /team-invitations/{id}
**Summary:** Delete a team invitation
**Parameters:**
- `team_id` (query): The team ID to list invitations for. Required unless user_id is provided.
- `id` (path): No description
**Responses:**
- 200: Successful response
# Send an email to invite a user to a team
URL: /api/admin/teams/team-invitations/send-code
Source: /vercel/path0/docs/content/api/admin/teams/team-invitations/send-code.mdx
# API Documentation: Send an email to invite a user to a team
The user receiving this email can join the team by clicking on the link in the email. If the user does not have an account yet, they will be prompted to create one.
## POST /team-invitations/send-code
**Summary:** Send an email to invite a user to a team
**Description:** The user receiving this email can join the team by clicking on the link in the email. If the user does not have an account yet, they will be prompted to create one.
**Request Body:** Request body required
**Responses:**
- 200: Successful response
# List teams
URL: /api/admin/teams/teams/get
Source: /vercel/path0/docs/content/api/admin/teams/teams/get.mdx
# API Documentation: List teams
List all the teams in the project.
## GET /teams
**Summary:** List teams
**Description:** List all the teams in the project.
**Parameters:**
- `user_id` (query): Filter for the teams that the user is a member of. Can be either `me` or an ID. Must be `me` in the client API
- `order_by` (query): Field to order results by. Currently only `created_at` is supported.
- `desc` (query): Whether to order results in descending order. Defaults to false (ascending).
- `limit` (query): The maximum number of items to return (capped at 200).
- `cursor` (query): The cursor to start the result set from. Requires `limit` to also be set.
- `query` (query): A search query to filter the results by. Free-text search applied to the team's id (exact-match) and display name.
**Responses:**
- 200: Successful response
# Create a team
URL: /api/admin/teams/teams/post
Source: /vercel/path0/docs/content/api/admin/teams/teams/post.mdx
# API Documentation: Create a team
Create a new team and optionally add the current user as a member.
## POST /teams
**Summary:** Create a team
**Description:** Create a new team and optionally add the current user as a member.
**Request Body:** Request body required
**Responses:**
- 201: Successful response
# List users
URL: /api/admin/users/users/get
Source: /vercel/path0/docs/content/api/admin/users/users/get.mdx
# API Documentation: List users
Lists all the users in the project. By default, only fully onboarded users are returned. Restricted users (those who haven't completed onboarding requirements like email verification) are included if `include_restricted` is set to `true`. Anonymous users are included if `include_anonymous` is set to `true` (which also includes restricted users).
## GET /users
**Summary:** List users
**Description:** Lists all the users in the project. By default, only fully onboarded users are returned. Restricted users (those who haven't completed onboarding requirements like email verification) are included if `include_restricted` is set to `true`. Anonymous users are included if `include_anonymous` is set to `true` (which also includes restricted users).
**Parameters:**
- `team_id` (query): Only return users who are members of the given team
- `limit` (query): The maximum number of items to return
- `cursor` (query): The cursor to start the result set from.
- `order_by` (query): The field to sort the results by. Defaults to signed_up_at
- `desc` (query): Whether to sort the results in descending order. Defaults to false
- `query` (query): A search query to filter the results by. This is a free-text search that is applied to the user's id (exact-match only), display name and primary email.
- `include_anonymous` (query): Whether to include anonymous users in the results. When true, also includes restricted users. Defaults to false
- `only_anonymous` (query): Whether to return only anonymous users. When true, implies include_anonymous=true. Defaults to false
- `include_restricted` (query): Whether to include restricted users in the results. Defaults to false
**Responses:**
- 200: Successful response
# Create user
URL: /api/admin/users/users/post
Source: /vercel/path0/docs/content/api/admin/users/users/post.mdx
# API Documentation: Create user
Creates a new user. E-mail authentication is always enabled, and no password is set, meaning the only way to authenticate the newly created user is through magic link.
## POST /users
**Summary:** Create user
**Description:** Creates a new user. E-mail authentication is always enabled, and no password is set, meaning the only way to authenticate the newly created user is through magic link.
**Request Body:** Request body required
**Responses:**
- 201: Successful response
# List team API keys
URL: /api/client/api-keys/team-api-keys/get
Source: /vercel/path0/docs/content/api/client/api-keys/team-api-keys/get.mdx
# API Documentation: List team API keys
List all team API keys for the project with their metadata and status
## GET /team-api-keys
**Summary:** List team API keys
**Description:** List all team API keys for the project with their metadata and status
**Parameters:**
- `team_id` (query): No description
**Responses:**
- 200: Successful response
# Create team API key
URL: /api/client/api-keys/team-api-keys/post
Source: /vercel/path0/docs/content/api/client/api-keys/team-api-keys/post.mdx
# API Documentation: Create team API key
Create a new API key for a user or team
## POST /team-api-keys
**Summary:** Create team API key
**Description:** Create a new API key for a user or team
**Request Body:** Request body required
**Responses:**
- 200: Successful response
# List user API keys
URL: /api/client/api-keys/user-api-keys/get
Source: /vercel/path0/docs/content/api/client/api-keys/user-api-keys/get.mdx
# API Documentation: List user API keys
List all user API keys for the project with their metadata and status
## GET /user-api-keys
**Summary:** List user API keys
**Description:** List all user API keys for the project with their metadata and status
**Parameters:**
- `user_id` (query): No description
**Responses:**
- 200: Successful response
# Create user API key
URL: /api/client/api-keys/user-api-keys/post
Source: /vercel/path0/docs/content/api/client/api-keys/user-api-keys/post.mdx
# API Documentation: Create user API key
Create a new API key for a user or team
## POST /user-api-keys
**Summary:** Create user API key
**Description:** Create a new API key for a user or team
**Request Body:** Request body required
**Responses:**
- 200: Successful response
# List contact channels
URL: /api/client/contact-channels/contact-channels/get
Source: /vercel/path0/docs/content/api/client/contact-channels/contact-channels/get.mdx
# API Documentation: List contact channels
Retrieves a list of all contact channels for a user.
## GET /contact-channels
**Summary:** List contact channels
**Description:** Retrieves a list of all contact channels for a user.
**Parameters:**
- `user_id` (query): The ID of the user, or the special value `me` for the currently authenticated user
- `contact_channel_id` (query): No description
**Responses:**
- 200: Successful response
# Create a contact channel
URL: /api/client/contact-channels/contact-channels/post
Source: /vercel/path0/docs/content/api/client/contact-channels/contact-channels/post.mdx
# API Documentation: Create a contact channel
Add a new contact channel for a user.
## POST /contact-channels
**Summary:** Create a contact channel
**Description:** Add a new contact channel for a user.
**Parameters:**
- `user_id` (query): The ID of the user, or the special value `me` for the currently authenticated user
- `contact_channel_id` (query): No description
**Request Body:** Request body required
**Responses:**
- 201: Successful response
# Verify an email
URL: /api/client/contact-channels/contact-channels/verify
Source: /vercel/path0/docs/content/api/client/contact-channels/contact-channels/verify.mdx
# API Documentation: Verify an email
Verify an email address of a user
## POST /contact-channels/verify
**Summary:** Verify an email
**Description:** Verify an email address of a user
**Request Body:** Request body required
**Responses:**
- 200: Successful response
# Initiate CLI authentication
URL: /api/client/cli-authentication/auth/cli
Source: /vercel/path0/docs/content/api/client/cli-authentication/auth/cli.mdx
# API Documentation: Initiate CLI authentication
Create a new CLI authentication session and return polling and login codes
## POST /auth/cli
**Summary:** Initiate CLI authentication
**Description:** Create a new CLI authentication session and return polling and login codes
**Request Body:** Request body required
**Responses:**
- 200: Successful response
# Get the current project
URL: /api/client/projects/projects/current
Source: /vercel/path0/docs/content/api/client/projects/projects/current.mdx
# API Documentation: Get the current project
Get the current project information including display name, OAuth providers and authentication methods. Useful for displaying the available login options to the user.
## GET /projects/current
**Summary:** Get the current project
**Description:** Get the current project information including display name, OAuth providers and authentication methods. Useful for displaying the available login options to the user.
**Responses:**
- 200: Successful response
# List sessions
URL: /api/client/sessions/auth/sessions
Source: /vercel/path0/docs/content/api/client/sessions/auth/sessions.mdx
# API Documentation: List sessions
List all sessions for the current user.
## GET /auth/sessions
**Summary:** List sessions
**Description:** List all sessions for the current user.
**Parameters:**
- `user_id` (query): The ID of the user, or the special value `me` for the currently authenticated user
**Responses:**
- 200: Successful response
# Accept the team invitation
URL: /api/client/teams/team-invitations/accept
Source: /vercel/path0/docs/content/api/client/teams/team-invitations/accept.mdx
# API Documentation: Accept the team invitation
Accept invitation and add user to the team
## POST /team-invitations/accept
**Summary:** Accept the team invitation
**Description:** Accept invitation and add user to the team
**Request Body:** Request body required
**Responses:**
- 200: Successful response
# Delete a team invitation
URL: /api/client/teams/team-invitations/id
Source: /vercel/path0/docs/content/api/client/teams/team-invitations/id.mdx
# API Documentation: Delete a team invitation
## DELETE /team-invitations/{id}
**Summary:** Delete a team invitation
**Parameters:**
- `team_id` (query): The team ID to list invitations for. Required unless user_id is provided.
- `id` (path): No description
**Responses:**
- 200: Successful response
# Send an email to invite a user to a team
URL: /api/client/teams/team-invitations/send-code
Source: /vercel/path0/docs/content/api/client/teams/team-invitations/send-code.mdx
# API Documentation: Send an email to invite a user to a team
The user receiving this email can join the team by clicking on the link in the email. If the user does not have an account yet, they will be prompted to create one.
## POST /team-invitations/send-code
**Summary:** Send an email to invite a user to a team
**Description:** The user receiving this email can join the team by clicking on the link in the email. If the user does not have an account yet, they will be prompted to create one.
**Request Body:** Request body required
**Responses:**
- 200: Successful response
# List teams
URL: /api/client/teams/teams/get
Source: /vercel/path0/docs/content/api/client/teams/teams/get.mdx
# API Documentation: List teams
List all the teams that the current user is a member of. `user_id=me` must be passed in the query parameters.
## GET /teams
**Summary:** List teams
**Description:** List all the teams that the current user is a member of. `user_id=me` must be passed in the query parameters.
**Parameters:**
- `user_id` (query): Filter for the teams that the user is a member of. Can be either `me` or an ID. Must be `me` in the client API
- `order_by` (query): Field to order results by. Currently only `created_at` is supported.
- `desc` (query): Whether to order results in descending order. Defaults to false (ascending).
- `limit` (query): The maximum number of items to return (capped at 200).
- `cursor` (query): The cursor to start the result set from. Requires `limit` to also be set.
- `query` (query): A search query to filter the results by. Free-text search applied to the team's id (exact-match) and display name.
**Responses:**
- 200: Successful response
# Create a team
URL: /api/client/teams/teams/post
Source: /vercel/path0/docs/content/api/client/teams/teams/post.mdx
# API Documentation: Create a team
Create a new team and optionally add the current user as a member.
## POST /teams
**Summary:** Create a team
**Description:** Create a new team and optionally add the current user as a member.
**Request Body:** Request body required
**Responses:**
- 201: Successful response
# Check team API key validity
URL: /api/server/api-keys/team-api-keys/check
Source: /vercel/path0/docs/content/api/server/api-keys/team-api-keys/check.mdx
# API Documentation: Check team API key validity
Validate a team API key
## POST /team-api-keys/check
**Summary:** Check team API key validity
**Description:** Validate a team API key
**Request Body:** Request body required
**Responses:**
- 200: Successful response
# List team API keys
URL: /api/server/api-keys/team-api-keys/get
Source: /vercel/path0/docs/content/api/server/api-keys/team-api-keys/get.mdx
# API Documentation: List team API keys
List all team API keys for the project with their metadata and status
## GET /team-api-keys
**Summary:** List team API keys
**Description:** List all team API keys for the project with their metadata and status
**Parameters:**
- `team_id` (query): No description
**Responses:**
- 200: Successful response
# Create team API key
URL: /api/server/api-keys/team-api-keys/post
Source: /vercel/path0/docs/content/api/server/api-keys/team-api-keys/post.mdx
# API Documentation: Create team API key
Create a new API key for a user or team
## POST /team-api-keys
**Summary:** Create team API key
**Description:** Create a new API key for a user or team
**Request Body:** Request body required
**Responses:**
- 200: Successful response
# Check user API key validity
URL: /api/server/api-keys/user-api-keys/check
Source: /vercel/path0/docs/content/api/server/api-keys/user-api-keys/check.mdx
# API Documentation: Check user API key validity
Validate a user API key
## POST /user-api-keys/check
**Summary:** Check user API key validity
**Description:** Validate a user API key
**Request Body:** Request body required
**Responses:**
- 200: Successful response
# List user API keys
URL: /api/server/api-keys/user-api-keys/get
Source: /vercel/path0/docs/content/api/server/api-keys/user-api-keys/get.mdx
# API Documentation: List user API keys
List all user API keys for the project with their metadata and status
## GET /user-api-keys
**Summary:** List user API keys
**Description:** List all user API keys for the project with their metadata and status
**Parameters:**
- `user_id` (query): No description
**Responses:**
- 200: Successful response
# Create user API key
URL: /api/server/api-keys/user-api-keys/post
Source: /vercel/path0/docs/content/api/server/api-keys/user-api-keys/post.mdx
# API Documentation: Create user API key
Create a new API key for a user or team
## POST /user-api-keys
**Summary:** Create user API key
**Description:** Create a new API key for a user or team
**Request Body:** Request body required
**Responses:**
- 200: Successful response
# Initiate CLI authentication
URL: /api/server/cli-authentication/auth/cli
Source: /vercel/path0/docs/content/api/server/cli-authentication/auth/cli.mdx
# API Documentation: Initiate CLI authentication
Create a new CLI authentication session and return polling and login codes
## POST /auth/cli
**Summary:** Initiate CLI authentication
**Description:** Create a new CLI authentication session and return polling and login codes
**Request Body:** Request body required
**Responses:**
- 200: Successful response
# List contact channels
URL: /api/server/contact-channels/contact-channels/get
Source: /vercel/path0/docs/content/api/server/contact-channels/contact-channels/get.mdx
# API Documentation: List contact channels
Retrieves a list of all contact channels for a user.
## GET /contact-channels
**Summary:** List contact channels
**Description:** Retrieves a list of all contact channels for a user.
**Parameters:**
- `user_id` (query): The ID of the user, or the special value `me` for the currently authenticated user
- `contact_channel_id` (query): No description
**Responses:**
- 200: Successful response
# Create a contact channel
URL: /api/server/contact-channels/contact-channels/post
Source: /vercel/path0/docs/content/api/server/contact-channels/contact-channels/post.mdx
# API Documentation: Create a contact channel
Add a new contact channel for a user.
## POST /contact-channels
**Summary:** Create a contact channel
**Description:** Add a new contact channel for a user.
**Parameters:**
- `user_id` (query): The ID of the user, or the special value `me` for the currently authenticated user
- `contact_channel_id` (query): No description
**Request Body:** Request body required
**Responses:**
- 201: Successful response
# Verify an email
URL: /api/server/contact-channels/contact-channels/verify
Source: /vercel/path0/docs/content/api/server/contact-channels/contact-channels/verify.mdx
# API Documentation: Verify an email
Verify an email address of a user
## POST /contact-channels/verify
**Summary:** Verify an email
**Description:** Verify an email address of a user
**Request Body:** Request body required
**Responses:**
- 200: Successful response
# Activate email capacity boost
URL: /api/server/emails/emails/capacity-boost
Source: /vercel/path0/docs/content/api/server/emails/emails/capacity-boost.mdx
# API Documentation: Activate email capacity boost
Temporarily increases email capacity by 4x for 4 hours.
## POST /emails/capacity-boost
**Summary:** Activate email capacity boost
**Description:** Temporarily increases email capacity by 4x for 4 hours.
**Responses:**
- 200: Successful response
# Get email delivery info
URL: /api/server/emails/emails/delivery-info
Source: /vercel/path0/docs/content/api/server/emails/emails/delivery-info.mdx
# API Documentation: Get email delivery info
Returns delivery statistics and capacity information for the current tenancy.
## GET /emails/delivery-info
**Summary:** Get email delivery info
**Description:** Returns delivery statistics and capacity information for the current tenancy.
**Responses:**
- 200: Successful response
# List email outbox
URL: /api/server/emails/emails/outbox
Source: /vercel/path0/docs/content/api/server/emails/emails/outbox.mdx
# API Documentation: List email outbox
Lists all emails in the outbox with optional filtering by status or simple_status.
## GET /emails/outbox
**Summary:** List email outbox
**Description:** Lists all emails in the outbox with optional filtering by status or simple_status.
**Parameters:**
- `status` (query): No description
- `simple_status` (query): No description
- `limit` (query): The maximum number of items to return. Maximum allowed is 100
- `cursor` (query): The cursor to start the result set from (email ID)
**Responses:**
- 200: Successful response
# Send email
URL: /api/server/emails/emails/send-email
Source: /vercel/path0/docs/content/api/server/emails/emails/send-email.mdx
# API Documentation: Send email
Send an email to a list of users. The content field should contain either {html} for HTML emails, {template_id, variables} for template-based emails, or {draft_id} for a draft email.
## POST /emails/send-email
**Summary:** Send email
**Description:** Send an email to a list of users. The content field should contain either {html} for HTML emails, {template_id, variables} for template-based emails, or {draft_id} for a draft email.
**Responses:**
- 200: Successful response
# List OAuth providers
URL: /api/server/oauth/oauth-providers/get
Source: /vercel/path0/docs/content/api/server/oauth/oauth-providers/get.mdx
# API Documentation: List OAuth providers
Retrieves a list of all OAuth providers for a user.
## GET /oauth-providers
**Summary:** List OAuth providers
**Description:** Retrieves a list of all OAuth providers for a user.
**Parameters:**
- `user_id` (query): No description
**Responses:**
- 200: Successful response
# Create an OAuth provider
URL: /api/server/oauth/oauth-providers/post
Source: /vercel/path0/docs/content/api/server/oauth/oauth-providers/post.mdx
# API Documentation: Create an OAuth provider
Add a new OAuth provider for a user.
## POST /oauth-providers
**Summary:** Create an OAuth provider
**Description:** Add a new OAuth provider for a user.
**Request Body:** Request body required
**Responses:**
- 201: Successful response
# Get the current project
URL: /api/server/projects/projects/current
Source: /vercel/path0/docs/content/api/server/projects/projects/current.mdx
# API Documentation: Get the current project
Get the current project information including display name, OAuth providers and authentication methods. Useful for displaying the available login options to the user.
## GET /projects/current
**Summary:** Get the current project
**Description:** Get the current project information including display name, OAuth providers and authentication methods. Useful for displaying the available login options to the user.
**Responses:**
- 200: Successful response
# Accept the team invitation
URL: /api/server/teams/team-invitations/accept
Source: /vercel/path0/docs/content/api/server/teams/team-invitations/accept.mdx
# API Documentation: Accept the team invitation
Accept invitation and add user to the team
## POST /team-invitations/accept
**Summary:** Accept the team invitation
**Description:** Accept invitation and add user to the team
**Request Body:** Request body required
**Responses:**
- 200: Successful response
# Delete a team invitation
URL: /api/server/teams/team-invitations/id
Source: /vercel/path0/docs/content/api/server/teams/team-invitations/id.mdx
# API Documentation: Delete a team invitation
## DELETE /team-invitations/{id}
**Summary:** Delete a team invitation
**Parameters:**
- `team_id` (query): The team ID to list invitations for. Required unless user_id is provided.
- `id` (path): No description
**Responses:**
- 200: Successful response
# Send an email to invite a user to a team
URL: /api/server/teams/team-invitations/send-code
Source: /vercel/path0/docs/content/api/server/teams/team-invitations/send-code.mdx
# API Documentation: Send an email to invite a user to a team
The user receiving this email can join the team by clicking on the link in the email. If the user does not have an account yet, they will be prompted to create one.
## POST /team-invitations/send-code
**Summary:** Send an email to invite a user to a team
**Description:** The user receiving this email can join the team by clicking on the link in the email. If the user does not have an account yet, they will be prompted to create one.
**Request Body:** Request body required
**Responses:**
- 200: Successful response
# List teams
URL: /api/server/teams/teams/get
Source: /vercel/path0/docs/content/api/server/teams/teams/get.mdx
# API Documentation: List teams
List all the teams in the project.
## GET /teams
**Summary:** List teams
**Description:** List all the teams in the project.
**Parameters:**
- `user_id` (query): Filter for the teams that the user is a member of. Can be either `me` or an ID. Must be `me` in the client API
- `order_by` (query): Field to order results by. Currently only `created_at` is supported.
- `desc` (query): Whether to order results in descending order. Defaults to false (ascending).
- `limit` (query): The maximum number of items to return (capped at 200).
- `cursor` (query): The cursor to start the result set from. Requires `limit` to also be set.
- `query` (query): A search query to filter the results by. Free-text search applied to the team's id (exact-match) and display name.
**Responses:**
- 200: Successful response
# Create a team
URL: /api/server/teams/teams/post
Source: /vercel/path0/docs/content/api/server/teams/teams/post.mdx
# API Documentation: Create a team
Create a new team and optionally add the current user as a member.
## POST /teams
**Summary:** Create a team
**Description:** Create a new team and optionally add the current user as a member.
**Request Body:** Request body required
**Responses:**
- 201: Successful response
# List users
URL: /api/server/users/users/get
Source: /vercel/path0/docs/content/api/server/users/users/get.mdx
# API Documentation: List users
Lists all the users in the project. By default, only fully onboarded users are returned. Restricted users (those who haven't completed onboarding requirements like email verification) are included if `include_restricted` is set to `true`. Anonymous users are included if `include_anonymous` is set to `true` (which also includes restricted users).
## GET /users
**Summary:** List users
**Description:** Lists all the users in the project. By default, only fully onboarded users are returned. Restricted users (those who haven't completed onboarding requirements like email verification) are included if `include_restricted` is set to `true`. Anonymous users are included if `include_anonymous` is set to `true` (which also includes restricted users).
**Parameters:**
- `team_id` (query): Only return users who are members of the given team
- `limit` (query): The maximum number of items to return
- `cursor` (query): The cursor to start the result set from.
- `order_by` (query): The field to sort the results by. Defaults to signed_up_at
- `desc` (query): Whether to sort the results in descending order. Defaults to false
- `query` (query): A search query to filter the results by. This is a free-text search that is applied to the user's id (exact-match only), display name and primary email.
- `include_anonymous` (query): Whether to include anonymous users in the results. When true, also includes restricted users. Defaults to false
- `only_anonymous` (query): Whether to return only anonymous users. When true, implies include_anonymous=true. Defaults to false
- `include_restricted` (query): Whether to include restricted users in the results. Defaults to false
**Responses:**
- 200: Successful response
# Create user
URL: /api/server/users/users/post
Source: /vercel/path0/docs/content/api/server/users/users/post.mdx
# API Documentation: Create user
Creates a new user. E-mail authentication is always enabled, and no password is set, meaning the only way to authenticate the newly created user is through magic link.
## POST /users
**Summary:** Create user
**Description:** Creates a new user. E-mail authentication is always enabled, and no password is set, meaning the only way to authenticate the newly created user is through magic link.
**Request Body:** Request body required
**Responses:**
- 201: Successful response
# Sign up anonymously
URL: /api/admin/anonymous/auth/anonymous/sign-up
Source: /vercel/path0/docs/content/api/admin/anonymous/auth/anonymous/sign-up.mdx
# API Documentation: Sign up anonymously
Create a new anonymous account with no email
## POST /auth/anonymous/sign-up
**Summary:** Sign up anonymously
**Description:** Create a new anonymous account with no email
**Responses:**
- 200: Successful response
# Get team API key details
URL: /api/admin/api-keys/team-api-keys/api_key_id/get
Source: /vercel/path0/docs/content/api/admin/api-keys/team-api-keys/api_key_id/get.mdx
# API Documentation: Get team API key details
Get details of a specific team API key
## GET /team-api-keys/{api_key_id}
**Summary:** Get team API key details
**Description:** Get details of a specific team API key
**Parameters:**
- `api_key_id` (path): No description
**Responses:**
- 200: Successful response
# Update team API key
URL: /api/admin/api-keys/team-api-keys/api_key_id/patch
Source: /vercel/path0/docs/content/api/admin/api-keys/team-api-keys/api_key_id/patch.mdx
# API Documentation: Update team API key
Update an team API key
## PATCH /team-api-keys/{api_key_id}
**Summary:** Update team API key
**Description:** Update an team API key
**Parameters:**
- `api_key_id` (path): No description
**Request Body:** Request body required
**Responses:**
- 200: Successful response
# Get user API key details
URL: /api/admin/api-keys/user-api-keys/api_key_id/get
Source: /vercel/path0/docs/content/api/admin/api-keys/user-api-keys/api_key_id/get.mdx
# API Documentation: Get user API key details
Get details of a specific user API key
## GET /user-api-keys/{api_key_id}
**Summary:** Get user API key details
**Description:** Get details of a specific user API key
**Parameters:**
- `api_key_id` (path): No description
**Responses:**
- 200: Successful response
# Update user API key
URL: /api/admin/api-keys/user-api-keys/api_key_id/patch
Source: /vercel/path0/docs/content/api/admin/api-keys/user-api-keys/api_key_id/patch.mdx
# API Documentation: Update user API key
Update an user API key
## PATCH /user-api-keys/{api_key_id}
**Summary:** Update user API key
**Description:** Update an user API key
**Parameters:**
- `api_key_id` (path): No description
**Request Body:** Request body required
**Responses:**
- 200: Successful response
# Complete CLI authentication
URL: /api/admin/cli-authentication/auth/cli/complete
Source: /vercel/path0/docs/content/api/admin/cli-authentication/auth/cli/complete.mdx
# API Documentation: Complete CLI authentication
Inspect, claim, or complete a CLI authentication session
## POST /auth/cli/complete
**Summary:** Complete CLI authentication
**Description:** Inspect, claim, or complete a CLI authentication session
**Request Body:** Request body required
**Responses:**
- 200: Successful response
# Poll CLI authentication status
URL: /api/admin/cli-authentication/auth/cli/poll
Source: /vercel/path0/docs/content/api/admin/cli-authentication/auth/cli/poll.mdx
# API Documentation: Poll CLI authentication status
Check the status of a CLI authentication session using the polling code
## POST /auth/cli/poll
**Summary:** Poll CLI authentication status
**Description:** Check the status of a CLI authentication session using the polling code
**Request Body:** Request body required
**Responses:**
- 200: Successful response
- 201: Successful response
# Check email verification code
URL: /api/admin/contact-channels/contact-channels/verify/check-code
Source: /vercel/path0/docs/content/api/admin/contact-channels/contact-channels/verify/check-code.mdx
# API Documentation: Check email verification code
Check if an email verification code is valid without using it
## POST /contact-channels/verify/check-code
**Summary:** Check email verification code
**Description:** Check if an email verification code is valid without using it
**Request Body:** Request body required
**Responses:**
- 200: Successful response
# List notification preferences
URL: /api/admin/emails/emails/notification-preference/user_id
Source: /vercel/path0/docs/content/api/admin/emails/emails/notification-preference/user_id.mdx
# API Documentation: List notification preferences
Get all notification preferences for a user, showing which notification categories are enabled or disabled.
## GET /emails/notification-preference/{user_id}
**Summary:** List notification preferences
**Description:** Get all notification preferences for a user, showing which notification categories are enabled or disabled.
**Parameters:**
- `user_id` (path): The ID of the user, or the special value `me` for the currently authenticated user
**Responses:**
- 200: Successful response
# OAuth token endpoints
URL: /api/admin/oauth/auth/oauth/token
Source: /vercel/path0/docs/content/api/admin/oauth/auth/oauth/token.mdx
# API Documentation: OAuth token endpoints
This endpoint is used to exchange an authorization code or refresh token for an access token.
## POST /auth/oauth/token
**Summary:** OAuth token endpoints
**Description:** This endpoint is used to exchange an authorization code or refresh token for an access token.
**Request Body:** Request body required
**Responses:**
- 200: Successful response
# List AI conversations
URL: /api/admin/others/internal/ai-conversations/get
Source: /vercel/path0/docs/content/api/admin/others/internal/ai-conversations/get.mdx
# API Documentation: List AI conversations
List AI conversations for the current user filtered by project
## GET /internal/ai-conversations
**Summary:** List AI conversations
**Description:** List AI conversations for the current user filtered by project
**Parameters:**
- `projectId` (query): No description
**Responses:**
- 200: Successful response
# Create AI conversation
URL: /api/admin/others/internal/ai-conversations/post
Source: /vercel/path0/docs/content/api/admin/others/internal/ai-conversations/post.mdx
# API Documentation: Create AI conversation
Create a new AI conversation with optional initial messages
## POST /internal/ai-conversations
**Summary:** Create AI conversation
**Description:** Create a new AI conversation with optional initial messages
**Request Body:** Request body required
**Responses:**
- 200: Successful response
# List conversations
URL: /api/admin/others/internal/conversations/get
Source: /vercel/path0/docs/content/api/admin/others/internal/conversations/get.mdx
# API Documentation: List conversations
List conversations for a managed project
## GET /internal/conversations
**Summary:** List conversations
**Description:** List conversations for a managed project
**Parameters:**
- `projectId` (query): The unique identifier of the project
- `query` (query): No description
- `status` (query): No description
- `userId` (query): The unique identifier of the user
- `limit` (query): No description
- `offset` (query): No description
**Responses:**
- 200: Successful response
# Create conversation
URL: /api/admin/others/internal/conversations/post
Source: /vercel/path0/docs/content/api/admin/others/internal/conversations/post.mdx
# API Documentation: Create conversation
Create a managed project conversation for a user
## POST /internal/conversations
**Summary:** Create conversation
**Description:** Create a managed project conversation for a user
**Request Body:** Request body required
**Responses:**
- 200: Successful response
# MFA sign in
URL: /api/admin/otp/auth/mfa/sign-in
Source: /vercel/path0/docs/content/api/admin/otp/auth/mfa/sign-in.mdx
# API Documentation: MFA sign in
Complete multi-factor authorization to sign in, with a TOTP and an MFA attempt code
## POST /auth/mfa/sign-in
**Summary:** MFA sign in
**Description:** Complete multi-factor authorization to sign in, with a TOTP and an MFA attempt code
**Request Body:** Request body required
**Responses:**
- 200: Successful response
# Send sign-in code
URL: /api/admin/otp/auth/otp/send-sign-in-code
Source: /vercel/path0/docs/content/api/admin/otp/auth/otp/send-sign-in-code.mdx
# API Documentation: Send sign-in code
Send a code to the user's email address for sign-in.
## POST /auth/otp/send-sign-in-code
**Summary:** Send sign-in code
**Description:** Send a code to the user's email address for sign-in.
**Request Body:** Request body required
**Responses:**
- 200: Successful response
# Sign in with a code
URL: /api/admin/otp/auth/otp/sign-in
Source: /vercel/path0/docs/content/api/admin/otp/auth/otp/sign-in.mdx
# API Documentation: Sign in with a code
## POST /auth/otp/sign-in
**Summary:** Sign in with a code
**Request Body:** Request body required
**Responses:**
- 200: Successful response
# Reset password with a code
URL: /api/admin/password/auth/password/reset
Source: /vercel/path0/docs/content/api/admin/password/auth/password/reset.mdx
# API Documentation: Reset password with a code
Reset password with a code
## POST /auth/password/reset
**Summary:** Reset password with a code
**Description:** Reset password with a code
**Request Body:** Request body required
**Responses:**
- 200: Successful response
# Send reset password code
URL: /api/admin/password/auth/password/send-reset-code
Source: /vercel/path0/docs/content/api/admin/password/auth/password/send-reset-code.mdx
# API Documentation: Send reset password code
Send a code to the user's email address for resetting the password.
## POST /auth/password/send-reset-code
**Summary:** Send reset password code
**Description:** Send a code to the user's email address for resetting the password.
**Request Body:** Request body required
**Responses:**
- 200: Successful response
# Set password
URL: /api/admin/password/auth/password/set
Source: /vercel/path0/docs/content/api/admin/password/auth/password/set.mdx
# API Documentation: Set password
Set a new password for the current user
## POST /auth/password/set
**Summary:** Set password
**Description:** Set a new password for the current user
**Request Body:** Request body required
**Responses:**
- 200: Successful response
# Sign in with email and password
URL: /api/admin/password/auth/password/sign-in
Source: /vercel/path0/docs/content/api/admin/password/auth/password/sign-in.mdx
# API Documentation: Sign in with email and password
Sign in to an account with email and password
## POST /auth/password/sign-in
**Summary:** Sign in with email and password
**Description:** Sign in to an account with email and password
**Request Body:** Request body required
**Responses:**
- 200: Successful response
# Sign up with email and password
URL: /api/admin/password/auth/password/sign-up
Source: /vercel/path0/docs/content/api/admin/password/auth/password/sign-up.mdx
# API Documentation: Sign up with email and password
Create a new account with email and password
## POST /auth/password/sign-up
**Summary:** Sign up with email and password
**Description:** Create a new account with email and password
**Request Body:** Request body required
**Responses:**
- 200: Successful response
# Update password
URL: /api/admin/password/auth/password/update
Source: /vercel/path0/docs/content/api/admin/password/auth/password/update.mdx
# API Documentation: Update password
Update the password of the current user, requires the old password
## POST /auth/password/update
**Summary:** Update password
**Description:** Update the password of the current user, requires the old password
**Parameters:**
- `x-stack-refresh-token` (header): No description
**Request Body:** Request body required
**Responses:**
- 200: Successful response
# Create Purchase URL
URL: /api/admin/payments/payments/purchases/create-purchase-url
Source: /vercel/path0/docs/content/api/admin/payments/payments/purchases/create-purchase-url.mdx
# API Documentation: Create Purchase URL
Creates a secure checkout URL for purchasing a product.
## POST /payments/purchases/create-purchase-url
**Summary:** Create Purchase URL
**Description:** Creates a secure checkout URL for purchasing a product.
**Request Body:** Request body required
**Responses:**
- 200: Successful response
# Create Purchase Session
URL: /api/admin/payments/payments/purchases/purchase-session
Source: /vercel/path0/docs/content/api/admin/payments/payments/purchases/purchase-session.mdx
# API Documentation: Create Purchase Session
Creates a purchase session for completing a purchase.
## POST /payments/purchases/purchase-session
**Summary:** Create Purchase Session
**Description:** Creates a purchase session for completing a purchase.
**Request Body:** Request body required
**Responses:**
- 200: Successful response
# Validate Purchase Code
URL: /api/admin/payments/payments/purchases/validate-code
Source: /vercel/path0/docs/content/api/admin/payments/payments/purchases/validate-code.mdx
# API Documentation: Validate Purchase Code
Validates a purchase verification code and returns purchase details including available prices.
## POST /payments/purchases/validate-code
**Summary:** Validate Purchase Code
**Description:** Validates a purchase verification code and returns purchase details including available prices.
**Request Body:** Request body required
**Responses:**
- 200: Successful response
# Delete a project permission definition
URL: /api/admin/permissions/project-permission-definitions/permission_id/delete
Source: /vercel/path0/docs/content/api/admin/permissions/project-permission-definitions/permission_id/delete.mdx
# API Documentation: Delete a project permission definition
Delete a project permission definition (the equivalent of deleting a permission on the Stack dashboard)
## DELETE /project-permission-definitions/{permission_id}
**Summary:** Delete a project permission definition
**Description:** Delete a project permission definition (the equivalent of deleting a permission on the Stack dashboard)
**Parameters:**
- `permission_id` (path): The permission ID used to uniquely identify a permission. Can either be a custom permission with lowercase letters, numbers, `:`, and `_` characters, or one of the system permissions: `$update_team`, `$delete_team`, `$read_members`, `$remove_members`, `$invite_members`, `$manage_api_keys`
**Responses:**
- 200: Successful response
# Update a project permission definition
URL: /api/admin/permissions/project-permission-definitions/permission_id/patch
Source: /vercel/path0/docs/content/api/admin/permissions/project-permission-definitions/permission_id/patch.mdx
# API Documentation: Update a project permission definition
Update a project permission definition (the equivalent of updating a permission on the Stack dashboard)
## PATCH /project-permission-definitions/{permission_id}
**Summary:** Update a project permission definition
**Description:** Update a project permission definition (the equivalent of updating a permission on the Stack dashboard)
**Parameters:**
- `permission_id` (path): The permission ID used to uniquely identify a permission. Can either be a custom permission with lowercase letters, numbers, `:`, and `_` characters, or one of the system permissions: `$update_team`, `$delete_team`, `$read_members`, `$remove_members`, `$invite_members`, `$manage_api_keys`
**Request Body:** Request body required
**Responses:**
- 200: Successful response
# Delete a team permission definition
URL: /api/admin/permissions/team-permission-definitions/permission_id/delete
Source: /vercel/path0/docs/content/api/admin/permissions/team-permission-definitions/permission_id/delete.mdx
# API Documentation: Delete a team permission definition
Delete a permission definition (the equivalent of deleting a permission on the Stack dashboard)
## DELETE /team-permission-definitions/{permission_id}
**Summary:** Delete a team permission definition
**Description:** Delete a permission definition (the equivalent of deleting a permission on the Stack dashboard)
**Parameters:**
- `permission_id` (path): The permission ID used to uniquely identify a permission. Can either be a custom permission with lowercase letters, numbers, `:`, and `_` characters, or one of the system permissions: `$update_team`, `$delete_team`, `$read_members`, `$remove_members`, `$invite_members`, `$manage_api_keys`
**Responses:**
- 200: Successful response
# Update a team permission definition
URL: /api/admin/permissions/team-permission-definitions/permission_id/patch
Source: /vercel/path0/docs/content/api/admin/permissions/team-permission-definitions/permission_id/patch.mdx
# API Documentation: Update a team permission definition
Update a permission definition (the equivalent of updating a permission on the Stack dashboard)
## PATCH /team-permission-definitions/{permission_id}
**Summary:** Update a team permission definition
**Description:** Update a permission definition (the equivalent of updating a permission on the Stack dashboard)
**Parameters:**
- `permission_id` (path): The permission ID used to uniquely identify a permission. Can either be a custom permission with lowercase letters, numbers, `:`, and `_` characters, or one of the system permissions: `$update_team`, `$delete_team`, `$read_members`, `$remove_members`, `$invite_members`, `$manage_api_keys`
**Request Body:** Request body required
**Responses:**
- 200: Successful response
# Sign out of the current session
URL: /api/admin/sessions/auth/sessions/current
Source: /vercel/path0/docs/content/api/admin/sessions/auth/sessions/current.mdx
# API Documentation: Sign out of the current session
Sign out of the current session and invalidate the refresh token
## DELETE /auth/sessions/current
**Summary:** Sign out of the current session
**Description:** Sign out of the current session and invalidate the refresh token
**Responses:**
- 200: Successful response
# List sessions
URL: /api/admin/sessions/auth/sessions/get
Source: /vercel/path0/docs/content/api/admin/sessions/auth/sessions/get.mdx
# API Documentation: List sessions
List all sessions for the current user.
## GET /auth/sessions
**Summary:** List sessions
**Description:** List all sessions for the current user.
**Parameters:**
- `user_id` (query): The ID of the user, or the special value `me` for the currently authenticated user
**Responses:**
- 200: Successful response
# Delete session
URL: /api/admin/sessions/auth/sessions/id
Source: /vercel/path0/docs/content/api/admin/sessions/auth/sessions/id.mdx
# API Documentation: Delete session
Delete a session by ID.
## DELETE /auth/sessions/{id}
**Summary:** Delete session
**Description:** Delete a session by ID.
**Parameters:**
- `user_id` (query): The ID of the user, or the special value `me` for the currently authenticated user
- `id` (path): No description
**Responses:**
- 200: Successful response
# Create session
URL: /api/admin/sessions/auth/sessions/post
Source: /vercel/path0/docs/content/api/admin/sessions/auth/sessions/post.mdx
# API Documentation: Create session
Create a new session for a given user. This will return a refresh token that can be used to impersonate the user.
## POST /auth/sessions
**Summary:** Create session
**Description:** Create a new session for a given user. This will return a refresh token that can be used to impersonate the user.
**Request Body:** Request body required
**Responses:**
- 200: Successful response
# Check if a team invitation code is valid
URL: /api/admin/teams/team-invitations/accept/check-code
Source: /vercel/path0/docs/content/api/admin/teams/team-invitations/accept/check-code.mdx
# API Documentation: Check if a team invitation code is valid
Check if a team invitation code is valid without using it
## POST /team-invitations/accept/check-code
**Summary:** Check if a team invitation code is valid
**Description:** Check if a team invitation code is valid without using it
**Request Body:** Request body required
**Responses:**
- 200: Successful response
# Get team invitation details
URL: /api/admin/teams/team-invitations/accept/details
Source: /vercel/path0/docs/content/api/admin/teams/team-invitations/accept/details.mdx
# API Documentation: Get team invitation details
Get additional information about a team invitation code
## POST /team-invitations/accept/details
**Summary:** Get team invitation details
**Description:** Get additional information about a team invitation code
**Request Body:** Request body required
**Responses:**
- 200: Successful response
# Accept a team invitation by ID
URL: /api/admin/teams/team-invitations/id/accept
Source: /vercel/path0/docs/content/api/admin/teams/team-invitations/id/accept.mdx
# API Documentation: Accept a team invitation by ID
Accepts a team invitation for the specified user. The user must have a verified email matching the invitation's recipient email. This marks the invitation as used and adds the user to the team.
## POST /team-invitations/{id}/accept
**Summary:** Accept a team invitation by ID
**Description:** Accepts a team invitation for the specified user. The user must have a verified email matching the invitation's recipient email. This marks the invitation as used and adds the user to the team.
**Parameters:**
- `user_id` (query): The ID of the user, or the special value `me` for the currently authenticated user
- `id` (path): No description
**Responses:**
- 200: Successful response
# Delete a team
URL: /api/admin/teams/teams/team_id/delete
Source: /vercel/path0/docs/content/api/admin/teams/teams/team_id/delete.mdx
# API Documentation: Delete a team
Delete a team by ID.
## DELETE /teams/{team_id}
**Summary:** Delete a team
**Description:** Delete a team by ID.
**Parameters:**
- `team_id` (path): No description
**Responses:**
- 200: Successful response
# Get a team
URL: /api/admin/teams/teams/team_id/get
Source: /vercel/path0/docs/content/api/admin/teams/teams/team_id/get.mdx
# API Documentation: Get a team
Get a team by ID.
## GET /teams/{team_id}
**Summary:** Get a team
**Description:** Get a team by ID.
**Parameters:**
- `team_id` (path): No description
**Responses:**
- 200: Successful response
# Update a team
URL: /api/admin/teams/teams/team_id/patch
Source: /vercel/path0/docs/content/api/admin/teams/teams/team_id/patch.mdx
# API Documentation: Update a team
Update the team information by ID.
## PATCH /teams/{team_id}
**Summary:** Update a team
**Description:** Update the team information by ID.
**Parameters:**
- `team_id` (path): No description
**Request Body:** Request body required
**Responses:**
- 200: Successful response
# Delete current user
URL: /api/admin/users/users/me/delete
Source: /vercel/path0/docs/content/api/admin/users/users/me/delete.mdx
# API Documentation: Delete current user
Deletes the currently authenticated user. Use this with caution.
## DELETE /users/me
**Summary:** Delete current user
**Description:** Deletes the currently authenticated user. Use this with caution.
**Responses:**
- 200: Successful response
# Get current user
URL: /api/admin/users/users/me/get
Source: /vercel/path0/docs/content/api/admin/users/users/me/get.mdx
# API Documentation: Get current user
Gets the currently authenticated user.
## GET /users/me
**Summary:** Get current user
**Description:** Gets the currently authenticated user.
**Responses:**
- 200: Successful response
# Update current user
URL: /api/admin/users/users/me/patch
Source: /vercel/path0/docs/content/api/admin/users/users/me/patch.mdx
# API Documentation: Update current user
Updates the currently authenticated user. Only the values provided will be updated.
## PATCH /users/me
**Summary:** Update current user
**Description:** Updates the currently authenticated user. Only the values provided will be updated.
**Request Body:** Request body required
**Responses:**
- 200: Successful response
# Delete user
URL: /api/admin/users/users/user_id/delete
Source: /vercel/path0/docs/content/api/admin/users/users/user_id/delete.mdx
# API Documentation: Delete user
Deletes a user. Use this with caution.
## DELETE /users/{user_id}
**Summary:** Delete user
**Description:** Deletes a user. Use this with caution.
**Parameters:**
- `user_id` (path): The ID of the user, or the special value `me` for the currently authenticated user
**Responses:**
- 200: Successful response
# Get user
URL: /api/admin/users/users/user_id/get
Source: /vercel/path0/docs/content/api/admin/users/users/user_id/get.mdx
# API Documentation: Get user
Gets a user by user ID.
## GET /users/{user_id}
**Summary:** Get user
**Description:** Gets a user by user ID.
**Parameters:**
- `user_id` (path): The ID of the user, or the special value `me` for the currently authenticated user
**Responses:**
- 200: Successful response
# Update user
URL: /api/admin/users/users/user_id/patch
Source: /vercel/path0/docs/content/api/admin/users/users/user_id/patch.mdx
# API Documentation: Update user
Updates a user. Only the values provided will be updated.
## PATCH /users/{user_id}
**Summary:** Update user
**Description:** Updates a user. Only the values provided will be updated.
**Parameters:**
- `user_id` (path): The ID of the user, or the special value `me` for the currently authenticated user
**Request Body:** Request body required
**Responses:**
- 200: Successful response
# Sign up anonymously
URL: /api/client/anonymous/auth/anonymous/sign-up
Source: /vercel/path0/docs/content/api/client/anonymous/auth/anonymous/sign-up.mdx
# API Documentation: Sign up anonymously
Create a new anonymous account with no email
## POST /auth/anonymous/sign-up
**Summary:** Sign up anonymously
**Description:** Create a new anonymous account with no email
**Responses:**
- 200: Successful response
# Get team API key details
URL: /api/client/api-keys/team-api-keys/api_key_id/get
Source: /vercel/path0/docs/content/api/client/api-keys/team-api-keys/api_key_id/get.mdx
# API Documentation: Get team API key details
Get details of a specific team API key
## GET /team-api-keys/{api_key_id}
**Summary:** Get team API key details
**Description:** Get details of a specific team API key
**Parameters:**
- `api_key_id` (path): No description
**Responses:**
- 200: Successful response
# Update team API key
URL: /api/client/api-keys/team-api-keys/api_key_id/patch
Source: /vercel/path0/docs/content/api/client/api-keys/team-api-keys/api_key_id/patch.mdx
# API Documentation: Update team API key
Update an team API key
## PATCH /team-api-keys/{api_key_id}
**Summary:** Update team API key
**Description:** Update an team API key
**Parameters:**
- `api_key_id` (path): No description
**Request Body:** Request body required
**Responses:**
- 200: Successful response
# Get user API key details
URL: /api/client/api-keys/user-api-keys/api_key_id/get
Source: /vercel/path0/docs/content/api/client/api-keys/user-api-keys/api_key_id/get.mdx
# API Documentation: Get user API key details
Get details of a specific user API key
## GET /user-api-keys/{api_key_id}
**Summary:** Get user API key details
**Description:** Get details of a specific user API key
**Parameters:**
- `api_key_id` (path): No description
**Responses:**
- 200: Successful response
# Update user API key
URL: /api/client/api-keys/user-api-keys/api_key_id/patch
Source: /vercel/path0/docs/content/api/client/api-keys/user-api-keys/api_key_id/patch.mdx
# API Documentation: Update user API key
Update an user API key
## PATCH /user-api-keys/{api_key_id}
**Summary:** Update user API key
**Description:** Update an user API key
**Parameters:**
- `api_key_id` (path): No description
**Request Body:** Request body required
**Responses:**
- 200: Successful response
# Check email verification code
URL: /api/client/contact-channels/contact-channels/verify/check-code
Source: /vercel/path0/docs/content/api/client/contact-channels/contact-channels/verify/check-code.mdx
# API Documentation: Check email verification code
Check if an email verification code is valid without using it
## POST /contact-channels/verify/check-code
**Summary:** Check email verification code
**Description:** Check if an email verification code is valid without using it
**Request Body:** Request body required
**Responses:**
- 200: Successful response
# Complete CLI authentication
URL: /api/client/cli-authentication/auth/cli/complete
Source: /vercel/path0/docs/content/api/client/cli-authentication/auth/cli/complete.mdx
# API Documentation: Complete CLI authentication
Inspect, claim, or complete a CLI authentication session
## POST /auth/cli/complete
**Summary:** Complete CLI authentication
**Description:** Inspect, claim, or complete a CLI authentication session
**Request Body:** Request body required
**Responses:**
- 200: Successful response
# Poll CLI authentication status
URL: /api/client/cli-authentication/auth/cli/poll
Source: /vercel/path0/docs/content/api/client/cli-authentication/auth/cli/poll.mdx
# API Documentation: Poll CLI authentication status
Check the status of a CLI authentication session using the polling code
## POST /auth/cli/poll
**Summary:** Poll CLI authentication status
**Description:** Check the status of a CLI authentication session using the polling code
**Request Body:** Request body required
**Responses:**
- 200: Successful response
- 201: Successful response
# List notification preferences
URL: /api/client/emails/emails/notification-preference/user_id
Source: /vercel/path0/docs/content/api/client/emails/emails/notification-preference/user_id.mdx
# API Documentation: List notification preferences
Get all notification preferences for a user, showing which notification categories are enabled or disabled.
## GET /emails/notification-preference/{user_id}
**Summary:** List notification preferences
**Description:** Get all notification preferences for a user, showing which notification categories are enabled or disabled.
**Parameters:**
- `user_id` (path): The ID of the user, or the special value `me` for the currently authenticated user
**Responses:**
- 200: Successful response
# OAuth token endpoints
URL: /api/client/oauth/auth/oauth/token
Source: /vercel/path0/docs/content/api/client/oauth/auth/oauth/token.mdx
# API Documentation: OAuth token endpoints
This endpoint is used to exchange an authorization code or refresh token for an access token.
## POST /auth/oauth/token
**Summary:** OAuth token endpoints
**Description:** This endpoint is used to exchange an authorization code or refresh token for an access token.
**Request Body:** Request body required
**Responses:**
- 200: Successful response
# List AI conversations
URL: /api/client/others/internal/ai-conversations/get
Source: /vercel/path0/docs/content/api/client/others/internal/ai-conversations/get.mdx
# API Documentation: List AI conversations
List AI conversations for the current user filtered by project
## GET /internal/ai-conversations
**Summary:** List AI conversations
**Description:** List AI conversations for the current user filtered by project
**Parameters:**
- `projectId` (query): No description
**Responses:**
- 200: Successful response
# Create AI conversation
URL: /api/client/others/internal/ai-conversations/post
Source: /vercel/path0/docs/content/api/client/others/internal/ai-conversations/post.mdx
# API Documentation: Create AI conversation
Create a new AI conversation with optional initial messages
## POST /internal/ai-conversations
**Summary:** Create AI conversation
**Description:** Create a new AI conversation with optional initial messages
**Request Body:** Request body required
**Responses:**
- 200: Successful response
# List conversations
URL: /api/client/others/internal/conversations/get
Source: /vercel/path0/docs/content/api/client/others/internal/conversations/get.mdx
# API Documentation: List conversations
List conversations for a managed project
## GET /internal/conversations
**Summary:** List conversations
**Description:** List conversations for a managed project
**Parameters:**
- `projectId` (query): The unique identifier of the project
- `query` (query): No description
- `status` (query): No description
- `userId` (query): The unique identifier of the user
- `limit` (query): No description
- `offset` (query): No description
**Responses:**
- 200: Successful response
# Create conversation
URL: /api/client/others/internal/conversations/post
Source: /vercel/path0/docs/content/api/client/others/internal/conversations/post.mdx
# API Documentation: Create conversation
Create a managed project conversation for a user
## POST /internal/conversations
**Summary:** Create conversation
**Description:** Create a managed project conversation for a user
**Request Body:** Request body required
**Responses:**
- 200: Successful response
# MFA sign in
URL: /api/client/otp/auth/mfa/sign-in
Source: /vercel/path0/docs/content/api/client/otp/auth/mfa/sign-in.mdx
# API Documentation: MFA sign in
Complete multi-factor authorization to sign in, with a TOTP and an MFA attempt code
## POST /auth/mfa/sign-in
**Summary:** MFA sign in
**Description:** Complete multi-factor authorization to sign in, with a TOTP and an MFA attempt code
**Request Body:** Request body required
**Responses:**
- 200: Successful response
# Send sign-in code
URL: /api/client/otp/auth/otp/send-sign-in-code
Source: /vercel/path0/docs/content/api/client/otp/auth/otp/send-sign-in-code.mdx
# API Documentation: Send sign-in code
Send a code to the user's email address for sign-in.
## POST /auth/otp/send-sign-in-code
**Summary:** Send sign-in code
**Description:** Send a code to the user's email address for sign-in.
**Request Body:** Request body required
**Responses:**
- 200: Successful response
# Sign in with a code
URL: /api/client/otp/auth/otp/sign-in
Source: /vercel/path0/docs/content/api/client/otp/auth/otp/sign-in.mdx
# API Documentation: Sign in with a code
## POST /auth/otp/sign-in
**Summary:** Sign in with a code
**Request Body:** Request body required
**Responses:**
- 200: Successful response
# Reset password with a code
URL: /api/client/password/auth/password/reset
Source: /vercel/path0/docs/content/api/client/password/auth/password/reset.mdx
# API Documentation: Reset password with a code
Reset password with a code
## POST /auth/password/reset
**Summary:** Reset password with a code
**Description:** Reset password with a code
**Request Body:** Request body required
**Responses:**
- 200: Successful response
# Send reset password code
URL: /api/client/password/auth/password/send-reset-code
Source: /vercel/path0/docs/content/api/client/password/auth/password/send-reset-code.mdx
# API Documentation: Send reset password code
Send a code to the user's email address for resetting the password.
## POST /auth/password/send-reset-code
**Summary:** Send reset password code
**Description:** Send a code to the user's email address for resetting the password.
**Request Body:** Request body required
**Responses:**
- 200: Successful response
# Set password
URL: /api/client/password/auth/password/set
Source: /vercel/path0/docs/content/api/client/password/auth/password/set.mdx
# API Documentation: Set password
Set a new password for the current user
## POST /auth/password/set
**Summary:** Set password
**Description:** Set a new password for the current user
**Request Body:** Request body required
**Responses:**
- 200: Successful response
# Sign in with email and password
URL: /api/client/password/auth/password/sign-in
Source: /vercel/path0/docs/content/api/client/password/auth/password/sign-in.mdx
# API Documentation: Sign in with email and password
Sign in to an account with email and password
## POST /auth/password/sign-in
**Summary:** Sign in with email and password
**Description:** Sign in to an account with email and password
**Request Body:** Request body required
**Responses:**
- 200: Successful response
# Sign up with email and password
URL: /api/client/password/auth/password/sign-up
Source: /vercel/path0/docs/content/api/client/password/auth/password/sign-up.mdx
# API Documentation: Sign up with email and password
Create a new account with email and password
## POST /auth/password/sign-up
**Summary:** Sign up with email and password
**Description:** Create a new account with email and password
**Request Body:** Request body required
**Responses:**
- 200: Successful response
# Update password
URL: /api/client/password/auth/password/update
Source: /vercel/path0/docs/content/api/client/password/auth/password/update.mdx
# API Documentation: Update password
Update the password of the current user, requires the old password
## POST /auth/password/update
**Summary:** Update password
**Description:** Update the password of the current user, requires the old password
**Parameters:**
- `x-stack-refresh-token` (header): No description
**Request Body:** Request body required
**Responses:**
- 200: Successful response
# Create Purchase URL
URL: /api/client/payments/payments/purchases/create-purchase-url
Source: /vercel/path0/docs/content/api/client/payments/payments/purchases/create-purchase-url.mdx
# API Documentation: Create Purchase URL
Creates a secure checkout URL for purchasing a product.
## POST /payments/purchases/create-purchase-url
**Summary:** Create Purchase URL
**Description:** Creates a secure checkout URL for purchasing a product.
**Request Body:** Request body required
**Responses:**
- 200: Successful response
# Create Purchase Session
URL: /api/client/payments/payments/purchases/purchase-session
Source: /vercel/path0/docs/content/api/client/payments/payments/purchases/purchase-session.mdx
# API Documentation: Create Purchase Session
Creates a purchase session for completing a purchase.
## POST /payments/purchases/purchase-session
**Summary:** Create Purchase Session
**Description:** Creates a purchase session for completing a purchase.
**Request Body:** Request body required
**Responses:**
- 200: Successful response
# Validate Purchase Code
URL: /api/client/payments/payments/purchases/validate-code
Source: /vercel/path0/docs/content/api/client/payments/payments/purchases/validate-code.mdx
# API Documentation: Validate Purchase Code
Validates a purchase verification code and returns purchase details including available prices.
## POST /payments/purchases/validate-code
**Summary:** Validate Purchase Code
**Description:** Validates a purchase verification code and returns purchase details including available prices.
**Request Body:** Request body required
**Responses:**
- 200: Successful response
# Sign out of the current session
URL: /api/client/sessions/auth/sessions/current
Source: /vercel/path0/docs/content/api/client/sessions/auth/sessions/current.mdx
# API Documentation: Sign out of the current session
Sign out of the current session and invalidate the refresh token
## DELETE /auth/sessions/current
**Summary:** Sign out of the current session
**Description:** Sign out of the current session and invalidate the refresh token
**Responses:**
- 200: Successful response
# Delete session
URL: /api/client/sessions/auth/sessions/id
Source: /vercel/path0/docs/content/api/client/sessions/auth/sessions/id.mdx
# API Documentation: Delete session
Delete a session by ID.
## DELETE /auth/sessions/{id}
**Summary:** Delete session
**Description:** Delete a session by ID.
**Parameters:**
- `user_id` (query): The ID of the user, or the special value `me` for the currently authenticated user
- `id` (path): No description
**Responses:**
- 200: Successful response
# Check if a team invitation code is valid
URL: /api/client/teams/team-invitations/accept/check-code
Source: /vercel/path0/docs/content/api/client/teams/team-invitations/accept/check-code.mdx
# API Documentation: Check if a team invitation code is valid
Check if a team invitation code is valid without using it
## POST /team-invitations/accept/check-code
**Summary:** Check if a team invitation code is valid
**Description:** Check if a team invitation code is valid without using it
**Request Body:** Request body required
**Responses:**
- 200: Successful response
# Get team invitation details
URL: /api/client/teams/team-invitations/accept/details
Source: /vercel/path0/docs/content/api/client/teams/team-invitations/accept/details.mdx
# API Documentation: Get team invitation details
Get additional information about a team invitation code
## POST /team-invitations/accept/details
**Summary:** Get team invitation details
**Description:** Get additional information about a team invitation code
**Request Body:** Request body required
**Responses:**
- 200: Successful response
# Accept a team invitation by ID
URL: /api/client/teams/team-invitations/id/accept
Source: /vercel/path0/docs/content/api/client/teams/team-invitations/id/accept.mdx
# API Documentation: Accept a team invitation by ID
Accepts a team invitation for the specified user. The user must have a verified email matching the invitation's recipient email. This marks the invitation as used and adds the user to the team.
## POST /team-invitations/{id}/accept
**Summary:** Accept a team invitation by ID
**Description:** Accepts a team invitation for the specified user. The user must have a verified email matching the invitation's recipient email. This marks the invitation as used and adds the user to the team.
**Parameters:**
- `user_id` (query): The ID of the user, or the special value `me` for the currently authenticated user
- `id` (path): No description
**Responses:**
- 200: Successful response
# Remove a user from a team
URL: /api/client/teams/team-memberships/team_id/user_id
Source: /vercel/path0/docs/content/api/client/teams/team-memberships/team_id/user_id.mdx
# API Documentation: Remove a user from a team
All the users are allowed to remove themselves from a team (`user_id=me`). Only the users who have the `$remove_members` permission are allowed to remove other users from a team. `team_id` is must an ID of a team that the user is a member of.
## DELETE /team-memberships/{team_id}/{user_id}
**Summary:** Remove a user from a team
**Description:** All the users are allowed to remove themselves from a team (`user_id=me`). Only the users who have the `$remove_members` permission are allowed to remove other users from a team. `team_id` is must an ID of a team that the user is a member of.
**Parameters:**
- `team_id` (path): No description
- `user_id` (path): The ID of the user, or the special value `me` for the currently authenticated user
**Responses:**
- 200: Successful response
# Delete a team
URL: /api/client/teams/teams/team_id/delete
Source: /vercel/path0/docs/content/api/client/teams/teams/team_id/delete.mdx
# API Documentation: Delete a team
Delete a team. Only allowed if the current user is a member of the team and has the `$delete_team` permission.
## DELETE /teams/{team_id}
**Summary:** Delete a team
**Description:** Delete a team. Only allowed if the current user is a member of the team and has the `$delete_team` permission.
**Parameters:**
- `team_id` (path): No description
**Responses:**
- 200: Successful response
# Get a team
URL: /api/client/teams/teams/team_id/get
Source: /vercel/path0/docs/content/api/client/teams/teams/team_id/get.mdx
# API Documentation: Get a team
Get a team that the current user is a member of.
## GET /teams/{team_id}
**Summary:** Get a team
**Description:** Get a team that the current user is a member of.
**Parameters:**
- `team_id` (path): No description
**Responses:**
- 200: Successful response
# Update a team
URL: /api/client/teams/teams/team_id/patch
Source: /vercel/path0/docs/content/api/client/teams/teams/team_id/patch.mdx
# API Documentation: Update a team
Update the team information. Only allowed if the current user is a member of the team and has the `$update_team` permission.
## PATCH /teams/{team_id}
**Summary:** Update a team
**Description:** Update the team information. Only allowed if the current user is a member of the team and has the `$update_team` permission.
**Parameters:**
- `team_id` (path): No description
**Request Body:** Request body required
**Responses:**
- 200: Successful response
# Delete current user
URL: /api/client/users/users/me/delete
Source: /vercel/path0/docs/content/api/client/users/users/me/delete.mdx
# API Documentation: Delete current user
Deletes the currently authenticated user. Use this with caution.
## DELETE /users/me
**Summary:** Delete current user
**Description:** Deletes the currently authenticated user. Use this with caution.
**Responses:**
- 200: Successful response
# Get current user
URL: /api/client/users/users/me/get
Source: /vercel/path0/docs/content/api/client/users/users/me/get.mdx
# API Documentation: Get current user
Gets the currently authenticated user.
## GET /users/me
**Summary:** Get current user
**Description:** Gets the currently authenticated user.
**Responses:**
- 200: Successful response
# Update current user
URL: /api/client/users/users/me/patch
Source: /vercel/path0/docs/content/api/client/users/users/me/patch.mdx
# API Documentation: Update current user
Updates the currently authenticated user. Only the values provided will be updated.
## PATCH /users/me
**Summary:** Update current user
**Description:** Updates the currently authenticated user. Only the values provided will be updated.
**Request Body:** Request body required
**Responses:**
- 200: Successful response
# Sign up anonymously
URL: /api/server/anonymous/auth/anonymous/sign-up
Source: /vercel/path0/docs/content/api/server/anonymous/auth/anonymous/sign-up.mdx
# API Documentation: Sign up anonymously
Create a new anonymous account with no email
## POST /auth/anonymous/sign-up
**Summary:** Sign up anonymously
**Description:** Create a new anonymous account with no email
**Responses:**
- 200: Successful response
# Get team API key details
URL: /api/server/api-keys/team-api-keys/api_key_id/get
Source: /vercel/path0/docs/content/api/server/api-keys/team-api-keys/api_key_id/get.mdx
# API Documentation: Get team API key details
Get details of a specific team API key
## GET /team-api-keys/{api_key_id}
**Summary:** Get team API key details
**Description:** Get details of a specific team API key
**Parameters:**
- `api_key_id` (path): No description
**Responses:**
- 200: Successful response
# Update team API key
URL: /api/server/api-keys/team-api-keys/api_key_id/patch
Source: /vercel/path0/docs/content/api/server/api-keys/team-api-keys/api_key_id/patch.mdx
# API Documentation: Update team API key
Update an team API key
## PATCH /team-api-keys/{api_key_id}
**Summary:** Update team API key
**Description:** Update an team API key
**Parameters:**
- `api_key_id` (path): No description
**Request Body:** Request body required
**Responses:**
- 200: Successful response
# Get user API key details
URL: /api/server/api-keys/user-api-keys/api_key_id/get
Source: /vercel/path0/docs/content/api/server/api-keys/user-api-keys/api_key_id/get.mdx
# API Documentation: Get user API key details
Get details of a specific user API key
## GET /user-api-keys/{api_key_id}
**Summary:** Get user API key details
**Description:** Get details of a specific user API key
**Parameters:**
- `api_key_id` (path): No description
**Responses:**
- 200: Successful response
# Update user API key
URL: /api/server/api-keys/user-api-keys/api_key_id/patch
Source: /vercel/path0/docs/content/api/server/api-keys/user-api-keys/api_key_id/patch.mdx
# API Documentation: Update user API key
Update an user API key
## PATCH /user-api-keys/{api_key_id}
**Summary:** Update user API key
**Description:** Update an user API key
**Parameters:**
- `api_key_id` (path): No description
**Request Body:** Request body required
**Responses:**
- 200: Successful response
# Complete CLI authentication
URL: /api/server/cli-authentication/auth/cli/complete
Source: /vercel/path0/docs/content/api/server/cli-authentication/auth/cli/complete.mdx
# API Documentation: Complete CLI authentication
Inspect, claim, or complete a CLI authentication session
## POST /auth/cli/complete
**Summary:** Complete CLI authentication
**Description:** Inspect, claim, or complete a CLI authentication session
**Request Body:** Request body required
**Responses:**
- 200: Successful response
# Poll CLI authentication status
URL: /api/server/cli-authentication/auth/cli/poll
Source: /vercel/path0/docs/content/api/server/cli-authentication/auth/cli/poll.mdx
# API Documentation: Poll CLI authentication status
Check the status of a CLI authentication session using the polling code
## POST /auth/cli/poll
**Summary:** Poll CLI authentication status
**Description:** Check the status of a CLI authentication session using the polling code
**Request Body:** Request body required
**Responses:**
- 200: Successful response
- 201: Successful response
# Check email verification code
URL: /api/server/contact-channels/contact-channels/verify/check-code
Source: /vercel/path0/docs/content/api/server/contact-channels/contact-channels/verify/check-code.mdx
# API Documentation: Check email verification code
Check if an email verification code is valid without using it
## POST /contact-channels/verify/check-code
**Summary:** Check email verification code
**Description:** Check if an email verification code is valid without using it
**Request Body:** Request body required
**Responses:**
- 200: Successful response
# List notification preferences
URL: /api/server/emails/emails/notification-preference/user_id
Source: /vercel/path0/docs/content/api/server/emails/emails/notification-preference/user_id.mdx
# API Documentation: List notification preferences
Get all notification preferences for a user, showing which notification categories are enabled or disabled.
## GET /emails/notification-preference/{user_id}
**Summary:** List notification preferences
**Description:** Get all notification preferences for a user, showing which notification categories are enabled or disabled.
**Parameters:**
- `user_id` (path): The ID of the user, or the special value `me` for the currently authenticated user
**Responses:**
- 200: Successful response
# OAuth token endpoints
URL: /api/server/oauth/auth/oauth/token
Source: /vercel/path0/docs/content/api/server/oauth/auth/oauth/token.mdx
# API Documentation: OAuth token endpoints
This endpoint is used to exchange an authorization code or refresh token for an access token.
## POST /auth/oauth/token
**Summary:** OAuth token endpoints
**Description:** This endpoint is used to exchange an authorization code or refresh token for an access token.
**Request Body:** Request body required
**Responses:**
- 200: Successful response
# List AI conversations
URL: /api/server/others/internal/ai-conversations/get
Source: /vercel/path0/docs/content/api/server/others/internal/ai-conversations/get.mdx
# API Documentation: List AI conversations
List AI conversations for the current user filtered by project
## GET /internal/ai-conversations
**Summary:** List AI conversations
**Description:** List AI conversations for the current user filtered by project
**Parameters:**
- `projectId` (query): No description
**Responses:**
- 200: Successful response
# Create AI conversation
URL: /api/server/others/internal/ai-conversations/post
Source: /vercel/path0/docs/content/api/server/others/internal/ai-conversations/post.mdx
# API Documentation: Create AI conversation
Create a new AI conversation with optional initial messages
## POST /internal/ai-conversations
**Summary:** Create AI conversation
**Description:** Create a new AI conversation with optional initial messages
**Request Body:** Request body required
**Responses:**
- 200: Successful response
# List conversations
URL: /api/server/others/internal/conversations/get
Source: /vercel/path0/docs/content/api/server/others/internal/conversations/get.mdx
# API Documentation: List conversations
List conversations for a managed project
## GET /internal/conversations
**Summary:** List conversations
**Description:** List conversations for a managed project
**Parameters:**
- `projectId` (query): The unique identifier of the project
- `query` (query): No description
- `status` (query): No description
- `userId` (query): The unique identifier of the user
- `limit` (query): No description
- `offset` (query): No description
**Responses:**
- 200: Successful response
# Create conversation
URL: /api/server/others/internal/conversations/post
Source: /vercel/path0/docs/content/api/server/others/internal/conversations/post.mdx
# API Documentation: Create conversation
Create a managed project conversation for a user
## POST /internal/conversations
**Summary:** Create conversation
**Description:** Create a managed project conversation for a user
**Request Body:** Request body required
**Responses:**
- 200: Successful response
# MFA sign in
URL: /api/server/otp/auth/mfa/sign-in
Source: /vercel/path0/docs/content/api/server/otp/auth/mfa/sign-in.mdx
# API Documentation: MFA sign in
Complete multi-factor authorization to sign in, with a TOTP and an MFA attempt code
## POST /auth/mfa/sign-in
**Summary:** MFA sign in
**Description:** Complete multi-factor authorization to sign in, with a TOTP and an MFA attempt code
**Request Body:** Request body required
**Responses:**
- 200: Successful response
# Send sign-in code
URL: /api/server/otp/auth/otp/send-sign-in-code
Source: /vercel/path0/docs/content/api/server/otp/auth/otp/send-sign-in-code.mdx
# API Documentation: Send sign-in code
Send a code to the user's email address for sign-in.
## POST /auth/otp/send-sign-in-code
**Summary:** Send sign-in code
**Description:** Send a code to the user's email address for sign-in.
**Request Body:** Request body required
**Responses:**
- 200: Successful response
# Sign in with a code
URL: /api/server/otp/auth/otp/sign-in
Source: /vercel/path0/docs/content/api/server/otp/auth/otp/sign-in.mdx
# API Documentation: Sign in with a code
## POST /auth/otp/sign-in
**Summary:** Sign in with a code
**Request Body:** Request body required
**Responses:**
- 200: Successful response
# Reset password with a code
URL: /api/server/password/auth/password/reset
Source: /vercel/path0/docs/content/api/server/password/auth/password/reset.mdx
# API Documentation: Reset password with a code
Reset password with a code
## POST /auth/password/reset
**Summary:** Reset password with a code
**Description:** Reset password with a code
**Request Body:** Request body required
**Responses:**
- 200: Successful response
# Send reset password code
URL: /api/server/password/auth/password/send-reset-code
Source: /vercel/path0/docs/content/api/server/password/auth/password/send-reset-code.mdx
# API Documentation: Send reset password code
Send a code to the user's email address for resetting the password.
## POST /auth/password/send-reset-code
**Summary:** Send reset password code
**Description:** Send a code to the user's email address for resetting the password.
**Request Body:** Request body required
**Responses:**
- 200: Successful response
# Set password
URL: /api/server/password/auth/password/set
Source: /vercel/path0/docs/content/api/server/password/auth/password/set.mdx
# API Documentation: Set password
Set a new password for the current user
## POST /auth/password/set
**Summary:** Set password
**Description:** Set a new password for the current user
**Request Body:** Request body required
**Responses:**
- 200: Successful response
# Sign in with email and password
URL: /api/server/password/auth/password/sign-in
Source: /vercel/path0/docs/content/api/server/password/auth/password/sign-in.mdx
# API Documentation: Sign in with email and password
Sign in to an account with email and password
## POST /auth/password/sign-in
**Summary:** Sign in with email and password
**Description:** Sign in to an account with email and password
**Request Body:** Request body required
**Responses:**
- 200: Successful response
# Sign up with email and password
URL: /api/server/password/auth/password/sign-up
Source: /vercel/path0/docs/content/api/server/password/auth/password/sign-up.mdx
# API Documentation: Sign up with email and password
Create a new account with email and password
## POST /auth/password/sign-up
**Summary:** Sign up with email and password
**Description:** Create a new account with email and password
**Request Body:** Request body required
**Responses:**
- 200: Successful response
# Update password
URL: /api/server/password/auth/password/update
Source: /vercel/path0/docs/content/api/server/password/auth/password/update.mdx
# API Documentation: Update password
Update the password of the current user, requires the old password
## POST /auth/password/update
**Summary:** Update password
**Description:** Update the password of the current user, requires the old password
**Parameters:**
- `x-stack-refresh-token` (header): No description
**Request Body:** Request body required
**Responses:**
- 200: Successful response
# Create Purchase URL
URL: /api/server/payments/payments/purchases/create-purchase-url
Source: /vercel/path0/docs/content/api/server/payments/payments/purchases/create-purchase-url.mdx
# API Documentation: Create Purchase URL
Creates a secure checkout URL for purchasing a product.
## POST /payments/purchases/create-purchase-url
**Summary:** Create Purchase URL
**Description:** Creates a secure checkout URL for purchasing a product.
**Request Body:** Request body required
**Responses:**
- 200: Successful response
# Create Purchase Session
URL: /api/server/payments/payments/purchases/purchase-session
Source: /vercel/path0/docs/content/api/server/payments/payments/purchases/purchase-session.mdx
# API Documentation: Create Purchase Session
Creates a purchase session for completing a purchase.
## POST /payments/purchases/purchase-session
**Summary:** Create Purchase Session
**Description:** Creates a purchase session for completing a purchase.
**Request Body:** Request body required
**Responses:**
- 200: Successful response
# Validate Purchase Code
URL: /api/server/payments/payments/purchases/validate-code
Source: /vercel/path0/docs/content/api/server/payments/payments/purchases/validate-code.mdx
# API Documentation: Validate Purchase Code
Validates a purchase verification code and returns purchase details including available prices.
## POST /payments/purchases/validate-code
**Summary:** Validate Purchase Code
**Description:** Validates a purchase verification code and returns purchase details including available prices.
**Request Body:** Request body required
**Responses:**
- 200: Successful response
# Sign out of the current session
URL: /api/server/sessions/auth/sessions/current
Source: /vercel/path0/docs/content/api/server/sessions/auth/sessions/current.mdx
# API Documentation: Sign out of the current session
Sign out of the current session and invalidate the refresh token
## DELETE /auth/sessions/current
**Summary:** Sign out of the current session
**Description:** Sign out of the current session and invalidate the refresh token
**Responses:**
- 200: Successful response
# List sessions
URL: /api/server/sessions/auth/sessions/get
Source: /vercel/path0/docs/content/api/server/sessions/auth/sessions/get.mdx
# API Documentation: List sessions
List all sessions for the current user.
## GET /auth/sessions
**Summary:** List sessions
**Description:** List all sessions for the current user.
**Parameters:**
- `user_id` (query): The ID of the user, or the special value `me` for the currently authenticated user
**Responses:**
- 200: Successful response
# Delete session
URL: /api/server/sessions/auth/sessions/id
Source: /vercel/path0/docs/content/api/server/sessions/auth/sessions/id.mdx
# API Documentation: Delete session
Delete a session by ID.
## DELETE /auth/sessions/{id}
**Summary:** Delete session
**Description:** Delete a session by ID.
**Parameters:**
- `user_id` (query): The ID of the user, or the special value `me` for the currently authenticated user
- `id` (path): No description
**Responses:**
- 200: Successful response
# Create session
URL: /api/server/sessions/auth/sessions/post
Source: /vercel/path0/docs/content/api/server/sessions/auth/sessions/post.mdx
# API Documentation: Create session
Create a new session for a given user. This will return a refresh token that can be used to impersonate the user.
## POST /auth/sessions
**Summary:** Create session
**Description:** Create a new session for a given user. This will return a refresh token that can be used to impersonate the user.
**Request Body:** Request body required
**Responses:**
- 200: Successful response
# Check if a team invitation code is valid
URL: /api/server/teams/team-invitations/accept/check-code
Source: /vercel/path0/docs/content/api/server/teams/team-invitations/accept/check-code.mdx
# API Documentation: Check if a team invitation code is valid
Check if a team invitation code is valid without using it
## POST /team-invitations/accept/check-code
**Summary:** Check if a team invitation code is valid
**Description:** Check if a team invitation code is valid without using it
**Request Body:** Request body required
**Responses:**
- 200: Successful response
# Get team invitation details
URL: /api/server/teams/team-invitations/accept/details
Source: /vercel/path0/docs/content/api/server/teams/team-invitations/accept/details.mdx
# API Documentation: Get team invitation details
Get additional information about a team invitation code
## POST /team-invitations/accept/details
**Summary:** Get team invitation details
**Description:** Get additional information about a team invitation code
**Request Body:** Request body required
**Responses:**
- 200: Successful response
# Accept a team invitation by ID
URL: /api/server/teams/team-invitations/id/accept
Source: /vercel/path0/docs/content/api/server/teams/team-invitations/id/accept.mdx
# API Documentation: Accept a team invitation by ID
Accepts a team invitation for the specified user. The user must have a verified email matching the invitation's recipient email. This marks the invitation as used and adds the user to the team.
## POST /team-invitations/{id}/accept
**Summary:** Accept a team invitation by ID
**Description:** Accepts a team invitation for the specified user. The user must have a verified email matching the invitation's recipient email. This marks the invitation as used and adds the user to the team.
**Parameters:**
- `user_id` (query): The ID of the user, or the special value `me` for the currently authenticated user
- `id` (path): No description
**Responses:**
- 200: Successful response
# Delete a team
URL: /api/server/teams/teams/team_id/delete
Source: /vercel/path0/docs/content/api/server/teams/teams/team_id/delete.mdx
# API Documentation: Delete a team
Delete a team by ID.
## DELETE /teams/{team_id}
**Summary:** Delete a team
**Description:** Delete a team by ID.
**Parameters:**
- `team_id` (path): No description
**Responses:**
- 200: Successful response
# Get a team
URL: /api/server/teams/teams/team_id/get
Source: /vercel/path0/docs/content/api/server/teams/teams/team_id/get.mdx
# API Documentation: Get a team
Get a team by ID.
## GET /teams/{team_id}
**Summary:** Get a team
**Description:** Get a team by ID.
**Parameters:**
- `team_id` (path): No description
**Responses:**
- 200: Successful response
# Update a team
URL: /api/server/teams/teams/team_id/patch
Source: /vercel/path0/docs/content/api/server/teams/teams/team_id/patch.mdx
# API Documentation: Update a team
Update the team information by ID.
## PATCH /teams/{team_id}
**Summary:** Update a team
**Description:** Update the team information by ID.
**Parameters:**
- `team_id` (path): No description
**Request Body:** Request body required
**Responses:**
- 200: Successful response
# Delete current user
URL: /api/server/users/users/me/delete
Source: /vercel/path0/docs/content/api/server/users/users/me/delete.mdx
# API Documentation: Delete current user
Deletes the currently authenticated user. Use this with caution.
## DELETE /users/me
**Summary:** Delete current user
**Description:** Deletes the currently authenticated user. Use this with caution.
**Responses:**
- 200: Successful response
# Get current user
URL: /api/server/users/users/me/get
Source: /vercel/path0/docs/content/api/server/users/users/me/get.mdx
# API Documentation: Get current user
Gets the currently authenticated user.
## GET /users/me
**Summary:** Get current user
**Description:** Gets the currently authenticated user.
**Responses:**
- 200: Successful response
# Update current user
URL: /api/server/users/users/me/patch
Source: /vercel/path0/docs/content/api/server/users/users/me/patch.mdx
# API Documentation: Update current user
Updates the currently authenticated user. Only the values provided will be updated.
## PATCH /users/me
**Summary:** Update current user
**Description:** Updates the currently authenticated user. Only the values provided will be updated.
**Request Body:** Request body required
**Responses:**
- 200: Successful response
# Delete user
URL: /api/server/users/users/user_id/delete
Source: /vercel/path0/docs/content/api/server/users/users/user_id/delete.mdx
# API Documentation: Delete user
Deletes a user. Use this with caution.
## DELETE /users/{user_id}
**Summary:** Delete user
**Description:** Deletes a user. Use this with caution.
**Parameters:**
- `user_id` (path): The ID of the user, or the special value `me` for the currently authenticated user
**Responses:**
- 200: Successful response
# Get user
URL: /api/server/users/users/user_id/get
Source: /vercel/path0/docs/content/api/server/users/users/user_id/get.mdx
# API Documentation: Get user
Gets a user by user ID.
## GET /users/{user_id}
**Summary:** Get user
**Description:** Gets a user by user ID.
**Parameters:**
- `user_id` (path): The ID of the user, or the special value `me` for the currently authenticated user
**Responses:**
- 200: Successful response
# Update user
URL: /api/server/users/users/user_id/patch
Source: /vercel/path0/docs/content/api/server/users/users/user_id/patch.mdx
# API Documentation: Update user
Updates a user. Only the values provided will be updated.
## PATCH /users/{user_id}
**Summary:** Update user
**Description:** Updates a user. Only the values provided will be updated.
**Parameters:**
- `user_id` (path): The ID of the user, or the special value `me` for the currently authenticated user
**Request Body:** Request body required
**Responses:**
- 200: Successful response
# Delete a contact channel
URL: /api/admin/contact-channels/contact-channels/user_id/contact_channel_id/delete
Source: /vercel/path0/docs/content/api/admin/contact-channels/contact-channels/user_id/contact_channel_id/delete.mdx
# API Documentation: Delete a contact channel
Removes a contact channel for a given user.
## DELETE /contact-channels/{user_id}/{contact_channel_id}
**Summary:** Delete a contact channel
**Description:** Removes a contact channel for a given user.
**Parameters:**
- `user_id` (query): The ID of the user, or the special value `me` for the currently authenticated user
- `contact_channel_id` (query): No description
- `user_id` (path): the user that the contact channel belongs to
- `contact_channel_id` (path): the target contact channel
**Responses:**
- 200: Successful response
# Get a contact channel
URL: /api/admin/contact-channels/contact-channels/user_id/contact_channel_id/get
Source: /vercel/path0/docs/content/api/admin/contact-channels/contact-channels/user_id/contact_channel_id/get.mdx
# API Documentation: Get a contact channel
Retrieves a specific contact channel by the user ID and the contact channel ID.
## GET /contact-channels/{user_id}/{contact_channel_id}
**Summary:** Get a contact channel
**Description:** Retrieves a specific contact channel by the user ID and the contact channel ID.
**Parameters:**
- `user_id` (query): The ID of the user, or the special value `me` for the currently authenticated user
- `contact_channel_id` (query): No description
- `user_id` (path): the user that the contact channel belongs to
- `contact_channel_id` (path): the target contact channel
**Responses:**
- 200: Successful response
# Update a contact channel
URL: /api/admin/contact-channels/contact-channels/user_id/contact_channel_id/patch
Source: /vercel/path0/docs/content/api/admin/contact-channels/contact-channels/user_id/contact_channel_id/patch.mdx
# API Documentation: Update a contact channel
Updates an existing contact channel. Only the values provided will be updated.
## PATCH /contact-channels/{user_id}/{contact_channel_id}
**Summary:** Update a contact channel
**Description:** Updates an existing contact channel. Only the values provided will be updated.
**Parameters:**
- `user_id` (query): The ID of the user, or the special value `me` for the currently authenticated user
- `contact_channel_id` (query): No description
- `user_id` (path): the user that the contact channel belongs to
- `contact_channel_id` (path): the target contact channel
**Request Body:** Request body required
**Responses:**
- 200: Successful response
# Send contact channel verification code
URL: /api/admin/contact-channels/contact-channels/user_id/contact_channel_id/send-verification-code
Source: /vercel/path0/docs/content/api/admin/contact-channels/contact-channels/user_id/contact_channel_id/send-verification-code.mdx
# API Documentation: Send contact channel verification code
Send a code to the user's contact channel for verifying the contact channel.
## POST /contact-channels/{user_id}/{contact_channel_id}/send-verification-code
**Summary:** Send contact channel verification code
**Description:** Send a code to the user's contact channel for verifying the contact channel.
**Parameters:**
- `user_id` (path): The user to send the verification code to.
- `contact_channel_id` (path): The contact channel to send the verification code to.
**Request Body:** Request body required
**Responses:**
- 200: Successful response
# Update notification preference
URL: /api/admin/emails/emails/notification-preference/user_id/notification_category_id
Source: /vercel/path0/docs/content/api/admin/emails/emails/notification-preference/user_id/notification_category_id.mdx
# API Documentation: Update notification preference
Enable or disable a specific notification category for a user.
## PATCH /emails/notification-preference/{user_id}/{notification_category_id}
**Summary:** Update notification preference
**Description:** Enable or disable a specific notification category for a user.
**Parameters:**
- `user_id` (path): The ID of the user, or the special value `me` for the currently authenticated user
- `notification_category_id` (path): No description
**Request Body:** Request body required
**Responses:**
- 200: Successful response
# Get email outbox entry
URL: /api/admin/emails/emails/outbox/id/get
Source: /vercel/path0/docs/content/api/admin/emails/emails/outbox/id/get.mdx
# API Documentation: Get email outbox entry
Gets a single email from the outbox by ID.
## GET /emails/outbox/{id}
**Summary:** Get email outbox entry
**Description:** Gets a single email from the outbox by ID.
**Parameters:**
- `status` (query): No description
- `simple_status` (query): No description
- `id` (path): No description
**Responses:**
- 200: Successful response
# Update email outbox entry
URL: /api/admin/emails/emails/outbox/id/patch
Source: /vercel/path0/docs/content/api/admin/emails/emails/outbox/id/patch.mdx
# API Documentation: Update email outbox entry
Updates an email in the outbox. Can be used to edit email content, pause/resume, or cancel emails. Only emails in editable states (`paused`, `preparing`, `rendering`, `render-error`, `scheduled`, `queued`, `server-error`) can be modified.
## PATCH /emails/outbox/{id}
**Summary:** Update email outbox entry
**Description:** Updates an email in the outbox. Can be used to edit email content, pause/resume, or cancel emails. Only emails in editable states (`paused`, `preparing`, `rendering`, `render-error`, `scheduled`, `queued`, `server-error`) can be modified.
**Parameters:**
- `status` (query): No description
- `simple_status` (query): No description
- `id` (path): No description
**Request Body:** Request body required
**Responses:**
- 200: Successful response
# OAuth authorize endpoint
URL: /api/admin/oauth/auth/oauth/authorize/provider_id
Source: /vercel/path0/docs/content/api/admin/oauth/auth/oauth/authorize/provider_id.mdx
# API Documentation: OAuth authorize endpoint
This endpoint is used to initiate the OAuth authorization flow. there are two purposes for this endpoint: 1. Authenticate a user with an OAuth provider. 2. Link an existing user with an OAuth provider.
## GET /auth/oauth/authorize/{provider_id}
**Summary:** OAuth authorize endpoint
**Description:** This endpoint is used to initiate the OAuth authorization flow. there are two purposes for this endpoint: 1. Authenticate a user with an OAuth provider. 2. Link an existing user with an OAuth provider.
**Parameters:**
- `type` (query): No description
- `token` (query): No description
- `provider_scope` (query): No description
- `error_redirect_uri` (query): No description
- `after_callback_redirect_url` (query): No description
- `stack_response_mode` (query): Response mode for the OAuth authorize endpoint. Defaults to 'redirect' if not provided.
- `hexclave_response_mode` (query): Response mode for the OAuth authorize endpoint. Defaults to 'redirect' if not provided.
- `bot_challenge_token` (query): No description
- `bot_challenge_phase` (query): No description
- `bot_challenge_unavailable` (query): No description
- `client_id` (query): No description
- `client_secret` (query): No description
- `redirect_uri` (query): No description
- `scope` (query): No description
- `state` (query): No description
- `grant_type` (query): No description
- `code_challenge` (query): No description
- `code_challenge_method` (query): No description
- `response_type` (query): No description
- `provider_id` (path): No description
**Responses:**
- 200: Successful response
- 307: Successful response
# Create cross-domain auth handoff redirect
URL: /api/admin/oauth/auth/oauth/cross-domain/authorize
Source: /vercel/path0/docs/content/api/admin/oauth/auth/oauth/cross-domain/authorize.mdx
# API Documentation: Create cross-domain auth handoff redirect
Creates a one-time OAuth authorization code redirect for cross-domain sign-in handoff using PKCE.
## POST /auth/oauth/cross-domain/authorize
**Summary:** Create cross-domain auth handoff redirect
**Description:** Creates a one-time OAuth authorization code redirect for cross-domain sign-in handoff using PKCE.
**Parameters:**
- `x-stack-publishable-client-key` (header): No description
- `x-stack-refresh-token` (header): No description
**Request Body:** Request body required
**Responses:**
- 200: Successful response
# Delete an OAuth provider
URL: /api/admin/oauth/oauth-providers/user_id/provider_id/delete
Source: /vercel/path0/docs/content/api/admin/oauth/oauth-providers/user_id/provider_id/delete.mdx
# API Documentation: Delete an OAuth provider
Removes an OAuth provider for a given user.
## DELETE /oauth-providers/{user_id}/{provider_id}
**Summary:** Delete an OAuth provider
**Description:** Removes an OAuth provider for a given user.
**Parameters:**
- `provider_id` (path): No description
- `user_id` (path): The ID of the user, or the special value `me` for the currently authenticated user
**Responses:**
- 200: Successful response
# Get an OAuth provider
URL: /api/admin/oauth/oauth-providers/user_id/provider_id/get
Source: /vercel/path0/docs/content/api/admin/oauth/oauth-providers/user_id/provider_id/get.mdx
# API Documentation: Get an OAuth provider
Retrieves a specific OAuth provider by the user ID and the OAuth provider ID.
## GET /oauth-providers/{user_id}/{provider_id}
**Summary:** Get an OAuth provider
**Description:** Retrieves a specific OAuth provider by the user ID and the OAuth provider ID.
**Parameters:**
- `provider_id` (path): No description
- `user_id` (path): The ID of the user, or the special value `me` for the currently authenticated user
**Responses:**
- 200: Successful response
# Update an OAuth provider
URL: /api/admin/oauth/oauth-providers/user_id/provider_id/patch
Source: /vercel/path0/docs/content/api/admin/oauth/oauth-providers/user_id/provider_id/patch.mdx
# API Documentation: Update an OAuth provider
Updates an existing OAuth provider. Only the values provided will be updated.
## PATCH /oauth-providers/{user_id}/{provider_id}
**Summary:** Update an OAuth provider
**Description:** Updates an existing OAuth provider. Only the values provided will be updated.
**Parameters:**
- `provider_id` (path): No description
- `user_id` (path): The ID of the user, or the special value `me` for the currently authenticated user
**Request Body:** Request body required
**Responses:**
- 200: Successful response
# Delete AI conversation
URL: /api/admin/others/internal/ai-conversations/conversationid/delete
Source: /vercel/path0/docs/content/api/admin/others/internal/ai-conversations/conversationid/delete.mdx
# API Documentation: Delete AI conversation
Delete an AI conversation and all its messages
## DELETE /internal/ai-conversations/{conversationId}
**Summary:** Delete AI conversation
**Description:** Delete an AI conversation and all its messages
**Parameters:**
- `conversationId` (path): No description
**Responses:**
- 200: Successful response
# Get AI conversation
URL: /api/admin/others/internal/ai-conversations/conversationid/get
Source: /vercel/path0/docs/content/api/admin/others/internal/ai-conversations/conversationid/get.mdx
# API Documentation: Get AI conversation
Fetch a single AI conversation with all its messages
## GET /internal/ai-conversations/{conversationId}
**Summary:** Get AI conversation
**Description:** Fetch a single AI conversation with all its messages
**Parameters:**
- `conversationId` (path): No description
**Responses:**
- 200: Successful response
# Replace conversation messages
URL: /api/admin/others/internal/ai-conversations/conversationid/messages
Source: /vercel/path0/docs/content/api/admin/others/internal/ai-conversations/conversationid/messages.mdx
# API Documentation: Replace conversation messages
Replace all messages in a conversation
## PUT /internal/ai-conversations/{conversationId}/messages
**Summary:** Replace conversation messages
**Description:** Replace all messages in a conversation
**Parameters:**
- `conversationId` (path): No description
**Request Body:** Request body required
**Responses:**
- 200: Successful response
# Update AI conversation
URL: /api/admin/others/internal/ai-conversations/conversationid/patch
Source: /vercel/path0/docs/content/api/admin/others/internal/ai-conversations/conversationid/patch.mdx
# API Documentation: Update AI conversation
Update the title of an AI conversation
## PATCH /internal/ai-conversations/{conversationId}
**Summary:** Update AI conversation
**Description:** Update the title of an AI conversation
**Parameters:**
- `conversationId` (path): No description
**Request Body:** Request body required
**Responses:**
- 200: Successful response
# Get conversation detail
URL: /api/admin/others/internal/conversations/conversationid/get
Source: /vercel/path0/docs/content/api/admin/others/internal/conversations/conversationid/get.mdx
# API Documentation: Get conversation detail
Get conversation detail for a managed project
## GET /internal/conversations/{conversationId}
**Summary:** Get conversation detail
**Description:** Get conversation detail for a managed project
**Parameters:**
- `projectId` (query): The unique identifier of the project
- `conversationId` (path): No description
**Responses:**
- 200: Successful response
# Update conversation
URL: /api/admin/others/internal/conversations/conversationid/patch
Source: /vercel/path0/docs/content/api/admin/others/internal/conversations/conversationid/patch.mdx
# API Documentation: Update conversation
Append a message or update conversation attributes on a managed project conversation
## PATCH /internal/conversations/{conversationId}
**Summary:** Update conversation
**Description:** Append a message or update conversation attributes on a managed project conversation
**Parameters:**
- `conversationId` (path): No description
**Responses:**
- 200: Successful response
# Check sign in code
URL: /api/admin/otp/auth/otp/sign-in/check-code
Source: /vercel/path0/docs/content/api/admin/otp/auth/otp/sign-in/check-code.mdx
# API Documentation: Check sign in code
Check if a sign in code is valid without using it
## POST /auth/otp/sign-in/check-code
**Summary:** Check sign in code
**Description:** Check if a sign in code is valid without using it
**Request Body:** Request body required
**Responses:**
- 200: Successful response
# Check reset password code
URL: /api/admin/password/auth/password/reset/check-code
Source: /vercel/path0/docs/content/api/admin/password/auth/password/reset/check-code.mdx
# API Documentation: Check reset password code
Check if a reset password code is valid without using it
## POST /auth/password/reset/check-code
**Summary:** Check reset password code
**Description:** Check if a reset password code is valid without using it
**Request Body:** Request body required
**Responses:**
- 200: Successful response
# Revoke a global permission from a user
URL: /api/admin/permissions/project-permissions/user_id/permission_id/delete
Source: /vercel/path0/docs/content/api/admin/permissions/project-permissions/user_id/permission_id/delete.mdx
# API Documentation: Revoke a global permission from a user
Revoke a global permission from a user
## DELETE /project-permissions/{user_id}/{permission_id}
**Summary:** Revoke a global permission from a user
**Description:** Revoke a global permission from a user
**Parameters:**
- `user_id` (path): The ID of the user, or the special value `me` for the currently authenticated user
- `permission_id` (path): The permission ID used to uniquely identify a permission. Can either be a custom permission with lowercase letters, numbers, `:`, and `_` characters, or one of the system permissions: `$update_team`, `$delete_team`, `$read_members`, `$remove_members`, `$invite_members`, `$manage_api_keys`
**Responses:**
- 200: Successful response
# Grant a global permission to a user
URL: /api/admin/permissions/project-permissions/user_id/permission_id/post
Source: /vercel/path0/docs/content/api/admin/permissions/project-permissions/user_id/permission_id/post.mdx
# API Documentation: Grant a global permission to a user
Grant a global permission to a user (the permission must be created first on the Stack dashboard)
## POST /project-permissions/{user_id}/{permission_id}
**Summary:** Grant a global permission to a user
**Description:** Grant a global permission to a user (the permission must be created first on the Stack dashboard)
**Parameters:**
- `user_id` (path): The ID of the user, or the special value `me` for the currently authenticated user
- `permission_id` (path): The permission ID used to uniquely identify a permission. Can either be a custom permission with lowercase letters, numbers, `:`, and `_` characters, or one of the system permissions: `$update_team`, `$delete_team`, `$read_members`, `$remove_members`, `$invite_members`, `$manage_api_keys`
**Request Body:** Request body required
**Responses:**
- 201: Successful response
# Refresh access token
URL: /api/admin/sessions/auth/sessions/current/refresh
Source: /vercel/path0/docs/content/api/admin/sessions/auth/sessions/current/refresh.mdx
# API Documentation: Refresh access token
Get a new access token using a refresh token
## POST /auth/sessions/current/refresh
**Summary:** Refresh access token
**Description:** Get a new access token using a refresh token
**Parameters:**
- `x-stack-refresh-token` (header): No description
**Responses:**
- 200: Successful response
# Get a team member profile
URL: /api/admin/teams/team-member-profiles/team_id/user_id/get
Source: /vercel/path0/docs/content/api/admin/teams/team-member-profiles/team_id/user_id/get.mdx
# API Documentation: Get a team member profile
Get a team member profile by user ID
## GET /team-member-profiles/{team_id}/{user_id}
**Summary:** Get a team member profile
**Description:** Get a team member profile by user ID
**Parameters:**
- `team_id` (path): No description
- `user_id` (path): The ID of the user, or the special value `me` for the currently authenticated user
**Responses:**
- 200: Successful response
# Update a team member profile
URL: /api/admin/teams/team-member-profiles/team_id/user_id/patch
Source: /vercel/path0/docs/content/api/admin/teams/team-member-profiles/team_id/user_id/patch.mdx
# API Documentation: Update a team member profile
Update a team member profile by user ID
## PATCH /team-member-profiles/{team_id}/{user_id}
**Summary:** Update a team member profile
**Description:** Update a team member profile by user ID
**Parameters:**
- `team_id` (path): No description
- `user_id` (path): The ID of the user, or the special value `me` for the currently authenticated user
**Request Body:** Request body required
**Responses:**
- 200: Successful response
# Remove a user from a team
URL: /api/admin/teams/team-memberships/team_id/user_id/delete
Source: /vercel/path0/docs/content/api/admin/teams/team-memberships/team_id/user_id/delete.mdx
# API Documentation: Remove a user from a team
## DELETE /team-memberships/{team_id}/{user_id}
**Summary:** Remove a user from a team
**Parameters:**
- `team_id` (path): No description
- `user_id` (path): The ID of the user, or the special value `me` for the currently authenticated user
**Responses:**
- 200: Successful response
# Add a user to a team
URL: /api/admin/teams/team-memberships/team_id/user_id/post
Source: /vercel/path0/docs/content/api/admin/teams/team-memberships/team_id/user_id/post.mdx
# API Documentation: Add a user to a team
## POST /team-memberships/{team_id}/{user_id}
**Summary:** Add a user to a team
**Parameters:**
- `team_id` (path): No description
- `user_id` (path): The ID of the user, or the special value `me` for the currently authenticated user
**Request Body:** Request body required
**Responses:**
- 201: Successful response
# Delete a contact channel
URL: /api/client/contact-channels/contact-channels/user_id/contact_channel_id/delete
Source: /vercel/path0/docs/content/api/client/contact-channels/contact-channels/user_id/contact_channel_id/delete.mdx
# API Documentation: Delete a contact channel
Removes a contact channel for a given user.
## DELETE /contact-channels/{user_id}/{contact_channel_id}
**Summary:** Delete a contact channel
**Description:** Removes a contact channel for a given user.
**Parameters:**
- `user_id` (query): The ID of the user, or the special value `me` for the currently authenticated user
- `contact_channel_id` (query): No description
- `user_id` (path): the user that the contact channel belongs to
- `contact_channel_id` (path): the target contact channel
**Responses:**
- 200: Successful response
# Get a contact channel
URL: /api/client/contact-channels/contact-channels/user_id/contact_channel_id/get
Source: /vercel/path0/docs/content/api/client/contact-channels/contact-channels/user_id/contact_channel_id/get.mdx
# API Documentation: Get a contact channel
Retrieves a specific contact channel by the user ID and the contact channel ID.
## GET /contact-channels/{user_id}/{contact_channel_id}
**Summary:** Get a contact channel
**Description:** Retrieves a specific contact channel by the user ID and the contact channel ID.
**Parameters:**
- `user_id` (query): The ID of the user, or the special value `me` for the currently authenticated user
- `contact_channel_id` (query): No description
- `user_id` (path): the user that the contact channel belongs to
- `contact_channel_id` (path): the target contact channel
**Responses:**
- 200: Successful response
# Update a contact channel
URL: /api/client/contact-channels/contact-channels/user_id/contact_channel_id/patch
Source: /vercel/path0/docs/content/api/client/contact-channels/contact-channels/user_id/contact_channel_id/patch.mdx
# API Documentation: Update a contact channel
Updates an existing contact channel. Only the values provided will be updated.
## PATCH /contact-channels/{user_id}/{contact_channel_id}
**Summary:** Update a contact channel
**Description:** Updates an existing contact channel. Only the values provided will be updated.
**Parameters:**
- `user_id` (query): The ID of the user, or the special value `me` for the currently authenticated user
- `contact_channel_id` (query): No description
- `user_id` (path): the user that the contact channel belongs to
- `contact_channel_id` (path): the target contact channel
**Request Body:** Request body required
**Responses:**
- 200: Successful response
# Send contact channel verification code
URL: /api/client/contact-channels/contact-channels/user_id/contact_channel_id/send-verification-code
Source: /vercel/path0/docs/content/api/client/contact-channels/contact-channels/user_id/contact_channel_id/send-verification-code.mdx
# API Documentation: Send contact channel verification code
Send a code to the user's contact channel for verifying the contact channel.
## POST /contact-channels/{user_id}/{contact_channel_id}/send-verification-code
**Summary:** Send contact channel verification code
**Description:** Send a code to the user's contact channel for verifying the contact channel.
**Parameters:**
- `user_id` (path): The user to send the verification code to.
- `contact_channel_id` (path): The contact channel to send the verification code to.
**Request Body:** Request body required
**Responses:**
- 200: Successful response
# Update notification preference
URL: /api/client/emails/emails/notification-preference/user_id/notification_category_id
Source: /vercel/path0/docs/content/api/client/emails/emails/notification-preference/user_id/notification_category_id.mdx
# API Documentation: Update notification preference
Enable or disable a specific notification category for a user.
## PATCH /emails/notification-preference/{user_id}/{notification_category_id}
**Summary:** Update notification preference
**Description:** Enable or disable a specific notification category for a user.
**Parameters:**
- `user_id` (path): The ID of the user, or the special value `me` for the currently authenticated user
- `notification_category_id` (path): No description
**Request Body:** Request body required
**Responses:**
- 200: Successful response
# OAuth authorize endpoint
URL: /api/client/oauth/auth/oauth/authorize/provider_id
Source: /vercel/path0/docs/content/api/client/oauth/auth/oauth/authorize/provider_id.mdx
# API Documentation: OAuth authorize endpoint
This endpoint is used to initiate the OAuth authorization flow. there are two purposes for this endpoint: 1. Authenticate a user with an OAuth provider. 2. Link an existing user with an OAuth provider.
## GET /auth/oauth/authorize/{provider_id}
**Summary:** OAuth authorize endpoint
**Description:** This endpoint is used to initiate the OAuth authorization flow. there are two purposes for this endpoint: 1. Authenticate a user with an OAuth provider. 2. Link an existing user with an OAuth provider.
**Parameters:**
- `type` (query): No description
- `token` (query): No description
- `provider_scope` (query): No description
- `error_redirect_uri` (query): No description
- `after_callback_redirect_url` (query): No description
- `stack_response_mode` (query): Response mode for the OAuth authorize endpoint. Defaults to 'redirect' if not provided.
- `hexclave_response_mode` (query): Response mode for the OAuth authorize endpoint. Defaults to 'redirect' if not provided.
- `bot_challenge_token` (query): No description
- `bot_challenge_phase` (query): No description
- `bot_challenge_unavailable` (query): No description
- `client_id` (query): No description
- `client_secret` (query): No description
- `redirect_uri` (query): No description
- `scope` (query): No description
- `state` (query): No description
- `grant_type` (query): No description
- `code_challenge` (query): No description
- `code_challenge_method` (query): No description
- `response_type` (query): No description
- `provider_id` (path): No description
**Responses:**
- 200: Successful response
- 307: Successful response
# Create cross-domain auth handoff redirect
URL: /api/client/oauth/auth/oauth/cross-domain/authorize
Source: /vercel/path0/docs/content/api/client/oauth/auth/oauth/cross-domain/authorize.mdx
# API Documentation: Create cross-domain auth handoff redirect
Creates a one-time OAuth authorization code redirect for cross-domain sign-in handoff using PKCE.
## POST /auth/oauth/cross-domain/authorize
**Summary:** Create cross-domain auth handoff redirect
**Description:** Creates a one-time OAuth authorization code redirect for cross-domain sign-in handoff using PKCE.
**Parameters:**
- `x-stack-publishable-client-key` (header): No description
- `x-stack-refresh-token` (header): No description
**Request Body:** Request body required
**Responses:**
- 200: Successful response
# Delete an OAuth provider
URL: /api/client/oauth/oauth-providers/user_id/provider_id/delete
Source: /vercel/path0/docs/content/api/client/oauth/oauth-providers/user_id/provider_id/delete.mdx
# API Documentation: Delete an OAuth provider
Removes an OAuth provider for a given user.
## DELETE /oauth-providers/{user_id}/{provider_id}
**Summary:** Delete an OAuth provider
**Description:** Removes an OAuth provider for a given user.
**Parameters:**
- `provider_id` (path): No description
- `user_id` (path): The ID of the user, or the special value `me` for the currently authenticated user
**Responses:**
- 200: Successful response
# Get an OAuth provider
URL: /api/client/oauth/oauth-providers/user_id/provider_id/get
Source: /vercel/path0/docs/content/api/client/oauth/oauth-providers/user_id/provider_id/get.mdx
# API Documentation: Get an OAuth provider
Retrieves a specific OAuth provider by the user ID and the OAuth provider ID.
## GET /oauth-providers/{user_id}/{provider_id}
**Summary:** Get an OAuth provider
**Description:** Retrieves a specific OAuth provider by the user ID and the OAuth provider ID.
**Parameters:**
- `provider_id` (path): No description
- `user_id` (path): The ID of the user, or the special value `me` for the currently authenticated user
**Responses:**
- 200: Successful response
# Update an OAuth provider
URL: /api/client/oauth/oauth-providers/user_id/provider_id/patch
Source: /vercel/path0/docs/content/api/client/oauth/oauth-providers/user_id/provider_id/patch.mdx
# API Documentation: Update an OAuth provider
Updates an existing OAuth provider for a user.
## PATCH /oauth-providers/{user_id}/{provider_id}
**Summary:** Update an OAuth provider
**Description:** Updates an existing OAuth provider for a user.
**Parameters:**
- `provider_id` (path): No description
- `user_id` (path): The ID of the user, or the special value `me` for the currently authenticated user
**Request Body:** Request body required
**Responses:**
- 200: Successful response
# Delete AI conversation
URL: /api/client/others/internal/ai-conversations/conversationid/delete
Source: /vercel/path0/docs/content/api/client/others/internal/ai-conversations/conversationid/delete.mdx
# API Documentation: Delete AI conversation
Delete an AI conversation and all its messages
## DELETE /internal/ai-conversations/{conversationId}
**Summary:** Delete AI conversation
**Description:** Delete an AI conversation and all its messages
**Parameters:**
- `conversationId` (path): No description
**Responses:**
- 200: Successful response
# Get AI conversation
URL: /api/client/others/internal/ai-conversations/conversationid/get
Source: /vercel/path0/docs/content/api/client/others/internal/ai-conversations/conversationid/get.mdx
# API Documentation: Get AI conversation
Fetch a single AI conversation with all its messages
## GET /internal/ai-conversations/{conversationId}
**Summary:** Get AI conversation
**Description:** Fetch a single AI conversation with all its messages
**Parameters:**
- `conversationId` (path): No description
**Responses:**
- 200: Successful response
# Replace conversation messages
URL: /api/client/others/internal/ai-conversations/conversationid/messages
Source: /vercel/path0/docs/content/api/client/others/internal/ai-conversations/conversationid/messages.mdx
# API Documentation: Replace conversation messages
Replace all messages in a conversation
## PUT /internal/ai-conversations/{conversationId}/messages
**Summary:** Replace conversation messages
**Description:** Replace all messages in a conversation
**Parameters:**
- `conversationId` (path): No description
**Request Body:** Request body required
**Responses:**
- 200: Successful response
# Update AI conversation
URL: /api/client/others/internal/ai-conversations/conversationid/patch
Source: /vercel/path0/docs/content/api/client/others/internal/ai-conversations/conversationid/patch.mdx
# API Documentation: Update AI conversation
Update the title of an AI conversation
## PATCH /internal/ai-conversations/{conversationId}
**Summary:** Update AI conversation
**Description:** Update the title of an AI conversation
**Parameters:**
- `conversationId` (path): No description
**Request Body:** Request body required
**Responses:**
- 200: Successful response
# Get conversation detail
URL: /api/client/others/internal/conversations/conversationid/get
Source: /vercel/path0/docs/content/api/client/others/internal/conversations/conversationid/get.mdx
# API Documentation: Get conversation detail
Get conversation detail for a managed project
## GET /internal/conversations/{conversationId}
**Summary:** Get conversation detail
**Description:** Get conversation detail for a managed project
**Parameters:**
- `projectId` (query): The unique identifier of the project
- `conversationId` (path): No description
**Responses:**
- 200: Successful response
# Update conversation
URL: /api/client/others/internal/conversations/conversationid/patch
Source: /vercel/path0/docs/content/api/client/others/internal/conversations/conversationid/patch.mdx
# API Documentation: Update conversation
Append a message or update conversation attributes on a managed project conversation
## PATCH /internal/conversations/{conversationId}
**Summary:** Update conversation
**Description:** Append a message or update conversation attributes on a managed project conversation
**Parameters:**
- `conversationId` (path): No description
**Responses:**
- 200: Successful response
# Check sign in code
URL: /api/client/otp/auth/otp/sign-in/check-code
Source: /vercel/path0/docs/content/api/client/otp/auth/otp/sign-in/check-code.mdx
# API Documentation: Check sign in code
Check if a sign in code is valid without using it
## POST /auth/otp/sign-in/check-code
**Summary:** Check sign in code
**Description:** Check if a sign in code is valid without using it
**Request Body:** Request body required
**Responses:**
- 200: Successful response
# Check reset password code
URL: /api/client/password/auth/password/reset/check-code
Source: /vercel/path0/docs/content/api/client/password/auth/password/reset/check-code.mdx
# API Documentation: Check reset password code
Check if a reset password code is valid without using it
## POST /auth/password/reset/check-code
**Summary:** Check reset password code
**Description:** Check if a reset password code is valid without using it
**Request Body:** Request body required
**Responses:**
- 200: Successful response
# Refresh access token
URL: /api/client/sessions/auth/sessions/current/refresh
Source: /vercel/path0/docs/content/api/client/sessions/auth/sessions/current/refresh.mdx
# API Documentation: Refresh access token
Get a new access token using a refresh token
## POST /auth/sessions/current/refresh
**Summary:** Refresh access token
**Description:** Get a new access token using a refresh token
**Parameters:**
- `x-stack-refresh-token` (header): No description
**Responses:**
- 200: Successful response
# Get a team member profile
URL: /api/client/teams/team-member-profiles/team_id/user_id/get
Source: /vercel/path0/docs/content/api/client/teams/team-member-profiles/team_id/user_id/get.mdx
# API Documentation: Get a team member profile
Get a team member profile. you can always get your own profile by setting `me` as the `user_id` in the path parameters on the client. If you want to get someone else's profile in a team, you need to have the `$read_members` permission in that team.
## GET /team-member-profiles/{team_id}/{user_id}
**Summary:** Get a team member profile
**Description:** Get a team member profile. you can always get your own profile by setting `me` as the `user_id` in the path parameters on the client. If you want to get someone else's profile in a team, you need to have the `$read_members` permission in that team.
**Parameters:**
- `team_id` (path): No description
- `user_id` (path): The ID of the user, or the special value `me` for the currently authenticated user
**Responses:**
- 200: Successful response
# Update your team member profile
URL: /api/client/teams/team-member-profiles/team_id/user_id/patch
Source: /vercel/path0/docs/content/api/client/teams/team-member-profiles/team_id/user_id/patch.mdx
# API Documentation: Update your team member profile
Update your own team member profile. `user_id` must be `me` in the path parameters on the client.
## PATCH /team-member-profiles/{team_id}/{user_id}
**Summary:** Update your team member profile
**Description:** Update your own team member profile. `user_id` must be `me` in the path parameters on the client.
**Parameters:**
- `team_id` (path): No description
- `user_id` (path): The ID of the user, or the special value `me` for the currently authenticated user
**Request Body:** Request body required
**Responses:**
- 200: Successful response
# Delete a contact channel
URL: /api/server/contact-channels/contact-channels/user_id/contact_channel_id/delete
Source: /vercel/path0/docs/content/api/server/contact-channels/contact-channels/user_id/contact_channel_id/delete.mdx
# API Documentation: Delete a contact channel
Removes a contact channel for a given user.
## DELETE /contact-channels/{user_id}/{contact_channel_id}
**Summary:** Delete a contact channel
**Description:** Removes a contact channel for a given user.
**Parameters:**
- `user_id` (query): The ID of the user, or the special value `me` for the currently authenticated user
- `contact_channel_id` (query): No description
- `user_id` (path): the user that the contact channel belongs to
- `contact_channel_id` (path): the target contact channel
**Responses:**
- 200: Successful response
# Get a contact channel
URL: /api/server/contact-channels/contact-channels/user_id/contact_channel_id/get
Source: /vercel/path0/docs/content/api/server/contact-channels/contact-channels/user_id/contact_channel_id/get.mdx
# API Documentation: Get a contact channel
Retrieves a specific contact channel by the user ID and the contact channel ID.
## GET /contact-channels/{user_id}/{contact_channel_id}
**Summary:** Get a contact channel
**Description:** Retrieves a specific contact channel by the user ID and the contact channel ID.
**Parameters:**
- `user_id` (query): The ID of the user, or the special value `me` for the currently authenticated user
- `contact_channel_id` (query): No description
- `user_id` (path): the user that the contact channel belongs to
- `contact_channel_id` (path): the target contact channel
**Responses:**
- 200: Successful response
# Update a contact channel
URL: /api/server/contact-channels/contact-channels/user_id/contact_channel_id/patch
Source: /vercel/path0/docs/content/api/server/contact-channels/contact-channels/user_id/contact_channel_id/patch.mdx
# API Documentation: Update a contact channel
Updates an existing contact channel. Only the values provided will be updated.
## PATCH /contact-channels/{user_id}/{contact_channel_id}
**Summary:** Update a contact channel
**Description:** Updates an existing contact channel. Only the values provided will be updated.
**Parameters:**
- `user_id` (query): The ID of the user, or the special value `me` for the currently authenticated user
- `contact_channel_id` (query): No description
- `user_id` (path): the user that the contact channel belongs to
- `contact_channel_id` (path): the target contact channel
**Request Body:** Request body required
**Responses:**
- 200: Successful response
# Send contact channel verification code
URL: /api/server/contact-channels/contact-channels/user_id/contact_channel_id/send-verification-code
Source: /vercel/path0/docs/content/api/server/contact-channels/contact-channels/user_id/contact_channel_id/send-verification-code.mdx
# API Documentation: Send contact channel verification code
Send a code to the user's contact channel for verifying the contact channel.
## POST /contact-channels/{user_id}/{contact_channel_id}/send-verification-code
**Summary:** Send contact channel verification code
**Description:** Send a code to the user's contact channel for verifying the contact channel.
**Parameters:**
- `user_id` (path): The user to send the verification code to.
- `contact_channel_id` (path): The contact channel to send the verification code to.
**Request Body:** Request body required
**Responses:**
- 200: Successful response
# Update notification preference
URL: /api/server/emails/emails/notification-preference/user_id/notification_category_id
Source: /vercel/path0/docs/content/api/server/emails/emails/notification-preference/user_id/notification_category_id.mdx
# API Documentation: Update notification preference
Enable or disable a specific notification category for a user.
## PATCH /emails/notification-preference/{user_id}/{notification_category_id}
**Summary:** Update notification preference
**Description:** Enable or disable a specific notification category for a user.
**Parameters:**
- `user_id` (path): The ID of the user, or the special value `me` for the currently authenticated user
- `notification_category_id` (path): No description
**Request Body:** Request body required
**Responses:**
- 200: Successful response
# Get email outbox entry
URL: /api/server/emails/emails/outbox/id/get
Source: /vercel/path0/docs/content/api/server/emails/emails/outbox/id/get.mdx
# API Documentation: Get email outbox entry
Gets a single email from the outbox by ID.
## GET /emails/outbox/{id}
**Summary:** Get email outbox entry
**Description:** Gets a single email from the outbox by ID.
**Parameters:**
- `status` (query): No description
- `simple_status` (query): No description
- `id` (path): No description
**Responses:**
- 200: Successful response
# Update email outbox entry
URL: /api/server/emails/emails/outbox/id/patch
Source: /vercel/path0/docs/content/api/server/emails/emails/outbox/id/patch.mdx
# API Documentation: Update email outbox entry
Updates an email in the outbox. Can be used to edit email content, pause/resume, or cancel emails. Only emails in editable states (`paused`, `preparing`, `rendering`, `render-error`, `scheduled`, `queued`, `server-error`) can be modified.
## PATCH /emails/outbox/{id}
**Summary:** Update email outbox entry
**Description:** Updates an email in the outbox. Can be used to edit email content, pause/resume, or cancel emails. Only emails in editable states (`paused`, `preparing`, `rendering`, `render-error`, `scheduled`, `queued`, `server-error`) can be modified.
**Parameters:**
- `status` (query): No description
- `simple_status` (query): No description
- `id` (path): No description
**Request Body:** Request body required
**Responses:**
- 200: Successful response
# OAuth authorize endpoint
URL: /api/server/oauth/auth/oauth/authorize/provider_id
Source: /vercel/path0/docs/content/api/server/oauth/auth/oauth/authorize/provider_id.mdx
# API Documentation: OAuth authorize endpoint
This endpoint is used to initiate the OAuth authorization flow. there are two purposes for this endpoint: 1. Authenticate a user with an OAuth provider. 2. Link an existing user with an OAuth provider.
## GET /auth/oauth/authorize/{provider_id}
**Summary:** OAuth authorize endpoint
**Description:** This endpoint is used to initiate the OAuth authorization flow. there are two purposes for this endpoint: 1. Authenticate a user with an OAuth provider. 2. Link an existing user with an OAuth provider.
**Parameters:**
- `type` (query): No description
- `token` (query): No description
- `provider_scope` (query): No description
- `error_redirect_uri` (query): No description
- `after_callback_redirect_url` (query): No description
- `stack_response_mode` (query): Response mode for the OAuth authorize endpoint. Defaults to 'redirect' if not provided.
- `hexclave_response_mode` (query): Response mode for the OAuth authorize endpoint. Defaults to 'redirect' if not provided.
- `bot_challenge_token` (query): No description
- `bot_challenge_phase` (query): No description
- `bot_challenge_unavailable` (query): No description
- `client_id` (query): No description
- `client_secret` (query): No description
- `redirect_uri` (query): No description
- `scope` (query): No description
- `state` (query): No description
- `grant_type` (query): No description
- `code_challenge` (query): No description
- `code_challenge_method` (query): No description
- `response_type` (query): No description
- `provider_id` (path): No description
**Responses:**
- 200: Successful response
- 307: Successful response
# Create cross-domain auth handoff redirect
URL: /api/server/oauth/auth/oauth/cross-domain/authorize
Source: /vercel/path0/docs/content/api/server/oauth/auth/oauth/cross-domain/authorize.mdx
# API Documentation: Create cross-domain auth handoff redirect
Creates a one-time OAuth authorization code redirect for cross-domain sign-in handoff using PKCE.
## POST /auth/oauth/cross-domain/authorize
**Summary:** Create cross-domain auth handoff redirect
**Description:** Creates a one-time OAuth authorization code redirect for cross-domain sign-in handoff using PKCE.
**Parameters:**
- `x-stack-publishable-client-key` (header): No description
- `x-stack-refresh-token` (header): No description
**Request Body:** Request body required
**Responses:**
- 200: Successful response
# Delete an OAuth provider
URL: /api/server/oauth/oauth-providers/user_id/provider_id/delete
Source: /vercel/path0/docs/content/api/server/oauth/oauth-providers/user_id/provider_id/delete.mdx
# API Documentation: Delete an OAuth provider
Removes an OAuth provider for a given user.
## DELETE /oauth-providers/{user_id}/{provider_id}
**Summary:** Delete an OAuth provider
**Description:** Removes an OAuth provider for a given user.
**Parameters:**
- `provider_id` (path): No description
- `user_id` (path): The ID of the user, or the special value `me` for the currently authenticated user
**Responses:**
- 200: Successful response
# Get an OAuth provider
URL: /api/server/oauth/oauth-providers/user_id/provider_id/get
Source: /vercel/path0/docs/content/api/server/oauth/oauth-providers/user_id/provider_id/get.mdx
# API Documentation: Get an OAuth provider
Retrieves a specific OAuth provider by the user ID and the OAuth provider ID.
## GET /oauth-providers/{user_id}/{provider_id}
**Summary:** Get an OAuth provider
**Description:** Retrieves a specific OAuth provider by the user ID and the OAuth provider ID.
**Parameters:**
- `provider_id` (path): No description
- `user_id` (path): The ID of the user, or the special value `me` for the currently authenticated user
**Responses:**
- 200: Successful response
# Update an OAuth provider
URL: /api/server/oauth/oauth-providers/user_id/provider_id/patch
Source: /vercel/path0/docs/content/api/server/oauth/oauth-providers/user_id/provider_id/patch.mdx
# API Documentation: Update an OAuth provider
Updates an existing OAuth provider. Only the values provided will be updated.
## PATCH /oauth-providers/{user_id}/{provider_id}
**Summary:** Update an OAuth provider
**Description:** Updates an existing OAuth provider. Only the values provided will be updated.
**Parameters:**
- `provider_id` (path): No description
- `user_id` (path): The ID of the user, or the special value `me` for the currently authenticated user
**Request Body:** Request body required
**Responses:**
- 200: Successful response
# Delete AI conversation
URL: /api/server/others/internal/ai-conversations/conversationid/delete
Source: /vercel/path0/docs/content/api/server/others/internal/ai-conversations/conversationid/delete.mdx
# API Documentation: Delete AI conversation
Delete an AI conversation and all its messages
## DELETE /internal/ai-conversations/{conversationId}
**Summary:** Delete AI conversation
**Description:** Delete an AI conversation and all its messages
**Parameters:**
- `conversationId` (path): No description
**Responses:**
- 200: Successful response
# Get AI conversation
URL: /api/server/others/internal/ai-conversations/conversationid/get
Source: /vercel/path0/docs/content/api/server/others/internal/ai-conversations/conversationid/get.mdx
# API Documentation: Get AI conversation
Fetch a single AI conversation with all its messages
## GET /internal/ai-conversations/{conversationId}
**Summary:** Get AI conversation
**Description:** Fetch a single AI conversation with all its messages
**Parameters:**
- `conversationId` (path): No description
**Responses:**
- 200: Successful response
# Replace conversation messages
URL: /api/server/others/internal/ai-conversations/conversationid/messages
Source: /vercel/path0/docs/content/api/server/others/internal/ai-conversations/conversationid/messages.mdx
# API Documentation: Replace conversation messages
Replace all messages in a conversation
## PUT /internal/ai-conversations/{conversationId}/messages
**Summary:** Replace conversation messages
**Description:** Replace all messages in a conversation
**Parameters:**
- `conversationId` (path): No description
**Request Body:** Request body required
**Responses:**
- 200: Successful response
# Update AI conversation
URL: /api/server/others/internal/ai-conversations/conversationid/patch
Source: /vercel/path0/docs/content/api/server/others/internal/ai-conversations/conversationid/patch.mdx
# API Documentation: Update AI conversation
Update the title of an AI conversation
## PATCH /internal/ai-conversations/{conversationId}
**Summary:** Update AI conversation
**Description:** Update the title of an AI conversation
**Parameters:**
- `conversationId` (path): No description
**Request Body:** Request body required
**Responses:**
- 200: Successful response
# Get conversation detail
URL: /api/server/others/internal/conversations/conversationid/get
Source: /vercel/path0/docs/content/api/server/others/internal/conversations/conversationid/get.mdx
# API Documentation: Get conversation detail
Get conversation detail for a managed project
## GET /internal/conversations/{conversationId}
**Summary:** Get conversation detail
**Description:** Get conversation detail for a managed project
**Parameters:**
- `projectId` (query): The unique identifier of the project
- `conversationId` (path): No description
**Responses:**
- 200: Successful response
# Update conversation
URL: /api/server/others/internal/conversations/conversationid/patch
Source: /vercel/path0/docs/content/api/server/others/internal/conversations/conversationid/patch.mdx
# API Documentation: Update conversation
Append a message or update conversation attributes on a managed project conversation
## PATCH /internal/conversations/{conversationId}
**Summary:** Update conversation
**Description:** Append a message or update conversation attributes on a managed project conversation
**Parameters:**
- `conversationId` (path): No description
**Responses:**
- 200: Successful response
# Check sign in code
URL: /api/server/otp/auth/otp/sign-in/check-code
Source: /vercel/path0/docs/content/api/server/otp/auth/otp/sign-in/check-code.mdx
# API Documentation: Check sign in code
Check if a sign in code is valid without using it
## POST /auth/otp/sign-in/check-code
**Summary:** Check sign in code
**Description:** Check if a sign in code is valid without using it
**Request Body:** Request body required
**Responses:**
- 200: Successful response
# Check reset password code
URL: /api/server/password/auth/password/reset/check-code
Source: /vercel/path0/docs/content/api/server/password/auth/password/reset/check-code.mdx
# API Documentation: Check reset password code
Check if a reset password code is valid without using it
## POST /auth/password/reset/check-code
**Summary:** Check reset password code
**Description:** Check if a reset password code is valid without using it
**Request Body:** Request body required
**Responses:**
- 200: Successful response
# Revoke a global permission from a user
URL: /api/server/permissions/project-permissions/user_id/permission_id/delete
Source: /vercel/path0/docs/content/api/server/permissions/project-permissions/user_id/permission_id/delete.mdx
# API Documentation: Revoke a global permission from a user
Revoke a global permission from a user
## DELETE /project-permissions/{user_id}/{permission_id}
**Summary:** Revoke a global permission from a user
**Description:** Revoke a global permission from a user
**Parameters:**
- `user_id` (path): The ID of the user, or the special value `me` for the currently authenticated user
- `permission_id` (path): The permission ID used to uniquely identify a permission. Can either be a custom permission with lowercase letters, numbers, `:`, and `_` characters, or one of the system permissions: `$update_team`, `$delete_team`, `$read_members`, `$remove_members`, `$invite_members`, `$manage_api_keys`
**Responses:**
- 200: Successful response
# Grant a global permission to a user
URL: /api/server/permissions/project-permissions/user_id/permission_id/post
Source: /vercel/path0/docs/content/api/server/permissions/project-permissions/user_id/permission_id/post.mdx
# API Documentation: Grant a global permission to a user
Grant a global permission to a user (the permission must be created first on the Stack dashboard)
## POST /project-permissions/{user_id}/{permission_id}
**Summary:** Grant a global permission to a user
**Description:** Grant a global permission to a user (the permission must be created first on the Stack dashboard)
**Parameters:**
- `user_id` (path): The ID of the user, or the special value `me` for the currently authenticated user
- `permission_id` (path): The permission ID used to uniquely identify a permission. Can either be a custom permission with lowercase letters, numbers, `:`, and `_` characters, or one of the system permissions: `$update_team`, `$delete_team`, `$read_members`, `$remove_members`, `$invite_members`, `$manage_api_keys`
**Request Body:** Request body required
**Responses:**
- 201: Successful response
# Refresh access token
URL: /api/server/sessions/auth/sessions/current/refresh
Source: /vercel/path0/docs/content/api/server/sessions/auth/sessions/current/refresh.mdx
# API Documentation: Refresh access token
Get a new access token using a refresh token
## POST /auth/sessions/current/refresh
**Summary:** Refresh access token
**Description:** Get a new access token using a refresh token
**Parameters:**
- `x-stack-refresh-token` (header): No description
**Responses:**
- 200: Successful response
# Remove a user from a team
URL: /api/server/teams/team-memberships/team_id/user_id/delete
Source: /vercel/path0/docs/content/api/server/teams/team-memberships/team_id/user_id/delete.mdx
# API Documentation: Remove a user from a team
## DELETE /team-memberships/{team_id}/{user_id}
**Summary:** Remove a user from a team
**Parameters:**
- `team_id` (path): No description
- `user_id` (path): The ID of the user, or the special value `me` for the currently authenticated user
**Responses:**
- 200: Successful response
# Add a user to a team
URL: /api/server/teams/team-memberships/team_id/user_id/post
Source: /vercel/path0/docs/content/api/server/teams/team-memberships/team_id/user_id/post.mdx
# API Documentation: Add a user to a team
## POST /team-memberships/{team_id}/{user_id}
**Summary:** Add a user to a team
**Parameters:**
- `team_id` (path): No description
- `user_id` (path): The ID of the user, or the special value `me` for the currently authenticated user
**Request Body:** Request body required
**Responses:**
- 201: Successful response
# Get a team member profile
URL: /api/server/teams/team-member-profiles/team_id/user_id/get
Source: /vercel/path0/docs/content/api/server/teams/team-member-profiles/team_id/user_id/get.mdx
# API Documentation: Get a team member profile
Get a team member profile by user ID
## GET /team-member-profiles/{team_id}/{user_id}
**Summary:** Get a team member profile
**Description:** Get a team member profile by user ID
**Parameters:**
- `team_id` (path): No description
- `user_id` (path): The ID of the user, or the special value `me` for the currently authenticated user
**Responses:**
- 200: Successful response
# Update a team member profile
URL: /api/server/teams/team-member-profiles/team_id/user_id/patch
Source: /vercel/path0/docs/content/api/server/teams/team-member-profiles/team_id/user_id/patch.mdx
# API Documentation: Update a team member profile
Update a team member profile by user ID
## PATCH /team-member-profiles/{team_id}/{user_id}
**Summary:** Update a team member profile
**Description:** Update a team member profile by user ID
**Parameters:**
- `team_id` (path): No description
- `user_id` (path): The ID of the user, or the special value `me` for the currently authenticated user
**Request Body:** Request body required
**Responses:**
- 200: Successful response
# Get Item
URL: /api/admin/payments/payments/items/customer_type/customer_id/item_id
Source: /vercel/path0/docs/content/api/admin/payments/payments/items/customer_type/customer_id/item_id.mdx
# API Documentation: Get Item
Retrieves information about a specific item (credits, quotas, etc.) for a customer.
## GET /payments/items/{customer_type}/{customer_id}/{item_id}
**Summary:** Get Item
**Description:** Retrieves information about a specific item (credits, quotas, etc.) for a customer.
**Parameters:**
- `customer_type` (path): The type of customer
- `customer_id` (path): The ID of the customer
- `item_id` (path): The ID of the item to retrieve
**Responses:**
- 200: Successful response
# Revoke a team permission from a user
URL: /api/admin/permissions/team-permissions/team_id/user_id/permission_id/delete
Source: /vercel/path0/docs/content/api/admin/permissions/team-permissions/team_id/user_id/permission_id/delete.mdx
# API Documentation: Revoke a team permission from a user
Revoke a team permission from a user
## DELETE /team-permissions/{team_id}/{user_id}/{permission_id}
**Summary:** Revoke a team permission from a user
**Description:** Revoke a team permission from a user
**Parameters:**
- `team_id` (path): No description
- `user_id` (path): The ID of the user, or the special value `me` for the currently authenticated user
- `permission_id` (path): The permission ID used to uniquely identify a permission. Can either be a custom permission with lowercase letters, numbers, `:`, and `_` characters, or one of the system permissions: `$update_team`, `$delete_team`, `$read_members`, `$remove_members`, `$invite_members`, `$manage_api_keys`
**Responses:**
- 200: Successful response
# Grant a team permission to a user
URL: /api/admin/permissions/team-permissions/team_id/user_id/permission_id/post
Source: /vercel/path0/docs/content/api/admin/permissions/team-permissions/team_id/user_id/permission_id/post.mdx
# API Documentation: Grant a team permission to a user
Grant a team permission to a user (the team permission must be created first on the Stack dashboard)
## POST /team-permissions/{team_id}/{user_id}/{permission_id}
**Summary:** Grant a team permission to a user
**Description:** Grant a team permission to a user (the team permission must be created first on the Stack dashboard)
**Parameters:**
- `team_id` (path): No description
- `user_id` (path): The ID of the user, or the special value `me` for the currently authenticated user
- `permission_id` (path): The permission ID used to uniquely identify a permission. Can either be a custom permission with lowercase letters, numbers, `:`, and `_` characters, or one of the system permissions: `$update_team`, `$delete_team`, `$read_members`, `$remove_members`, `$invite_members`, `$manage_api_keys`
**Request Body:** Request body required
**Responses:**
- 201: Successful response
# Get Item
URL: /api/client/payments/payments/items/customer_type/customer_id/item_id
Source: /vercel/path0/docs/content/api/client/payments/payments/items/customer_type/customer_id/item_id.mdx
# API Documentation: Get Item
Retrieves information about a specific item (credits, quotas, etc.) for a customer.
## GET /payments/items/{customer_type}/{customer_id}/{item_id}
**Summary:** Get Item
**Description:** Retrieves information about a specific item (credits, quotas, etc.) for a customer.
**Parameters:**
- `customer_type` (path): The type of customer
- `customer_id` (path): The ID of the customer
- `item_id` (path): The ID of the item to retrieve
**Responses:**
- 200: Successful response
# Get Item
URL: /api/server/payments/payments/items/customer_type/customer_id/item_id
Source: /vercel/path0/docs/content/api/server/payments/payments/items/customer_type/customer_id/item_id.mdx
# API Documentation: Get Item
Retrieves information about a specific item (credits, quotas, etc.) for a customer.
## GET /payments/items/{customer_type}/{customer_id}/{item_id}
**Summary:** Get Item
**Description:** Retrieves information about a specific item (credits, quotas, etc.) for a customer.
**Parameters:**
- `customer_type` (path): The type of customer
- `customer_id` (path): The ID of the customer
- `item_id` (path): The ID of the item to retrieve
**Responses:**
- 200: Successful response
# Revoke a team permission from a user
URL: /api/server/permissions/team-permissions/team_id/user_id/permission_id/delete
Source: /vercel/path0/docs/content/api/server/permissions/team-permissions/team_id/user_id/permission_id/delete.mdx
# API Documentation: Revoke a team permission from a user
Revoke a team permission from a user
## DELETE /team-permissions/{team_id}/{user_id}/{permission_id}
**Summary:** Revoke a team permission from a user
**Description:** Revoke a team permission from a user
**Parameters:**
- `team_id` (path): No description
- `user_id` (path): The ID of the user, or the special value `me` for the currently authenticated user
- `permission_id` (path): The permission ID used to uniquely identify a permission. Can either be a custom permission with lowercase letters, numbers, `:`, and `_` characters, or one of the system permissions: `$update_team`, `$delete_team`, `$read_members`, `$remove_members`, `$invite_members`, `$manage_api_keys`
**Responses:**
- 200: Successful response
# Grant a team permission to a user
URL: /api/server/permissions/team-permissions/team_id/user_id/permission_id/post
Source: /vercel/path0/docs/content/api/server/permissions/team-permissions/team_id/user_id/permission_id/post.mdx
# API Documentation: Grant a team permission to a user
Grant a team permission to a user (the team permission must be created first on the Stack dashboard)
## POST /team-permissions/{team_id}/{user_id}/{permission_id}
**Summary:** Grant a team permission to a user
**Description:** Grant a team permission to a user (the team permission must be created first on the Stack dashboard)
**Parameters:**
- `team_id` (path): No description
- `user_id` (path): The ID of the user, or the special value `me` for the currently authenticated user
- `permission_id` (path): The permission ID used to uniquely identify a permission. Can either be a custom permission with lowercase letters, numbers, `:`, and `_` characters, or one of the system permissions: `$update_team`, `$delete_team`, `$read_members`, `$remove_members`, `$invite_members`, `$manage_api_keys`
**Request Body:** Request body required
**Responses:**
- 201: Successful response
# Update Item Quantity
URL: /api/admin/payments/payments/items/customer_type/customer_id/item_id/update-quantity
Source: /vercel/path0/docs/content/api/admin/payments/payments/items/customer_type/customer_id/item_id/update-quantity.mdx
# API Documentation: Update Item Quantity
Updates the quantity of an item for a customer. Can increase or decrease quantities, with optional expiration and negative balance control.
## POST /payments/items/{customer_type}/{customer_id}/{item_id}/update-quantity
**Summary:** Update Item Quantity
**Description:** Updates the quantity of an item for a customer. Can increase or decrease quantities, with optional expiration and negative balance control.
**Parameters:**
- `allow_negative` (query): Whether to allow the quantity to go negative
- `customer_type` (path): The type of customer
- `customer_id` (path): The ID of the customer
- `item_id` (path): The ID of the item to update
**Request Body:** Request body required
**Responses:**
- 200: Successful response
# Update Item Quantity
URL: /api/server/payments/payments/items/customer_type/customer_id/item_id/update-quantity
Source: /vercel/path0/docs/content/api/server/payments/payments/items/customer_type/customer_id/item_id/update-quantity.mdx
# API Documentation: Update Item Quantity
Updates the quantity of an item for a customer. Can increase or decrease quantities, with optional expiration and negative balance control.
## POST /payments/items/{customer_type}/{customer_id}/{item_id}/update-quantity
**Summary:** Update Item Quantity
**Description:** Updates the quantity of an item for a customer. Can increase or decrease quantities, with optional expiration and negative balance control.
**Parameters:**
- `allow_negative` (query): Whether to allow the quantity to go negative
- `customer_type` (path): The type of customer
- `customer_id` (path): The ID of the customer
- `item_id` (path): The ID of the item to update
**Request Body:** Request body required
**Responses:**
- 200: Successful response
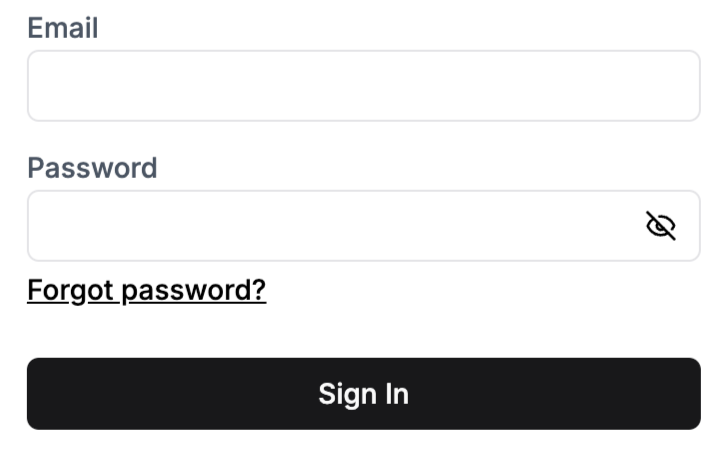

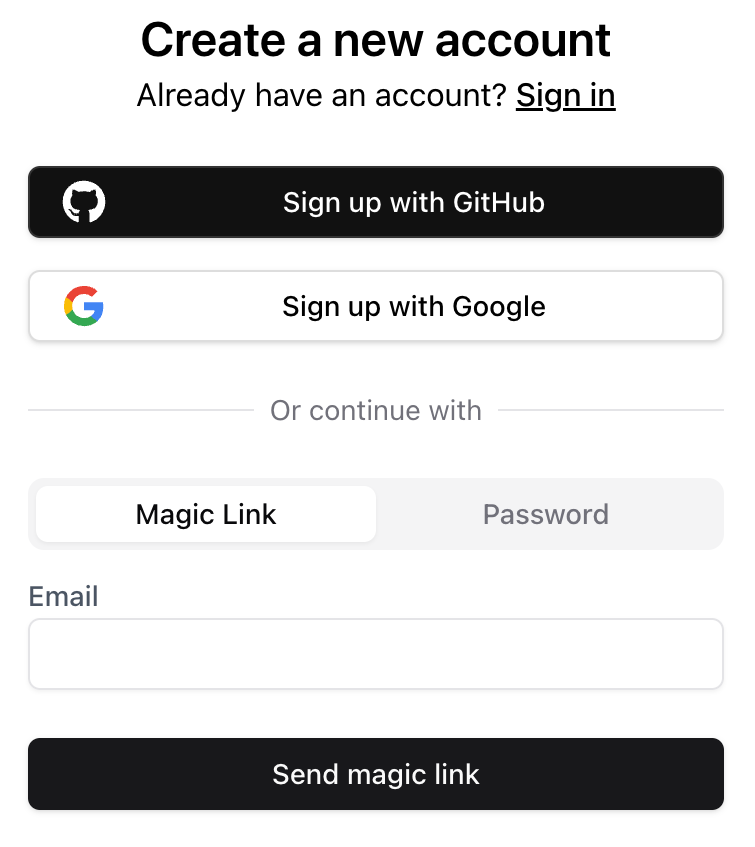

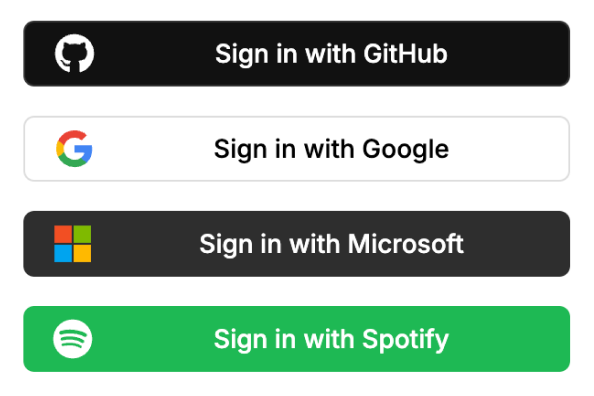
 You can import and use the `SelectedTeamSwitcher` component for the "current team" method. It updates the `selectedTeam` when a user selects a team:
```jsx
import { SelectedTeamSwitcher } from "@stackframe/stack";
export function MyPage() {
return (
You can import and use the `SelectedTeamSwitcher` component for the "current team" method. It updates the `selectedTeam` when a user selects a team:
```jsx
import { SelectedTeamSwitcher } from "@stackframe/stack";
export function MyPage() {
return (